OpenBSD 6.4 was released last week. It comes chock full of new goodies, including a built-in Wireless network manager ('join' syntax for ifconfig), derived snapshots for vmm virtual machine disk images (based on qcow2 support), improvements to pledge including the addition of unveil, and RETGUARD, a new stack protector for thwarting ROP attacks just to name a few new features.
I've been busy with the new job and getting settled into the new digs here in the Austin suburbs, but I carved out some time to update the OpenBSD/HTTPD/MySQL/PHP guide. There are a few changes to how PHP-FPM is configured, so you may want to pay close attention if you've followed the guide before.
The nginx and apache pages haven't gotten that many views lately, so I am not updating them this go-around. The httpd in OpenBSD's base install is a pretty well-proven web server at this point, and I've been using it in production, reliably, for years now. If you're thinking of running nginx or apache on OpenBSD, I'd urge you to take a look at httpd.
2018-10-24
OpenBSD 6.4 released, Web server guide updated
2018-02-07
Bad idea? Let's put a Windows 2000 server on the Internet.
Today, I decided to install Windows 2000 Advanced Server onto my Dell Latitude D610. The laptop itself is a workhorse, if a bit dated. Mostly, I was just curious what would happen if I left it out on the Internet without any service packs or firewall rules* and I live-tweeted it as I did my research.
Here's my twitter thread with just a few additional notes added. pcap and IDS alerts are at the end:
What happens when I put this on the Internet? pic.twitter.com/d19rvRnitG— ax0n (@ax0n) February 6, 2018
Okay, so... nmap is like DisGunBeGud.gif https://t.co/ZC0Kek8CTQ— ax0n (@ax0n) February 6, 2018
Span port fired up. @Snort on a @Raspberry_Pi 3 is watching intently.
About to drop this sucker into my DMZ.
Cannon fodder mode: Activate pic.twitter.com/3ftrVcOOeA— ax0n (@ax0n) February 6, 2018
So far, the Mirai telnet noise is the most prevalent junk, but I just took my Cowrie honeypot offline for this experiment. Snort with @EmergingThreats ETOpen rules is seeing RDP DoS and SipVicious, and nothing else since the cut-over. Bots are dumb. 30 minutes without being pwnd. pic.twitter.com/tmCyDMWY3Z— ax0n (@ax0n) February 6, 2018
There's basically nothing going on in the logs except for mass hysteria when I corrected the system clock. pic.twitter.com/lfVmdSU2VQ— ax0n (@ax0n) February 7, 2018
RDP login attempts (and counts) so far:— ax0n (@ax0n) February 7, 2018
181.214.87.7 (5)
51.15.184.118 (7)
74.63.221.148 (8)
5.101.40.60 (12)
Alright, so my ISP is giving me some firewall rules of their own, probably to stop the spread of EternalBlue exploit bots and WannaCry ransomware. Honestly, I appreciate it, but it's not helping me get pwned.77.72.82.x is smurfing its recon or something. Low and slow. pic.twitter.com/2fFZUfCIwG— ax0n (@ax0n) February 7, 2018
Here's a big part of the... problem? Apparently ATT UVerse is filtering in-bound connections on SMB/CIFS. https://t.co/QZGJLKfikJ (note: this is a good thing, unless you're *trying* to get pwned) There's still plenty of attack surface.— ax0n (@ax0n) February 7, 2018
[BRUTEFORCE INTENSIFIES] pic.twitter.com/xTOCNNMZiH— ax0n (@ax0n) February 7, 2018
Now let's see who guesses my six-character (4 lowercase alpha, 2 digit) Administrator password.— ax0n (@ax0n) February 7, 2018
The VNC scanners have come out to play. I'm not running VNC server though. pic.twitter.com/aPQSdHQGiF— ax0n (@ax0n) February 7, 2018
Alright kids, we're about 5 hours in without getting pwned (as far as I can tell). Here's the final count of source-IP/destination port tuples for inbound TCP connection attempts where count > 3. pic.twitter.com/eVF4BxCGGN— ax0n (@ax0n) February 7, 2018
With that, here are the links to those:I'm gonna wrap this thread up, link to these tweets in a blog post on @H_i_R tonight or tomorrow, and link to sanitized pcap and snort alert log files. Thanks for watching!— ax0n (@ax0n) February 7, 2018
Sanitized pcap (gzip): http://stuff.h-i-r.net/win2k.pcap.gz
Sanitized IDS log: http://stuff.h-i-r.net/win2k-ids-alerts.txt
2014-01-28
OpenVAS on BlackArch Linux: Installation Notes
OpenVAS can be tricky to set up. Once OpenVAS packages are installed, there's a bunch of steps you need to perform, and in a pretty specific order, to turn it into a working vulnerability scanner. There are four parts to OpenVAS: The Scanner service, the Manager service, the Administrator service, and then some front-end client. In this case, I'm demonstrating Greenbone Security Assistant, which is yet another service, an SSL web UI that you can access locally, or from another computer, for managing OpenVAS.
I recommend using sudo instead of doing everything as root, but you're obviously not obliged to do it that way. These instructions presume you are using sudo, though. Sudo isn't in the Arch base distribution, but you can add it with:
[root@spx ~]# pacman -S sudo
First, install all the packages. gsa is the web UI, while gsd is a graphical client that runs under X11. You don't need to install both of them, but I usually do. A bunch of dependencies will be added with these packages. Stuff in bold is what I typed. Everything else is terminal output. Most of the really verbose output is truncated and noted with my own commentary in ellipses.
[axon@spx ~]$ sudo pacman -S openvas-administrator openvas-manager openvas-scanner gsa gsd
resolving dependencies...
Packages (75): alsa-lib-1.0.27.2-1 cmake-2.8.12.1-3 damageproto-1.2.1-2
...
...
openvas-administrator-1.3.2-4 openvas-manager-4.0.4-3
openvas-scanner-3.4.0-5
Total Download Size: 73.21 MiB
Total Installed Size: 338.56 MiB
:: Proceed with installation? [Y/n] y
:: Retrieving packages ...
Next, download all the OpenVAS NVT scripts. These are updated frequently. By default, OpenVAS doesn't ship with any scripts, so you need to download them. If there are no NVTs, OpenVAS scanner service doesn't like to start.
[axon@spx ~]$ sudo openvas-nvt-sync
... lots of text while the NVT scripts download ...
zyxel_pwd.nasl.asc
[i] Download complete
[i] Checking dir: ok
[i] Checking MD5 checksum: ok
Next, make the SSL Cert for OpenVAS with this handy script:
[axon@spx ~]$ sudo openvas-mkcert
Answer each prompt if you want, but as this is a private-use certificate, I usually just hit enter at all the prompts to accept the defaults. We also need to make a Client Cert for OpenVAS-Manager (om) like this:
[axon@spx ~]$ sudo openvas-mkcert-client -n om -i
...
Write out database with 1 new entries
Data Base Updated
User om added to OpenVAS.
Start the OpenVAS Scanner service. This can take a really long time, and consumes a lot of RAM.
[axon@spx ~]$ sudo openvassd
Loading the OpenVAS plugins...base gpgme-Message: Setting GnuPG homedir to '/etc/openvas/gnupg'
base gpgme-Message: Using OpenPGP engine version '2.0.22'
Loading the plugins... 1887 (out of 33836)
The OpenVAS Manager service requires an SQLite database, but none is created during package installation. Use the following command to create the database. It will sit there for a few minutes and return to the command line without saying anything. This is normal.
[axon@spx ~]$ sudo openvasmd --rebuild
Start the OpenVAS Manager service. This runs quickly.
[axon@spx ~]$ sudo openvasmd
Add a user to OpenVAS. You'll log into OpenVAS with these credentials. Pick a strong password, not the one I use here.
[axon@spx ~]$ sudo openvasad -c 'add_user' -n adminusername -w adminpassword
ad main:MESSAGE:4484:2014-01-28 14h31.41 CST: No rules file provided, the new user will have no restrictions.
ad main:MESSAGE:4484:2014-01-28 14h31.41 CST: User adminusername has been successfully created.
Start the OpenVAS Administrator service.
[axon@spx ~]$ sudo openvasad
I'm
usually paranoid, and at this step, I check the process list for
"openvas" services. You should see openvassd, openvasad and openvasmd
all running. If not, look at the logs in /var/log/openvas to give you some hints, or check to make sure you performed each step necessay. If that all checks out, start a client, such as Greenbone Security Assistant.
[axon@spx ~]$ sudo gsad
Now just browse to https://localhost (or your BlackArch's network IP). You'll need to accept the self-signed certificate. Generating a new SSL cert for GSA is beyond the scope of this article.

2014-01-27
Introducing: BlackArch Linux
I've always admired Arch Linux, the spartan and light-weight Linux distro with its rolling release and clever package management system. At the same time, a lot of the security tools I know and love are difficult to compile, and found in few package repositories outside of Kali Linux, the Debian-derived distro that comes packed with pretty much every open-source security and penetration-testing tool that's relevant to today's researchers... and that's part of the problem. It's fun to play with new tools on occasion, but I rarely want or need all that stuff installed at once. Also, while I've spent more than enough time on Debian-family Linux distros thanks to a job managing Ubuntu LTS servers and hand-holding various friends and family through Ubuntu on desktops, it never quite felt like home as much as Arch does.

I prefer to start with a basic Arch Linux installation. For the command-line adept and those familiar with Arch, the Arch Installation Guide is a no-nonsense checklist of things you need to do, while the Beginners' Guide offers a bit more hand-holding. I used both when getting back into Arch Linux a while ago. You'll need to partition your drive, format the filesystems, pacstrap it, set up the network, add a user, and some other basic things that are outlined in the guides. Installation difficulty is on par with OpenBSD, but with a little less guidance from a dedicated install script. Don't forget to set up a boot loader!
 You'll probably want to customize your Arch Linux install, which may include setting up X11, a Display Manager and a Window Manager or Desktop Environment (handy for using a graphical web browser or GUI-driven tools such as BurpSuite). That's all covered in the Beginners' guide as well. I'm pretty fond of OpenBox with Conky, so I ended up with a pretty minimalist desktop, shown here.
Once you have Arch installed and a comfortable userland configured, you'll want to make sure it's up to date by running "pacman -Syu" and then you should install wget before moving on to installing BlackArch, if you haven't already:
pacman -S wget
From there, you can simply follow the instructions on the BlackArch Download page. This will just add the repositories to your Arch Linux installation, and doesn't actually install the packages. You can opt to install all the packages at once with:
pacman -S blackarch
But in my opinion, the fact that you can pick and choose which tools to install makes it quite nice for devices like netbooks or other machines that you really don't want bogged down with hundreds of tools you don't need. The BlackArch download page outlines how to peruse their repository for the stuff you want, or installing groups of similar packages, such as "blackarch-scanner" and "blackarch-networking"
In my next post, I'll explain how to configure OpenVAS, and get it up and running on BlackArch. I frequently set this up in my security lab when introducing interns to vulnerability scanning, and it's usually a bit tricky to get running for the first time.
2013-07-22
Lots of security content: July 2013 BSD Magazine
Yes, you have to give them your e-mail address. And yes, like many publications, there are a bunch of advertisements. Every once in a while, BSDMag covers a lot of security-related topics, and this is one of those. Click below to get the latest issue.

2011-08-30
Installing OpenVAS on BackTrack 5
In preparation for a talk I'll be giving at BSidesKC in October, I've been playing with BackTrack 5 and OpenVAS. OpenVAS was a little bit of a pain to get compiled on Ubuntu, but now that the OpenSUSE guys have built .DEB packages of a fairly recent version of OpenVAS (4.x), it's pretty easy to install on most modern Debian-derived systems. In fact, this works on Ubuntu Server as well, and I have tested it on 10.04 LTS. You just have to do it as root, like you'd do on BackTrack, because I was too lazy to write these instructions with "sudo" in front of each line (and using "| sudo tee -a" instead of the append-redirect for adding a quick line to the sources.list file).
This will be a rough post just to get my install notes down. The instructions on OpenVAS' website do not currently work as designed (however, I'm basing this post on them) and at the time of writing, the OpenSUSE build packages are broken in a number of ways that are easily fixed. For example, the openvas-scanner package provides a startup script in /etc/init.d, but the greenbone-security-assistant, openvas-manager and openvas-administrator packages do not. Some of the binaries are built to read files from /var/lib/openvas while others go for /usr/local/var/lib/openvas. Whatever. We'll deal with it. Also, a lot of these command lines are insanely long and probably will get cut off or line-wrapped by HiR's template. Copy. Paste. View Source. I trust our readers to be smart enough to figure that out.
Before starting, I recommend making sure you're up to date:
apt-get update && apt-get upgrade
Add the OpenVAS branch of the OpenSUSE Build Service to your apt sources, get the apt key and update your repository cache:
echo "deb http://download.opensuse.org/repositories/security:/OpenVAS:/STABLE:/v4/Debian_5.0/ ./" >> /etc/apt/sources.list

apt-key adv --keyserver hkp://keys.gnupg.net --recv-keys BED1E87979EAFD54

apt-get update
Next, install all the fun packages and dependencies needed in one run of things. Consider adding "gsd" to this package list if you think you'll want to use the Greenbone Security Desktop GUI interface. I plan on doing no such thing.
apt-get -y install greenbone-security-assistant openvas-cli openvas-manager openvas-scanner openvas-administrator sqlite3 xsltproc texlive-latex-base texlive-latex-extra texlive-latex-recommended htmldoc alien rpm nsis fakeroot
Make some directories and some symlinks to compensate for the clustercoitus of path discrepancies in the OBS packages.
mkdir -p /var/lib/openvas/private /var/lib/openvas/CA

mkdir -p /usr/local/var/lib/openvas /usr/local/var/lib/openvas/users

ln -s /var/lib/openvas/users /usr/local/var/lib/openvas/users

ln -s /var/lib/openvas/CA /usr/local/var/lib/openvas/CA

ln -s /var/lib/openvas/private /usr/local/var/lib/openvas/private
Make the openvas server cert, fetch the latest NVT plugins, and make the client cert used by openvas-manager:
openvas-mkcert -q

openvas-nvt-sync

openvas-mkcert-client -n om -i
Start the OpenVAS Services manually, rebuilding the OpenVAS Manager database once your get openvassd started (it'll take a good couple of minutes to load all the plugins), and all that jazz. Hey, Greenbone Security Assistant (the Web UI) works over https when you install it this way! It would only do HTTP when I installed it from source.
openvassd

openvasmd --rebuild

openvasmd

openvasad

gsad
Add an admin-level account for yourself. I suggest a different username for the -u argument. -r specifies the role, and you want to leave that value set to "Admin" if you want to be able to do much with OpenVAS.
openvasad -c add_user -n axon -r Admin
At this point, you should be good to go. Hit https: on your machine and have a blast.
Look for another article related to BackTrack 5 and OpenVAS right after BSidesKC. I've got something fun up my sleeve. If you're anywhere in the region, you should probably just show up. It'll be a good time.
2011-01-20
Introduction to encrypted Internet chat
In the middle of a discussion about IRC chat, I mentioned SILC, which apparently, quite a few people haven't heard about yet. It's not terribly surprising. Once quite popular, IRC is now a fringe communications platform in the wake of instant messaging. If IRC users represent the fringe of Internet society, then SILC users are the consummate outliers.
This post was made mostly to go along with a quick presentation I'm doing for Cowtown Computer Congress this evening. This is a quick and dirty rough draft that will likely be edited for speling and grammer err0rz.
SILC is Secure Internet Live Conferencing, and it borrows many things directly from Internet Relay Chat, fixing some of the weaknesses of IRC by using certificates, key exchange algorithms, digital signatures and encrypted connections. The end result is a chat platform capable of being used by groups or one-on-one communication where you can be absolutely sure you are communicating with the person you think you're communicating with. With the appropriate measures, you can also be certain that messages can't be trivially intercepted or forged by outsiders, even if the SILC server or network has been compromised. When talking in public groups (equivalent to IRC channels), only those in the group can see the messages due to a shared session key. People sniffing your local network segment won't know what's being said or with whom you're communicating.
While on the topic of encrypted chat, I'll also discuss Off-The-Record, a cryptographic plug-in that sits on top of certain instant messaging platforms (like AIM) by sending strong-crypto messsages over base64-encoded strings between users. To this end, it's usually easy for someone monitoring the network to tell with whom you're communicating, but nearly impossible to determine the actual contents of said communication.
Of course, some of these things have been recently been addressed, albeit not nearly as thoroughly, by using SSL/TLS. Several modern IM protocols rely on SSL/TLS, and certain IRC implementations also can use SSL now. These are beyond the scope of this article, but worth mentioning in passing.
There are two actively-developed clients that I will cover:
- A SILC plugin for irssi, a popular IRC client, which works best on Linux
- Native SILC support in Pidgin IM, which works on Mac OS X, Linux and Windows. Pidgin plugins for Off-The-Record exist for Mac OS X, Linux and Windows as well.
Irssi is my favorite IRC client. It's a curses-based program that runs in the terminal. The SILC plugin for irssi can be found in many package repositories. For example, installing it (and all dependencies, including irssi itself) in Ubuntu is as easy as:
$ sudo apt-get install irssi-plugin-silc
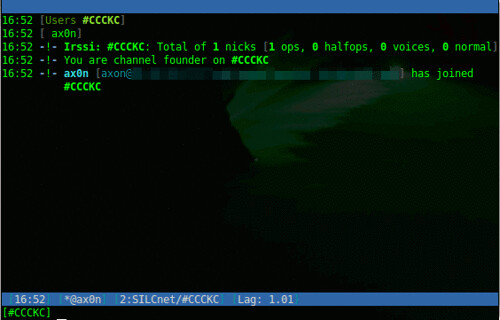
If you're familiar with IRC, it uses some familiar derivatives of commands:
Load the SILC plugin, prompts for your private key passphrase
/load silc
Connect to a SILC server
/connect -silcnet SILCnet [silc-server]
Join a group (or channel)
/join [group]
Grant operator status to a user in a group you control
/cumode [group] +o [user]
Send a one-on-one message to another user
/msg [user] [message]
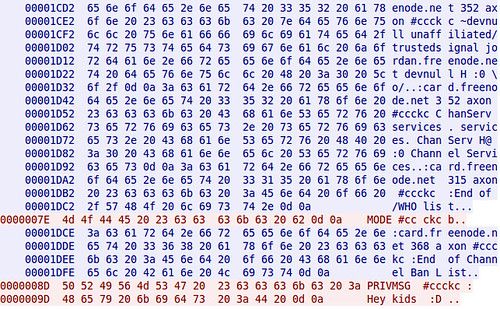
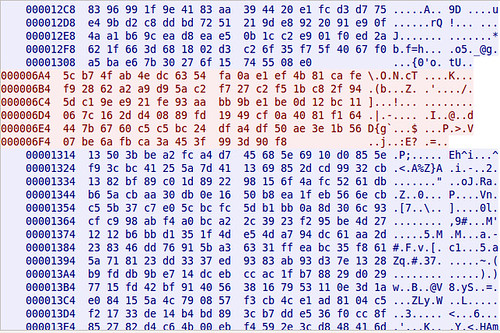
To compare, this is a screen shot of captured traffic from plain-text IRC, followed by one from SILC.
Pidgin
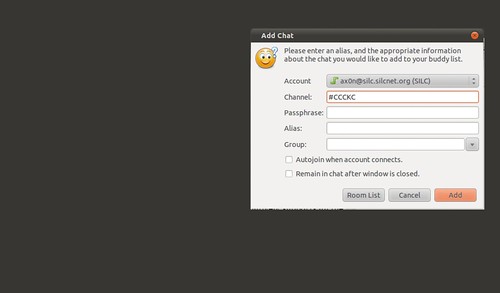
Pidgin is a cross platform open source chat application that natively supports all the major Instant Messaging protocols, including AIM, SILC and IRC. Once you've added a SILC server (via Accounts), you simply go to the Buddy List and select "Add chat" to join a group.
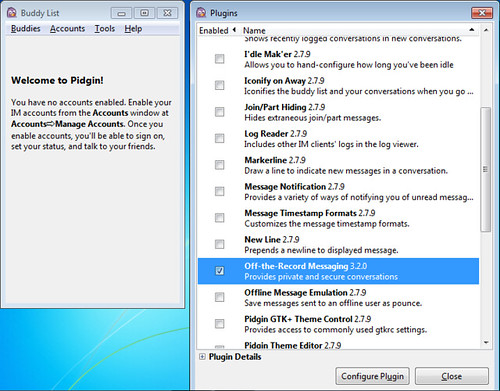
Off-The-Record
Adium, the Pidgin port for Mac OS X comes with OTR built right in!

Installing on Ubuntu is easy, as this will install Pidgin and the OTR plugin and all dependencies.
$ sudo apt-get install pidgin-otr
To get it up and running on Windows, first install Pidgin, then run the OTR plugin installer.
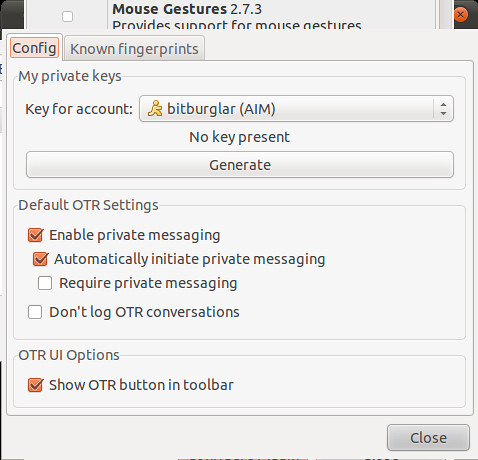
On Linux and Windows, you'll have to enable the plugin and generate a key before you can use it.
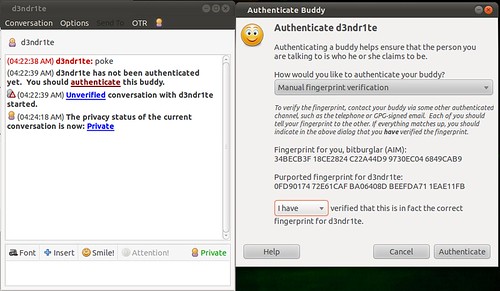
And then, once you initiate a chat with someone who also has OTR, you will need to verify their key. The best way to do this is in person or over a trusted communications platform. If you know their voice well enough, a phone call would probably work just fine.
Although AIM uses SSL by default these days, it's not uncommon to see AIM go across the wire in cleartext. Here's a screen shot comparing packet captures from a cleartext AIM session and one using OTR. You can't see it in the screen shots because of how large the OTR message is, but the OTR session only encrypts the message content itself. You can still see the names of the parties communicating.
That's all I've got for now.
2010-09-20
What I personally learned at CyberRAID
One last post from me on the inaugural CyberRAID event here in Kansas City.
2010-09-17
Evil WiFi: Subversive Wireless & Self Defense (BSidesKC)
2010-05-04
Conspiracy Theory: A Battle.net security shill?
 A few days ago, my wife logged in to World Of Warcraft only to find that all of her characters had been pretty much stripped of everything. Her username isn't related to any of her mail or social media accounts, and her passwords are unique between all her various accounts. Her WoW password wasn't easy to guess by a long shot, and complex enough that I doubt it was brute forced.
2010-03-24
Shodan gets monetized
 ... well, kind of.
2010-02-09
IT Security Certifications: Path to payday, or just a farce?
2010-02-08

2009-12-22
Guest Post: Setting up a Pfsense firewall
This is a guest post by BIOSshadow. You can follow him on Twitter and at his blog, Geek Crack.
Pfsense is a free, as in speech and beer, firewall for home, business, and any other purpose you can think of. It's based on FreeBSD, so it's very stable and has a very good TCP/IP stack. It has a serious feature list.
I have to explain how little PfSense needs in the hardware department. My setup is an old desktop computer that a client gave me because it "went bad." The power supply unit blew out during a lightning storm in the middle of the night. Anyway, it's a single core Intel processor, I am not sure what speed, with 512 MB of RAM, and a 40 GB hard drive. Now the only reason I have 40 gig is because it was easier to keep in there than fight the case, and put in a 10 gig I had around. So any basic computer you have around will work. But as with any computer, the more memory the better. I will get into that later.
You will need a video card/monitor and keyboard and of course a Pfsense CD. USB keyboard will work, a PS/2 won't need to load extra drivers. After the install and a little configuring is done, you can remove the video card/monitor and the keyboard, you can do everything through the web panel or SSH connection, if you turn it on.
Now onto the setup. (Note: For the screenshots I am using VirtualBox. This for the screenshots only). When it boots up to the bootloader, you want to boot with default, either by waiting for the timer to run out or by hitting enter.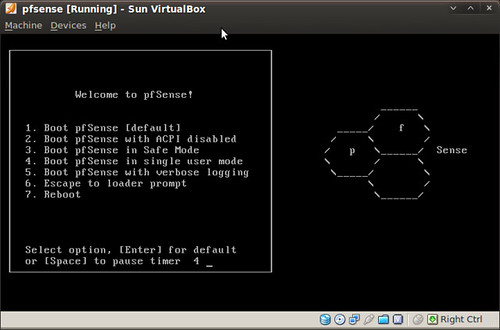
Now if you have two NICs, which I recommend, you do not need to setup VLANs, but you can. If you only have one NIC, you need to setup at least two VLANs.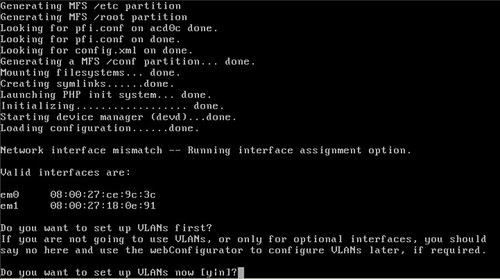
Now this is one of the great things about Pfsense that I can't find anywhere else: You unplug the ethernet cables, and it askes you to plug in the LAN cable into the LAN NIC. Then it does the same for the WAN cable and NIC. Now if you want to setup a DMZ with third NIC this where it do it.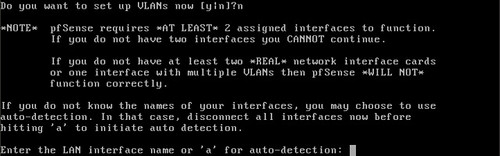
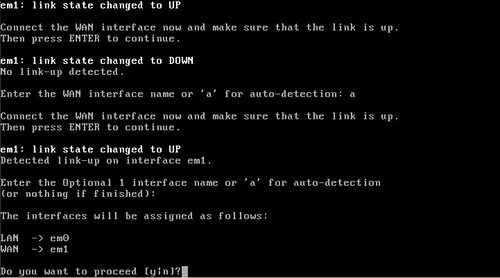
Pfsense will ask you if you want to proceed and then build the config files and startup all the daemons, like the Web Panel and others. Congrats! You have running Pfsense firewall, but everything is in memory and running from the CD. If you want run it like this then you are set, but if the power goes out you will have to set it up again using a backup config file or from scratch. If you want to install to a hard drive you will need to type "99" and hit enter to continue.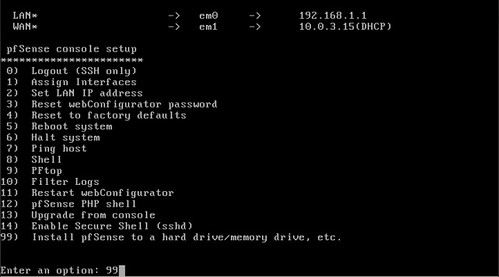
The hard drive installation is menu-driven and easy to use. If you are having issues, feel free to edit the setting and accept when done.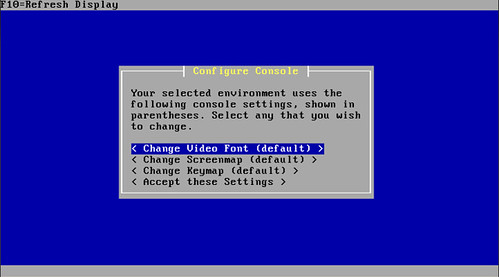
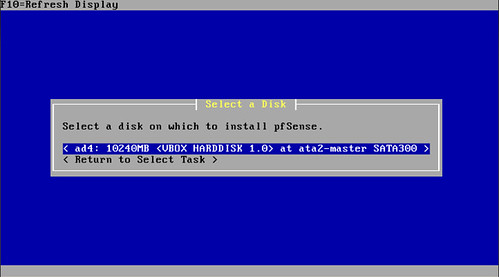
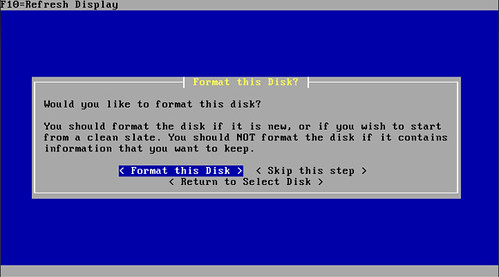
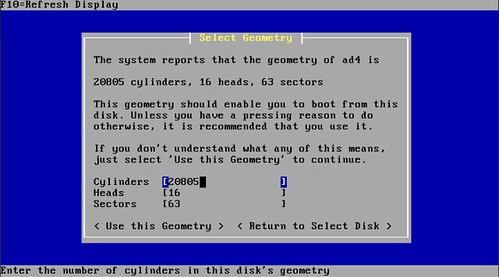
Select "Install PfSense" and select the hard drive you want to use. Format the disk and select "use this Geometry".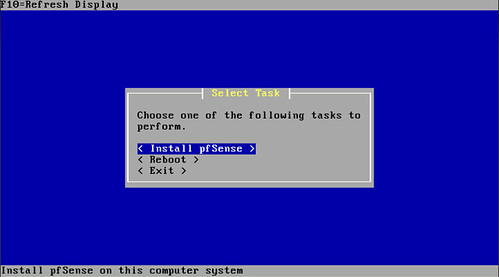
If you are lucky enough to have a muilti-processor system or are using a embedded system, select those options. Now remember this is "muilti processor" not "muilti-core processor".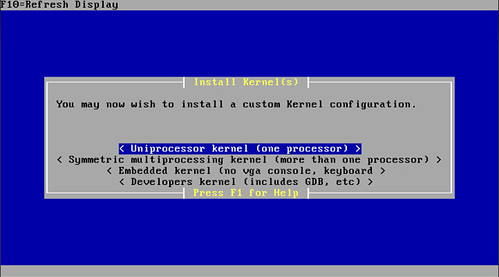
Now Pfsense is installed and ready to go. Just restart it and remove the disc.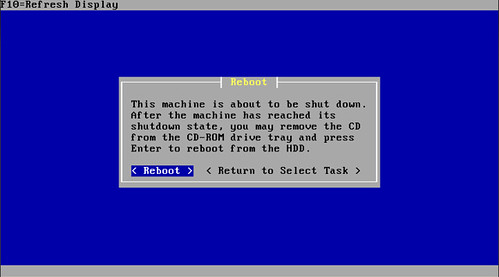
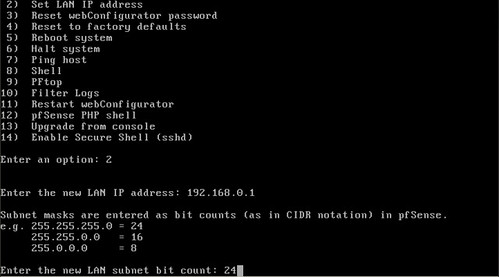
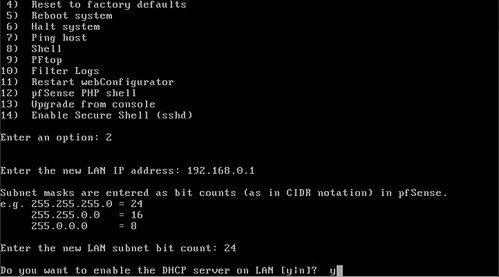
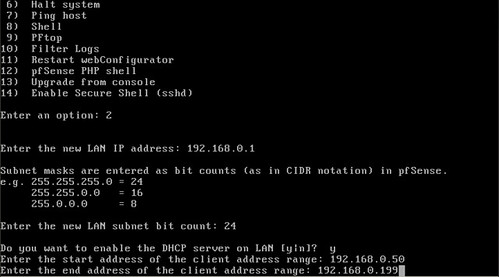
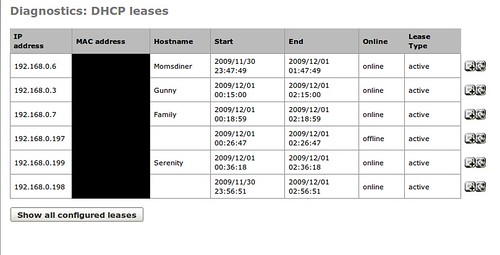
After the reboot, we will need to setup local IPs and their ranges. Unless, of course, you have a separate DHCP server, then set it up to connect to the server.
The IP settings are all up to you, I used a normal home setup for the sanity of my family (networked printers, NAS, and etc.) just remember the IP you give Pfsense, because you will need it to access the Web Panel.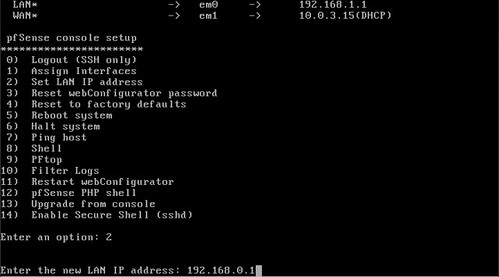
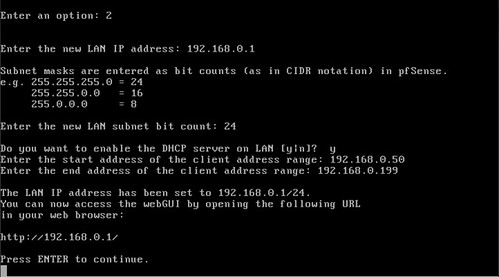
Now you are all set up. You can unplug the monitor and keyboard, and other stuff were using for set up.
Now back on your computer, open up a browser and go to the IP of Pfsense. The default username is "admin" and the default password is "pfsense".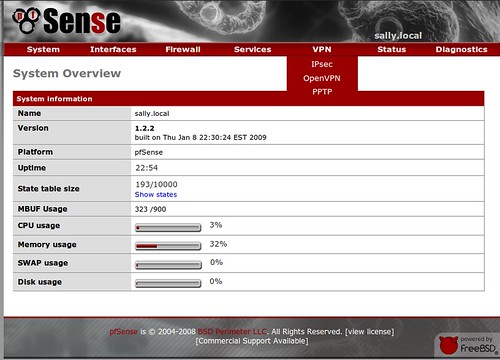
Of course, you want to change the password and if you want, you can change the username as well. To do so on the red navigation bar at the top, hover over system and click on General.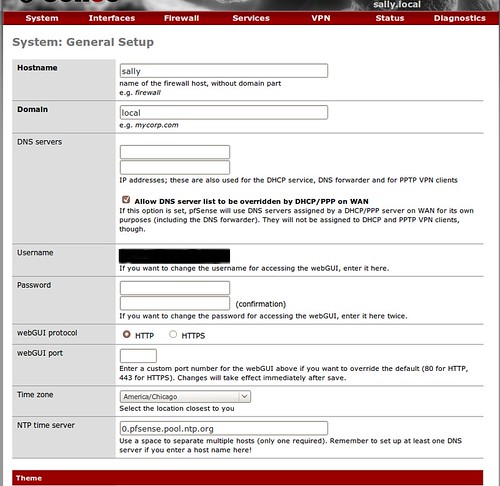
To enable SSH, which I recommend, you need to go the the Advanced section of the System Menu.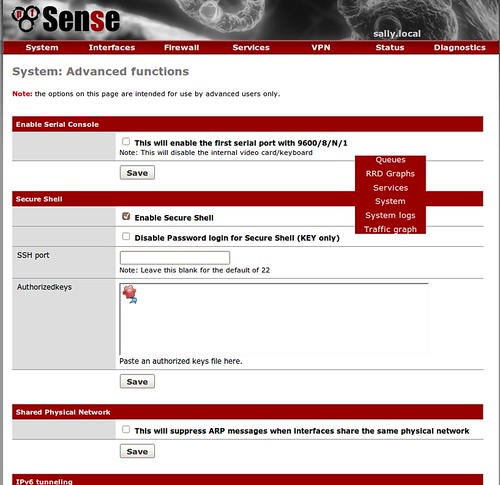
If your ISP is like mine, your MAC address is tied to the account and if you use it, you don't get access to the Internet. To edit it Go to Interfaces and then WAN.

Now you have working Pfsense firewall, have fun!
There are a few things Pfsense lacks, like a Squid proxy and A/V scanner. But it makes it up with its packages. It has quite a few packages, but remember: the more packages, processes and packets it handles, the more memory it uses and the lag increases. But they have packages for Snort, Squid, SquidGuard, and an A/V scanner.
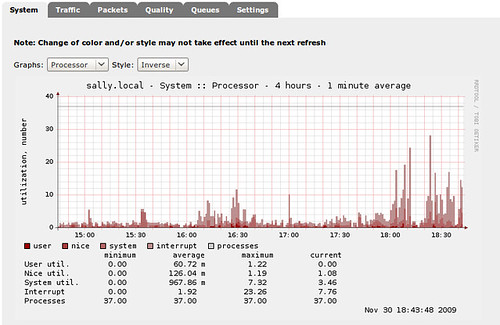
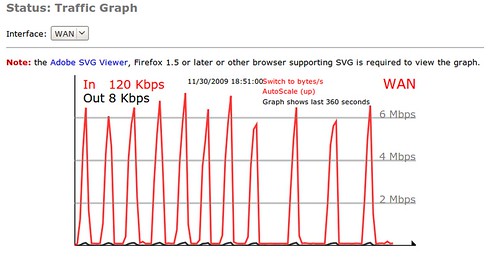
Well there it is: a completely setup and configured Pfsense, with A/V scanning, proxy and traffic monitor.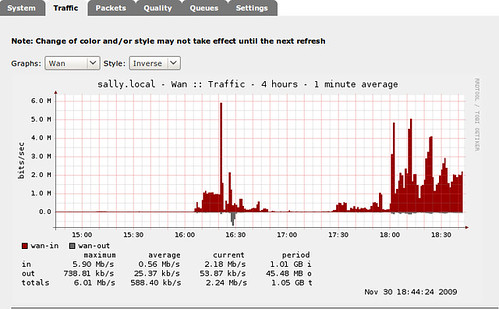
2009-12-09
How to better fix the GDM "face browser" login issue
It's really not that hard. I went poking through the documentation for gdm-simple-greeter and found an option outlined called disable_user_list. It took me a bit to figure out how to disable the feature, and I broke gdm a bunch of times before googling it and finding a great post by [daten] on the Fedora forums that outlines it.
So first, if you followed my angrily-penned directions from last night, undo that with these steps:
In a terminal window, execute:
$ sudo dpkg-reconfigure gdm
(select gdm instead of xdm at the dialog box)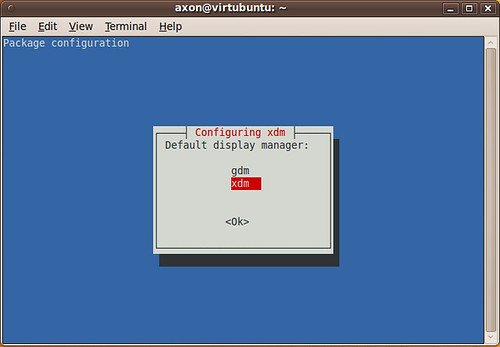
$ sudo /etc/init.d/xdm stop
(X11 will bail. Go ahead and login at the console prompt)
Continue as below, starting with the gconftool-2 command. You don't have to stop gdm, obviously. You can just start it.
If you didn't switch to xdm first...
Now, we can simply tell gdm to disable the user list with a lengthy gconftool-2 command. Make sure you scroll to see the whole thing:
$ sudo gconftool-2 --direct --config-source xml:readwrite:/etc/gconf/gconf.xml.defaults --type bool --set /apps/gdm/simple-greeter/disable_user_list true
Log off. The change may not take effect until you stop and start gdm. If you still see the user list, press ctrl-alt-F1 to get to the console, log in and run the following commands:
$ sudo /etc/init.d/gdm stop
$ sudo /etc/init.d/gdm start
At that point, you should have a new, still squishy and pretty login screen without the face browser of doom.
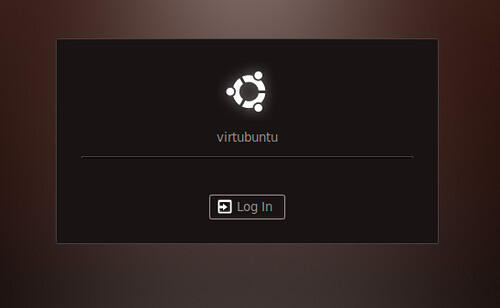
FYI, "axon" wasn't filled in automatically, I had to type it. This is much better!

2009-12-08
Fixing Ubuntu's broken excuse for a login screen
This is fscking unacceptable. Yah, it's slick. All windows-esque. Whatever. I hate it. I'd like to be able to type my user name in, and not have a freaking list of enumerated accounts sitting there on my damn login window. Now get off my lawn *shakes cane*