I've created a dedicated page with my guide for Multi-Booting Windows 10 and OpenBSD. This supersedes the earlier blog post on this topic. I've been running this setup for a few months now and I seem to have ironed out most of the gotchas, including how to, as elegantly as practicable, deal with Windows' BitLocker shenanigans as well as its tendency to override the rEFInd boot manager.
Showing posts with label Windows. Show all posts
Showing posts with label Windows. Show all posts
2021-03-17
Multi-booting OpenBSD and Windows 10 on modern hardware with rEFInd

The information here has been refined and documented in a dedicated page for Multi-Booting Windows 10 and OpenBSD. That page has all up-to-date details, and this post is no longer the best available source of information on this topic.
I recently purchased a 13.3" 8th Gen Lenovo ThinkPad X1 Carbon. Frankly, the X1 series has been my dream machine for years. I like small laptops, and this one is light, powerful and is similar to what's used by many of the OpenBSD core developers, so I knew it would probably be well-supported. My previous laptop -- the Acer I upgraded to an i5 for VMM years ago -- was set up for dual-boot, but somewhere along the way, the Windows boot manager stopped booting OpenBSD so I'd been using a modified OpenBSD install image on an SD card to load the OpenBSD kernel from the internal SSD, I set the BIOS to prioritize the SD card for booting, and I just remove the SD Card from my Acer if I need to boot Windows. That laptop is growing long in the tooth, but it's served me well for the past 5 years.
I decided to try properly dual-booting Windows and OpenBSD again with my new ThinkPad. And that's where things got ugly.
The steps to get Windows and OpenBSD working together, as outlined in the OpenBSD Multibooting FAQ seem to not work at all on recent Windows 10 versions, and especially on modern PCs with EFI and GPT disks. I tried several times without any luck, and I also rendered my system unbootable a number of times in my quest. Fortunately, I had made recovery media so I could blow away my X1 Carbon to factory defaults when things went sideways. That's a 45 minute process each time.
Start with a Windows install, and have good backups, including, if possible, external recovery media from the manufacturer. Several times, the drive partition table was so screwed up that the recovery partition was missing as well, leaving me with the recovery USB stick as my only way forward. To resize the Windows partitions, you will have to completely disable BitLocker full-disk encryption if it's enabled. I am a fan of FDE, but we have to turn it off for this to work. You can re-enable it when you have your whole system back up and running, but there are come caveats at the end.
Create a Live USB of GParted.
On another USB stick, write the contents of the OpenBSD installXX.img. This link references install68.img from OpenBSD 6.8, which may be out of date or a broken link when you read this.
Boot into the gparted live distro. On modern EFI/UEF systems, you will probably need to adjust secure boot and/or legacy boot options in your system's BIOS to continue.
Shrink the main Windows partition by some amount to make room for OpenBSD. I gave myself 120GB. That's how much room I have dedicated to OpenBSD on my Acer, and it seems to be a good size. I also usually create another FAT32 or Exfat partition that I can store files on to be accessed from both OpenBSD and Windows, but that's beyond the scope of this write-up.
Create a new partition for OpenBSD in the empty space. GParted doesn't know about OpenBSD partition types, so you'll have to then close GParted and launch a terminal window from the live environment. You'll have to launch gdisk via sudo and address your drive's device. For example:
sudo gdisk /dev/nvme0n1
Use the "p" option to print a list of partition entries. Find the one you created and use the "t" option to change the partition type to "A600" which is what OpenBSD expects to use for its disklabel entries. "w" will write the GPT and exit. You may also want to use the "b" option before you exit to make a backup of your partition tables just in case you mess something up. You'll have to store it to a USB drive, but you can probably store it on the same USB stick you booted GParted from.
At this point, I decided to reboot and make sure Windows still works. Thankfully, it did. Reboot into the OpenBSD installer using the USB stick you created. I won't walk through the whole installer process, but pay very close attention to the disk partitioning options. When prompted for the disks to install OpenBSD to, you should see an "OpenBSD Area" option and that should be the default disk partition to install to. If that option doesn't exist and you choose "gpt" or "whole disk" you will destroy the GPT record on your drive and destroy the Windows installation. Your system will only boot into OpenBSD if you proceed. You can probably use gdisk and your backup of the GPT to recover the partition table if you didn't actually install OpenBSD, or you may have to reinstall Windows and start all over again, and that isn't fun. Trust me. I've done that four times this week. Don't let the system do an auto-layout. Choose "custom." Unless you know what you're doing, just make one big disklabel partition for OpenBSD's root drive.
Once OpenBSD is installed, exit to the shell. You will need to copy the EFI boot executable to some other media so you can access it from Windows. I inserted a USB stick that was formatted for FAT32. It showed up as sd1 and the first non-BSD partition typically shows up as "i"
mkdir /usb
mount /dev/sd1i /usb
cp /mnt/usr/mdec/BOOTX64.EFI /usb/bootx64_openbsd.efi
umount /usb
Go ahead and reboot. It should boot into Windows. Fingers crossed!
Now, go download rEFInd and unzip the archive. I followed the Windows manual install instructions to get rEFInd working. I rebooted again, simply because I'd become so accustomed to bricking my shiny new laptop. To my surprise, rEFInd presented me with a boot menu. Windows showed up, and an additional menu item called "Fallback boot" also appeared. This menu option booted me into OpenBSD. That could be pretty much the end of it, but I wanted an actual OpenBSD menu option.
To accomplish this, I borrowed some mojo from this somewhat dated blog entry on FunctionallyParanoid
You have to access the EFI system partition from a privileged command shell (hearkening back to the instructions to manually install rEFInd from Windows), so I copied the refind.conf file off to my Documents folder, edited it with notepad, then saved it and copied it back over to the EFI system partition.
I added this clause near the end of the refind.conf file:
menuentry “OpenBSD”
{
icon \EFI\refind\icons\os_openbsd.png
loader \EFI\boot\bootx64_openbsd.efi
}
Make sure to download the OpenBSD icon and place it in the \EFI\refind\icons folder, too. Once I did that and rebooted, rEFInd still had the "fallback" menu item, but OpenBSD showed up with its own logo alongside the Windows logo. Both operating systems boot, and my mission was finally accomplished.
2018-10-27
Windows Defender can now run in a sandbox
Via the Microsoft Security Blog:
Windows Defender Antivirus has hit a new milestone: the built-in antivirus capabilities on Windows can now run within a sandbox. With this new development, Windows Defender Antivirus becomes the first complete antivirus solution to have this capability and continues to lead the industry in raising the bar for security.Sandboxes isolate processes in such a way as to prevent them from causing systemic harm, and because of the way modern antiviruses work, many of them have proven vulnerable to targeted arbitrary code execution attacks -- that's right, proof-of-concept malware exists that can exploit the antivirus suite! This is a major step toward improving the security of the Windows platform, and as far as I can tell, Defender is the first in its class to adopt this sort of fortification.
Right now, It's not set up by default. I'd imagine that may change in the near future.
Users can also force the sandboxing implementation to be enabled by setting a machine-wide environment variable (setx /M MP_FORCE_USE_SANDBOX 1) and restarting the machine. This is currently supported on Windows 10, version 1703 or later.

2018-02-07
Bad idea? Let's put a Windows 2000 server on the Internet.
Today, I decided to install Windows 2000 Advanced Server onto my Dell Latitude D610. The laptop itself is a workhorse, if a bit dated. Mostly, I was just curious what would happen if I left it out on the Internet without any service packs or firewall rules* and I live-tweeted it as I did my research.
Here's my twitter thread with just a few additional notes added. pcap and IDS alerts are at the end:
What happens when I put this on the Internet? pic.twitter.com/d19rvRnitG— ax0n (@ax0n) February 6, 2018
Okay, so... nmap is like DisGunBeGud.gif https://t.co/ZC0Kek8CTQ— ax0n (@ax0n) February 6, 2018
Span port fired up. @Snort on a @Raspberry_Pi 3 is watching intently.
About to drop this sucker into my DMZ.
Cannon fodder mode: Activate pic.twitter.com/3ftrVcOOeA— ax0n (@ax0n) February 6, 2018
So far, the Mirai telnet noise is the most prevalent junk, but I just took my Cowrie honeypot offline for this experiment. Snort with @EmergingThreats ETOpen rules is seeing RDP DoS and SipVicious, and nothing else since the cut-over. Bots are dumb. 30 minutes without being pwnd. pic.twitter.com/tmCyDMWY3Z— ax0n (@ax0n) February 6, 2018
There's basically nothing going on in the logs except for mass hysteria when I corrected the system clock. pic.twitter.com/lfVmdSU2VQ— ax0n (@ax0n) February 7, 2018
RDP login attempts (and counts) so far:— ax0n (@ax0n) February 7, 2018
181.214.87.7 (5)
51.15.184.118 (7)
74.63.221.148 (8)
5.101.40.60 (12)
Alright, so my ISP is giving me some firewall rules of their own, probably to stop the spread of EternalBlue exploit bots and WannaCry ransomware. Honestly, I appreciate it, but it's not helping me get pwned.77.72.82.x is smurfing its recon or something. Low and slow. pic.twitter.com/2fFZUfCIwG— ax0n (@ax0n) February 7, 2018
Here's a big part of the... problem? Apparently ATT UVerse is filtering in-bound connections on SMB/CIFS. https://t.co/QZGJLKfikJ (note: this is a good thing, unless you're *trying* to get pwned) There's still plenty of attack surface.— ax0n (@ax0n) February 7, 2018
[BRUTEFORCE INTENSIFIES] pic.twitter.com/xTOCNNMZiH— ax0n (@ax0n) February 7, 2018
Now let's see who guesses my six-character (4 lowercase alpha, 2 digit) Administrator password.— ax0n (@ax0n) February 7, 2018
The VNC scanners have come out to play. I'm not running VNC server though. pic.twitter.com/aPQSdHQGiF— ax0n (@ax0n) February 7, 2018
Alright kids, we're about 5 hours in without getting pwned (as far as I can tell). Here's the final count of source-IP/destination port tuples for inbound TCP connection attempts where count > 3. pic.twitter.com/eVF4BxCGGN— ax0n (@ax0n) February 7, 2018
With that, here are the links to those:I'm gonna wrap this thread up, link to these tweets in a blog post on @H_i_R tonight or tomorrow, and link to sanitized pcap and snort alert log files. Thanks for watching!— ax0n (@ax0n) February 7, 2018
Sanitized pcap (gzip): http://stuff.h-i-r.net/win2k.pcap.gz
Sanitized IDS log: http://stuff.h-i-r.net/win2k-ids-alerts.txt
2012-07-19
Windows SysAdmin trick: All your MMC snap-ins in one spot
At work, I frequently deal with both UNIX and Windows servers. My UNIX background has taught me to avoid logging in to systems -- even workstations -- with an administrative account unless you really need to use the power, even if you're a sysadmin. This works really well until it's time to start managing enterprise-wide settings like AD, DNS and DHCP. There are a variety of ways to solve the problem. Most places provide sysadmins with a user-level account and then an administrative-level account. You can log off from your workstation and log in with a domain administrator account to manage things. That's a genuine pain. You can remote desktop to a domain controller and log in with your admin account. You can even set up a terminal server with RSAT and other useful tools, and have your admins log in to that for routine enterprise maintenance.
Alternatively, you can install Remote Server Administration Tools onto Windows 7 Enterprise, and using a few quick tricks, you can have all of the MMC Snap-Ins you like at your fingertips, while still using an unprivileged domain account on your workstation. Once you get RSAT installed, you may need to also use "Programs and Features" to enable the Remote Server Administration Tools roles or its sub-roles as desired.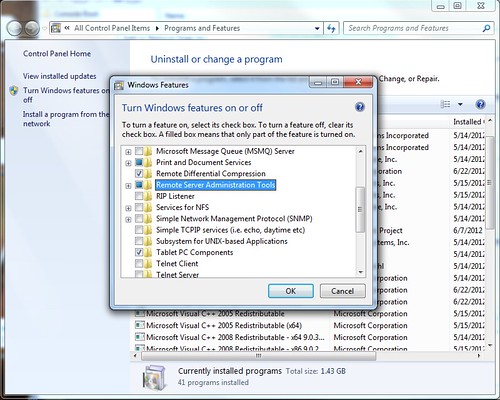 After installing RSAT, you'll notice an "Administrative Tools" item in your start menu, but the tools won't work unless you have domain admin privileges.
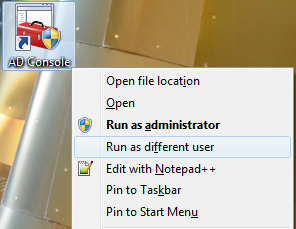
There's a trick to launching an authentication prompt before running any program on Windows. Hold shift, then right-click the program, and select "Run as different user." While you can do this to any of the Administrative Tools items in the start menu, We're going to use this trick to launch the Microsoft Management console so that we can make life even easier. Hit Start, then use the search to find mmc.exe. Hold shift. Right click it. Run as different user.
After installing RSAT, you'll notice an "Administrative Tools" item in your start menu, but the tools won't work unless you have domain admin privileges.
There's a trick to launching an authentication prompt before running any program on Windows. Hold shift, then right-click the program, and select "Run as different user." While you can do this to any of the Administrative Tools items in the start menu, We're going to use this trick to launch the Microsoft Management console so that we can make life even easier. Hit Start, then use the search to find mmc.exe. Hold shift. Right click it. Run as different user.
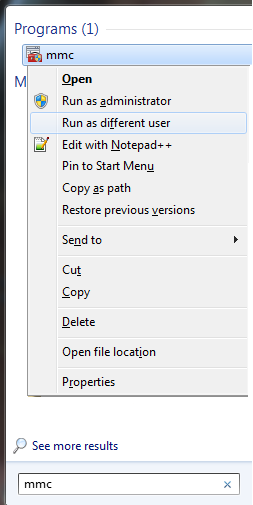 Here, provide a domain administrator account. If you have UAC enabled (as you well should!) you'll be asked if you wish to allow mmc to make changes to your computer. Obviously, you do.
Once MMC is running, select "Add/Remove Snap-Ins" from the File menu. Here, you'll be able to load up a bunch of the individual modules from Start->Administrative Tools all into one MMC window.
Here, provide a domain administrator account. If you have UAC enabled (as you well should!) you'll be asked if you wish to allow mmc to make changes to your computer. Obviously, you do.
Once MMC is running, select "Add/Remove Snap-Ins" from the File menu. Here, you'll be able to load up a bunch of the individual modules from Start->Administrative Tools all into one MMC window.
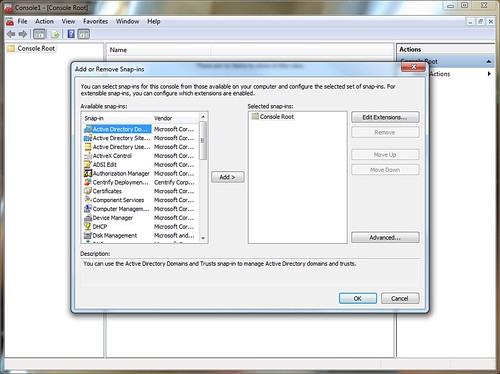 Once you have selected the tools you use frequently, you'll have a tree view of your favorite utilities, kind of like this:
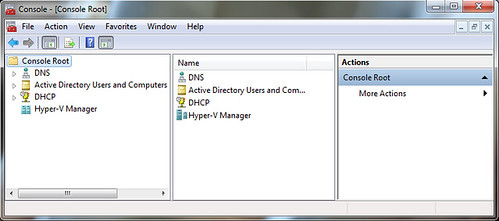 Be sure to connect the individual snap-ins to the servers you need, if they require it (Hyper V, DNS and DHCP in the above example need to connect to other servers) and once you have everything configured the way you plan to use it, use the File-> Save menu to stash the configuration file somewhere handy, such as on your network profile or hard drive.
I opted to create a shortcut on my desktop that launches mmc.exe C:\console.msc and I titled it "AD Console." When I run it, I have to remember to launch it with my domain admin account using the trick above. Now, taking care of the day to day tasks on the enterprise is simple.
Be sure to connect the individual snap-ins to the servers you need, if they require it (Hyper V, DNS and DHCP in the above example need to connect to other servers) and once you have everything configured the way you plan to use it, use the File-> Save menu to stash the configuration file somewhere handy, such as on your network profile or hard drive.
I opted to create a shortcut on my desktop that launches mmc.exe C:\console.msc and I titled it "AD Console." When I run it, I have to remember to launch it with my domain admin account using the trick above. Now, taking care of the day to day tasks on the enterprise is simple.
2010-07-27
Really, Verisign?
Verisign's latest snail mail spam included a Verisign-branded USB drive with information on their new SSL Certificate features. The package was heavily loaded with all kinds of "Trust" rhetoric. At the request of the guy who officially got it, I threw it into my Macbook to take a look at it. It wasn't on any network and it's not prone to any known vulnerabilities that might allow something to run directly from the USB without any interaction (unlike Windows)
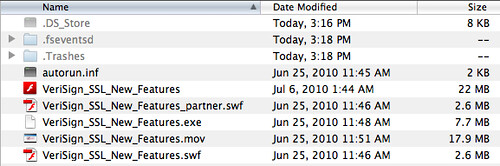
Autorun, Verisign? Really? AND Lame Adobe Flash? You honestly expect us to TRUST this kind of crap? To add insult to injury, the USB drive itself is only 64MB. You can't even install BackTrack on it or otherwise put it to any productive use.
2010-03-23
DNS Tunneling Part 2: Windows Clients
Of all the tools I tried to get working, Dan Kaminsky's OzymanDNS was the only one I could find that actually works for Windows. Maybe there are others out there (link to them in the comments!) but I didn't find any at a glance. Also, Doxpara seems to be down, so here's a mirror of the source package for Linux/Unix/BSD/OS X.
This is generally okay, because OzymanDNS is a fine solution in and of itself, even if it hasn't been updated in five years or so. OzymanDNS server runs fine on Mac OS X, Linux, and BSD. It's all in perl, and heck, it might even work under cygwin on Windows. I haven't bothered trying. I'm using Linux as my server for ozymanDNS.
I did have to perform the following actions before OzymanDNS would run:
sudo perl -MCPAN -e install Net::DNS
sudo perl -MCPAN -e install MIME:Base32
This installs the DNS and Base32 perl modules that Kaminsky's scripts need.
Next, keep in mind the name you chose for your subdomain name server if you followed along in Part 1. You'll need that here. SSH to your server and start ozymanDNS. Keep in mind you'll need to leave this process running while you're on the road. I launched it inside a GNU Screen session so that it could run in the background and I could re-attach to it when I want to. The syntax is:
sudo ./nomde.pl -i [your external-facing IP] [your subdomain name]
Someone made executables of these tools for Windows. You can download the Windows version of OzymanDNS (as well as putty and some DLLs) here. I recommend copying the DLLs and droute.exe into your path somewhere, like C:\Windows\System32 for example.
Once you're on the road and need to tunnel, configure putty. Click the screen shots below for full size.
Connection/Proxy, select the "Local" radio button, the "Consider proxying local host connections" check box, and enter "droute -r [DNS Server] sshdns.[your subdomain]" as shown below. DNS server should probably be whatever DNS server you were assigned via DHCP (use "ipconfig /all" from a command window) - I really don't know why you need something prefixed to your subdomain for ozymanDNS to work, but I always use "sshdns".
Switch to the Connection/SSH option in the configuration tree and enable compression.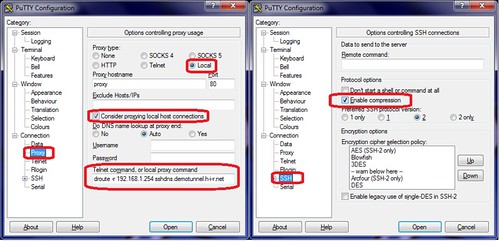
Next, set up a Dynamic tunnel on port 8080 (or whatever you want) as displayed below. Then finally go back up to "Session"and connect to Localhost port 22. Since this is a lot of work, I'd advise you to type something like "tunnel" into the "Saved Session" box, and save it. This will save you a lot of hassle down the line.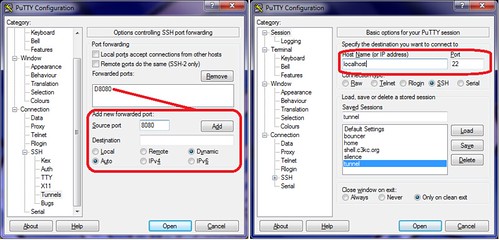
If all goes well, you'll be prompted to verify the SSH key for the connection, and then be allowed to log in. You'll also have a working Dynamic SOCKS tunnel thanks to this session. Again, I should remind you that this method of tunneling can be slow by nature of how DNS works. Tunneling more traffic over it, via SSH tunneling will be even slower. We try to mitigate that with Compression above, but it only helps so much.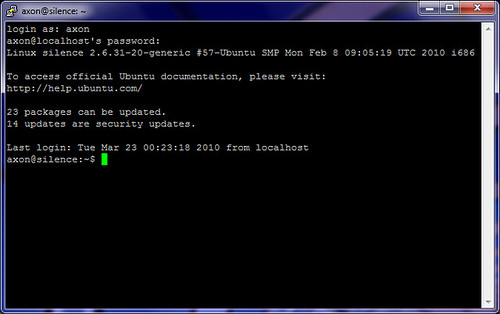
Now, configure Firefox to use the dynamic proxy. Tools/Options, Advanced, Network, Connection Settings. Use localhost for the SOCKS proxy host, and set the port to the one you configured in Putty.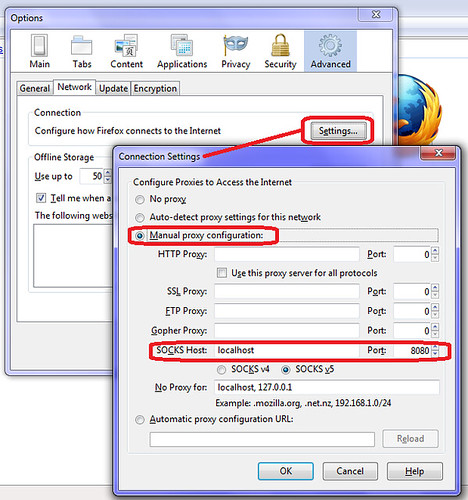
The final test is to make sure that we are actually going through the tunnel. I chose the old standby WhatIsMyIP.org.
I won't cover using ozymandns under Linux or BSD, but it works well enough. Use this on the client end to get a dynamic SOCKS proxy on port 8080.
ssh -D 8080 -o ProxyCommand="/path/to/droute.pl -r [DNS Server] sshdns.[your subdomain]" user@localhost
DNS Tunneling Series:
Part 1: Intro and Nameserver setup
Part 2: Windows Clients (using ozymandns)
Part 3: Linux, BSD and Mac OS X clients (using DNS2TCP)
2010-01-27
Remapping the MacBook Keyboard
I love OS X, and I also have this thing for Apple hardware, especially their laptops. You can rant and rave about "Apple Tax" until you're blue in the face. You won't sway me. One thing that kind of irks me, though, is the keyboard on the MacBook series.
While the sunken, chicklet-style keyboard garnered much criticism in 2006, I like the feel of it. As you can probably tell from the title of this article, my primary complaint isn't in the style of the keyboard. It's in the keys that seem to be missing. In OS X, the MacBook's scant 78-key input device makes sense. Other keys are nice, and are provided on the full-size keyboards for the desktop behemoths, but as a general rule, the slimmed-down laptop keyboard gets things done.
Being an Operating System Junkie, however, I often find a need for some oddball key that's nowhere to be found. In Linux and BSD (or when SSH-ing) from Windows using PuTTY, Shift-Insert pastes text to the terminal. There's no Insert key. In Windows, I'd rather not install vestigial bloatware to grab screen shots. Alt-PrintScreen is the old standby. There's no PrintScreen button, either.
At the same time, there are keys I rarely use in OS X, and they become completely useless on any other platform. They also happen to be near the places that I expect Insert and PrintScreen to be on a full-size keyboard.
There are registry hacks to remap keys on Windows. RandyRants has a great write-up on this, and wrote SharpKeys to help people easily re-map their keyboards. In my case, I wanted to remap F12 to function like PrintScreen, and the Keypad Enter key (next to the arrows, shown prominently in the photo above) to function as the Insert key.
The resulting registry patch is included so that you need not install vestigial bloatware just to remap your MacBook keyboard. Save the text below to a file called "remap.reg" and import it to your Windows Registry -- usually, by double-clicking it. Still, SharpKeys a nice utility to know about, particularly if you have any portable computers lacking a full set of keys.
On Linux and BSD, xmodmap will do the same thing, a lot easier. I didn't bother remapping Print Screen, but getting Enter to function as Insert was important. Create a file called ".xmodmaprc" in your home directory, and add the following content to it:Windows Registry Editor Version 5.00
[HKEY_LOCAL_MACHINE\SYSTEM\CurrentControlSet\Control\Keyboard Layout]
"Scancode Map"=hex:00,00,00,00,00,00,00,00,03,\
00,00,00,37,e0,58,00,52,e0,1c,e0,00,00,00,00
The next time you log in to Ubuntu, you'll get a dialog asking what you want to do with this file:keysym KP_Enter = Insert Insert Insert Insert
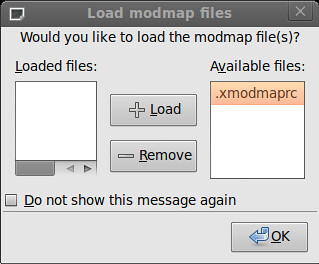
Load the .xmodmaprc file, and if you wish, choose to not show the dialog again. Click OK.
On BSD and perhaps many Linux flavors, you may have to manually edit some files to load xmodmap. You can usually put this line at the beginning of your .xsession or .xinitrc file to load the .xmodmaprc file when X starts. Alternatively, you can run it in an xterm to make sure it works:
These tricks work just as well on bare metal as they do in a virtual machine, or at least as tested in VirtualBox. That's a major annoyance out of the way for me!xmodmap .xmodmaprc
2010-01-24
Fixing Windows: NTLDR missing, install CD won't boot
I ran across a bizarre Windows issue today on a friend's laptop. It appears to be relatively common, but the answers seem to be elusive, or all over the map. Not only was there an "NTLDR Missing" error, but in trying to access the Recovery Console, the Windows XP Install CD was halting as a blank screen right after "Setup is inspecting your computer's hardware..."
The short answer:
The partition table or boot sector is corrupt and it's messing with Setup when it scans your hard drive and causing the lock up before the installer starts. You are going to have to delete the partition and re-install Windows from scratch. I hope you have backups! Of course, if you prefer, now's a good time to try some other Operating Systems. ;)
The long answer:
Normally, "NTLDR Missing" errors are easy to fix with the recovery console of the Windows install CD or with 3rd party tools like FixNTLDR, UBCD or BartPE (builds a live-CD from your Windows install CD)
The first things to try are replacing the core boot files from the pristine versions on the XP CD (as per the Microsoft KB article) -- ntdetect.com, ntldr, and verify that the syntax of boot.ini is valid. Also, running fdisk /mbr can fix certain boot problems. These should be non-damaging to the data on your drive. You should try to fix it before you go blowing away the partition table.
In my case, none of the third party tools were working, and all the Windows XP CDs I have failed to boot past the "Setup is inspecting..." screen on this machine. The screen went dark and the CD stopped spinning, the system hung and refused to boot. No boot means no recovery console. I tried using the Windows 7 CD, too. It would boot but couldn't find a valid windows partition to repair.
My next step was to boot into Backtrack 4 Final from USB, and try to replace the files as one would from the Windows Recovery Console. I was able to write to the hard drive, and get the files off the OEM Restore CD just fine. Boot.ini was also intact. Still, the system wouldn't boot from the hard drive or the XP install CD.
As mentioned above, it was time to blow away the partition table and start over. Fortunately, my friend had good backups on an external hard drive. I opted to use BackTrack 4 Final to perform the partition-ectomy. Several boot CDs can do this, too. YMMV.
Deleting the partition with BackTrack is simple. Once you have booted backtrack, execute "cfdisk /dev/hda" - This assumes you have only one hard drive in the machine, and that there's only Windows XP installed.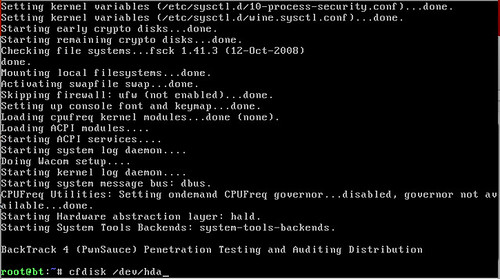
Select the partition using the up/down arrow keys and navigate with the left/right arrow keys to the "Delete" menu option. You may be wondering what I'm doing with a scant 2GB hard drive. This is actually a Windows XP Virtual machine, used for lab testing.
Then, use the arrow keys to navigate to the "Write" option.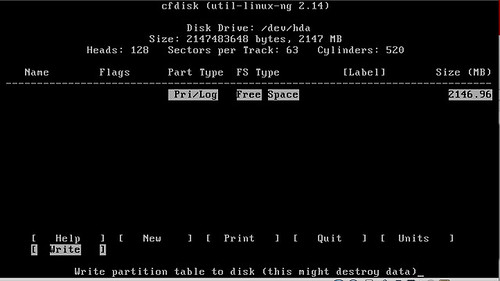
Quit cfdisk, then reboot with your Windows CD to start the installation process.
2009-12-29
Free Antiviruses
I'm not a huge proponent of anti-virus. It's not that I think I won't get one. It's just that I'm usually running an OS that's not a big target for viruses. I can't even list one AV tool specifically for OS X, BSD or Linux, but I'm sure something exists. I just stick with NoScript and RequestPolicy on FireFox to keep the browser malware at bay.
With Windows 7, I figured it might be time to look into AV if for no other reason rhan to get rid of the nagging system tray icon warning me that my computer might be at risk. Then, just today, Keith posted a list of free AV solutions for Windows. I went with MS Security Essentials. It stays out of the way for the most part from what I've seen, but it's not like I've tried pulling up a bunch of Russian Serialz, Crax & w4r3z sites or any crap like that -- A move I'd consider to be asking for trouble.
I know plenty of readers are Windows users, by choice or by force (employer?)
What have you had the best luck with? What other anti-malware tools are you using for yourself or for others who already hosed their systems up?
2009-12-28
Windows 7 on a MacBook: Kind of a pain to install
But it's sweet once it works with all the drivers installed
Let me step back a bit. I already had a license for Win7 Home Premium upgrade. That means I had to install it on top of Windows XP or Vista. So, I had to install XP Home first, which I also had a license for. Getting XP up and running was the root of my issues.
A while back ago, Apple pushed out an EFI update that supposedly removed the necessity to use BootCamp to install Windows or any other OS, really. With a spare partition on my hard drive, I decided to clobber Ubuntu, and install Windows XP over it. That ended up trashing the entire partition table, and bricking my MacBook.
Time Machine to the rescue. 3 hours later, I had restored my OS X partition from bare-metal to a point-in-time backup where the only thing I lost was 30 minutes of browser history. In other words: it worked perfectly. 45 minutes later, XP was installed, but the boot.ini file was pointing to the wrong partition. Using the XP recovery console to attempt a repair, I had whacked my partition table. AGAIN. Wash, Rinse, Repeat.
You need XP SP2 or higher, as it turns out. I guess I should have read the entire Boot C(r)amp manual first. I used BootCamp Assistant to create the partition this time, instead of partitioning it during restoration with the OS X install CD. Once XP Home SP2 was installed, I was without any drivers. The OS X CD supposedly contains them, but it was showing up as a blank disk when inserted. I wasn't worried about video drivers, or audio, or anything other than getting it on the network so I could activate Windows and commence the upgrade to Windows 7. For that, I ended up using a Linksys USB wireless adapter (and the driver CD). Then it was home-free.
Windows 7 installed fine without a lot of problems. It had many of the drivers already built-in, including the wireless. The audio and touch-pad drivers were sub-par, though. Other things like the iSight had non-existent support. Again, the OS X DVD I have wasn't showing the drivers under Windows 7 either and the BootCamp download from Apple wouldn't even run. I finally found a BootCamp driver download on the Digiex forum. Of course, you will want to use third-party supplied drivers at your own risk, but it seems to be working pretty well.
All in all, I burned almost an entire waking day attempting to get Win7 installed on my MacBook. A good part of that was the initial install of XP. Going straight to Win7, at least once you have the drivers, is probably not too bad. I can't stress enough how important it is to have a good Time Machine backup before you start, though.
End result:
Let it never be said I'm completely bigoted when it comes to Microsoft. My wife has been using 7 for a few months, and I'm already digging it. This may be Microsoft's best Windows release since Windows 2000, which I also had plenty of good things to say about.
Time will tell as I put it through its paces, but usability is just as good as OS X now that all the drivers are working properly, and this is a rather comfortable operating system for daily use.
2009-11-02
Windows 7: Is its success really a surprise?
I've been messing with Windows 7 since the beta, and my wife has the Ultimate edition installed on her laptop (having replaced Vista, for the most part).
Most people agree: Windows 7 is good. But really, when faced with the following choices, how could Windows 7 NOT succeed?
- Windows XP, a decade-old platform that's been patched to hell
- Vista, a chubby three-year-old toddler replete with nagging, resource-hogging character flaws
- Windows 7, the shiny hotness built after pay-to-participate beta testers shook out Vista's worst features and bugs over the course of 3 years
(this post is loosely based on an IM conversation with another friend of mine in the financial IT sector)
2009-09-23
Booting Linux and Windows on separate drives
 Normally, installing Windows isn't something I'd do. Not for friends. Not for family, and not for myself. My wife dual-boots Ubuntu and Vista on her laptop -- Vista because that's what shipped with it, and World Of Warcraft runs fine under it. She's plenty competent to keep it cleaned up, secure, and able to restore her stuff from backups if something goes wrong. She's probably better at Windows (at least Vista) than I am, and certainly doesn't need my help very often. As for me, I just didn't think I NEEDED Windows for much...
That is, until I found out how much better my employer's VPN works from Windows. It doesn't work well from MacOS, barely works under Ubuntu, and oddly, works okay under Solaris 10, but it's far from perfect. A few days ago, I logged into the VPN from the Corporate-mandated Windows XP Work PC in the office and was kind of in awe. We're talking an order of magnitude better, on a logarithmic scale. Figures, right? With all the after-hours remote work I'm finding myself doing more and more often these days, it looks like I'm installing Windows!
As a self-proclaimed Operating System Junkie, I suppose it wouldn't hurt to dabble in Windows just a little. After all, my wife's already running a game server on Win2k. What can it hurt?
The only machine I have laying around that I felt would do Windows justice is an old Dell PowerEdge tower server, which spends most of its time running Ubuntu. I didn't feel like re-partitioning or re-installing everything, so I unplugged the Ubuntu hard drive, scared up an old 20GB drive for Windows, bolted it into place, then went to town installing Windows. My goal was to move the Windows hard drive to the secondary IDE controller once installed, then figure out how to get GRUB to boot Windows.
From here, I'm assuming that:
- You have a Linux distro installed on the first hard drive booting with GRUB
- You have swapped the Linux hard drive out for a fresh one (also the first hard drive) and installed Windows to it.
- Afterward, you have put both hard drives in, with Linux as the Master on the Primary IDE controller (or the first SATA drive)
hd0 - Primary Master: 80GB HDD, Linux
hd1 - Primary Slave: Optical drive (DVD±RW, etc)
hd2 - Secondary Master: 20GB HDD, Windows
Next, I made certain that Linux booted properly. This, as expected, worked just fine. I rebooted, and paused GRUB's boot process and entered CLI mode to try to boot Windows. Initially, I tried this, which I thought should work:
grub> rootnoverify (hd2,0)  # Select partition, don't mount it
grub> chainloader +1        # Calls the first sector, should be Windows loader
grub> boot                  # What do you think?

Starting up ...
Yeah, right. It locks up. Doesn't even try.
Reading up on the GRUB documentation, I found the map command. Score! This tricks the BIOS into swapping drives around.
grub> map (hd0) (hd2) # Maps hd2 (as above) to hd0Amazingly, map did the trick and Windows started booting. It thinks it's running on C: and that Linux is on the secondary Master. Now, to take this and make a "Windows" option in the GRUB menu. Boot into Linux and add these lines to the end of /boot/grub/menu.lst:
grub> map (hd2) (hd0) # ... and vice versa ...
grub> rootnoverify (hd2,0)
grub> chainloader +1
grub> boot
title WindowsWhile you're in there, you may want to look for the Timeout line as well, and increase it. I chose not to, because I'll be booting to Windows very rarely.
map (hd0) (hd2)
map (hd2) (hd0)
rootnoverify (hd2,0)
chainloader +1
Then, update GRUB's configuration, since it has to write data to the boot sector on the Linux drive. On debian-based systems, it's:
$ sudo update-grubNow, give it a reboot and make sure that both Windows and Linux boot from GRUB as expected. This little project actually went easier than I'd expected, mostly thanks to GRUB's documentation. While extensive and technical, it is well-organized.
By the way, I tested the VPN for about 9 hours today and it was rock solid the whole time. Better than I can say for the other operating systems I've tried it with. At least I got some benefit from using Windows. If only I had awesome coffee, an IBM Model M and my MX Revolution mouse at the office every day. And if I could work in my pajamas.
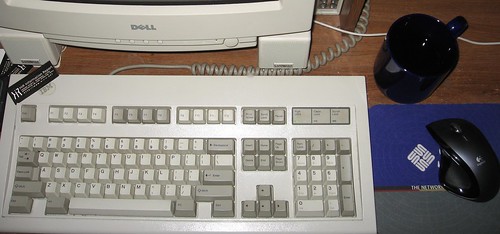
Now, if you'll excuse me, I need to go take a shower with concentrated chlorine bleach and a cheese grater to get rid of all this Microsoft residue.

2009-02-11
Patch-O-Rama: Microsoft, Blackberry and AIX, Oh My!
First up, Microsoft issued four patches yesterday:
- MS09-002: IE (Critical)
- MS09-003: Exchange (Critical)
- MS09-004: SQL Server
- MS09-005: Visio/MS Office
Also, there's a new Blackberry bug in town.
Tip of the hat to Kevin's Infosec Ramblings for some of these.
2008-12-15
ReactOS - Not quite there yet?
After doing my OS X updates, I installed ReactOS in Parallels. Install is reminiscent of Win2K, starts off with a blue text-only menu system, then goes through a GUI configuration after reboot. The splash screen is nifty, if nothing else.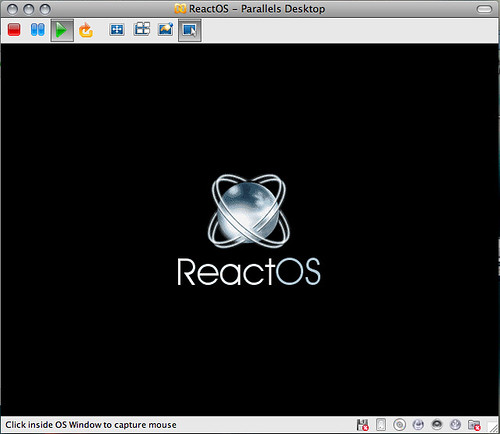
The first thing I noticed was the lack of a web browser. I FTP'd down the Mozilla Firefox 3.0.4 Win32 installer, which ran fine. Trying to launch Firefox, however... BONK!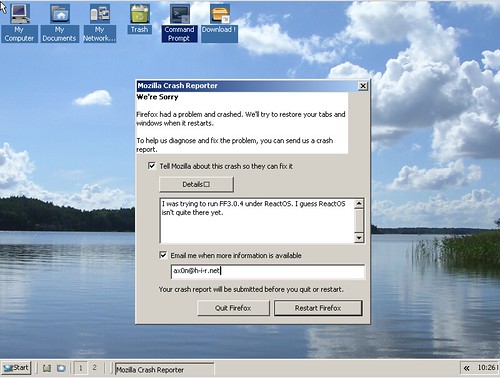
Maybe I need to try ReactOS on a real computer. It wouldn't be the first time something hasn't run quite right for me in a VM, but works perfectly well on a clunky old Pentium 3. More to come, I'm sure.
2008-12-13
Operating System Junkie
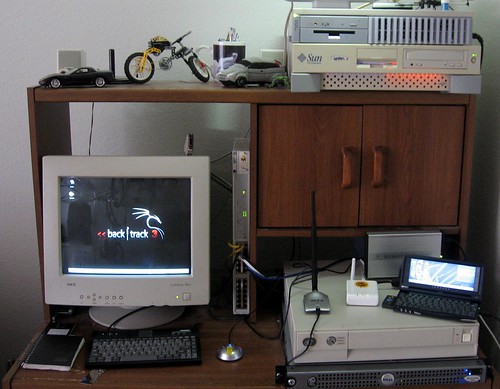 I've talked about the computers in the Lab-O-Ratory before. Today, the laboratory is really, really noisy -- more so than usual. I'm always working on something and I'm coming to realize that I'm pretty much a hopeless operating system junkie.
The photo is from a few months ago. The SparcStation 20 on the top of that photo used to be my OpenBSD 4.1 DMZ box until the hard drive died. I shelved it for a while and replaced it with a fresh install of OpenBSD 4.4 on one of the noisy 1U rackmount cluster servers from the startup I worked at in early '06. That 1U now sits in the SS20's old spot on top of the Sun Ultra 5 (which happens to be one of my primary workstations, running Solaris 10)
A few weeks ago, a friend of mine gave me a pile of old SCA-80 hard drives -- 4GB, 9GB stuff that was going to get landfilled. I put some of them in the SS20 again, and decided to try NetBSD. I used this for the SSH Reverse Tunneling article. It's now on the top of the lower stack, below the FON and Jornada and on top of the beige low-profile server. That's an IBM RS/6000 Model 250 -- 80 MHz (yes, really) with 256MB of RAM and a 36GB SCSI hard drive. Initially made to run IBM's AIX 3.x operating system, it still runs AIX 5.1 quite well as long as you keep the GUI from trying to start. After AIX 5.1, IBM dropped all support for Micro-Channel Architecture. Still, having AIX 5 to tinker with is beneficial to me. I have to deal with AIX (as well as Linux and Solaris) at my real job. Don't forget all the cool freeware that's been ported to AIX and Solaris!
The Dell PowerEdge server below it was going to be an AMP (Apache/MySQL/PHP) server for a client of mine who never ended up needing it. It gets re-purposed whenever I need a reasonably powerful machine or one with a lot of storage to test something on. I just installed FreeBSD 7 on it last night. This one's even more noisy than the 1U cluster server.
My wife bought a 4U rackmount case from Frogman back in the day, and it was originally built up as a telnet MUD server. Now, it's kind of the communal Windows 2000 test box. It's the HiR OpenArena server for the time being.
Then, there's the Dell Optiplex mini-tower out of frame that's still running BackTrack -- although after Mubix wrote about it, I plan on downloading Sumo very soon!
With so many of my own little projects going on and utilizing all these boxes, I'm currently running all of this in my apartment's second-bedroom-turned-laboratory:
With so many of my own little projects going on and utilizing all these boxes, I'm currently running all of this in my apartment's second-bedroom-turned-laboratory:
- OpenBSD 4.4 / x86
- Solaris 10 / ultrasparc
- jLime Linux (Mongo) / arm
- Openwrt Linux 7.09 / mips
- NetBSD 4.0.1 / sparc
- AIX 5.1 / ppc
- FreeBSD 7.0 / x86
- Backtrack Linux 3 / x86
- Windows 2000 SP4 / x86
That's not even considering that my wife's laptop is running Vista, and I'm running Mac OS Leopard on my own. I'm no stranger to lesser-known OS's either. I've written about OpenSolaris before. I used to run BeOS as my main platform at work. I've used Plan 9 before (in the late 90s) and I even helped a little bit with the now-defunct V2OS project in 2001.
2008-04-11
ApacheFriends XAMPP makes Apache setup easy
 I've been using XAMPP on Windows (which I'm forced to use at work) for a few years. I write a lot of custom PHP stuff to help me with my day job, and I also like to test functions or classes I write before I push it out to production. ApacheFriends XAMPP is an easy way to get a basic Apache installation up and running with some of the most popular add-ons including PHP and MySQL. It installs in OS X and many Linux distributions as well.
While nothing can replace a streamlined, custom-compiled AMP Stack set up just the way you need it, XAMPP affords busy sysadmins (and web developers that don't want to be sysadmins!) the ability to get a functional web dev environment up and running with ease.
Go ahead, give XAMPP a shot!
2008-02-08
FART on Windows
No, I'm not asking you to unleash a batch of cheek-flapping flatulence upon Vista. Although I wouldn't mind if you did.
FART is an open-source Find And Replace Tool for the Windows command-line. It's much like a mash-up of grep and sed, and capable of easily converting text files from UNIX to Windows/DOS style newlines among other things.
Via HacksZine. Thanks, [Eric]
Subscribe to:
Posts (Atom)

 Posts
Posts