In the third part of this series, I'll cover using DNS2TCP on unix-like operating systems. DNS2TCP is not written in perl. It's a set of small C programs. It can tunnel multiple types of traffic, as opposed to OzymanDNS which is designed to be used as a Proxy Command for SSH.
Compiling is straight-forward once you download it. This worked on all platforms I tried it on, which includes Ubuntu Linux, OpenBSD, and Mac OS X.
$ tar xvfz dns2tcp-0.4.3.tar.gz
$ cd dns2tcp-0.4.3
$ ./configure
$ make
$ sudo make install
Assuming that you have a valid subdomain nameserver (as outlined in part 1), you just need to edit the configuration file for the "dns2tcpd" server. There's an example file "server/dns2tcpdrc" in the archive that I've modified. Of particular note, make sure to change the "listen" line to 0.0.0.0 or your ethernet interface's IP address. The default configuration will not work because it listens only on localhost. Also, make sure that the "domain" line matches your subdomain. Finally, you must make sure that the chroot directory exists. This is where dns2tcp caches its data. The "ressource" lines are intentionally mis-spelled. The author of this tool lacks proper English grammar skills. That's okay, just keep it in mind. "ressource" lines have the format:
ressources = [resname]:[ip]:[port], ...
My config looks like this, for Squid and SSH:
# config file
listen = 0.0.0.0
port = 53
user=nobody
chroot = /var/empty/dns2tcp/
domain = l33t.h-i-r.net
ressources = ssh:127.0.0.1:22 , proxy:127.0.0.1:3128
Then, run it as follows:
$ sudo dns2tcpd -f /path/to/dns2tcpdrc
or, if you wish to also run it in the foreground for use in a screen session, add the -F flag:
$ sudo dns2tcpd -F -f /path/to/dns2tcpdrc
That's it for the server side.
Now, on the client end, compile and install dns2tcp as well. Configure the "dns2tcprc" file. Unfortunately, it can only be configured with one "ressource" at a time. I am going to use SSH with dynamic proxy again.
#
# configuration :
#
domain = l33t.h-i-r.net
ressource = ssh
local_port = 2222
debug_level=1
I've found that this tunnel software can take a while to fully work. Sometimes up to five minutes. Once it catches on for the first time, though, it seems much more stable and quick than OzymanDNS on the same platforms. Launch it like this:
$ dns2tcpc -f /path/to/dns2tcprc [DNS Server]
Where DNS Server is a DNS server you can access, and probably should be the one you were issued by DHCP.
Activate the SSH tunnel from the CLI:
$ ssh -C -p 2222 -D8080 user@localhost
In the screen shot below, you can see both the SSH session and the dns2tcp client window open.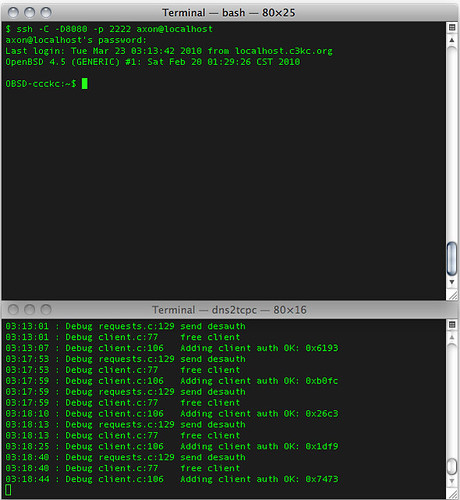
Again, configure Firefox to use the dynamic port you specified above as the proxy on localhost.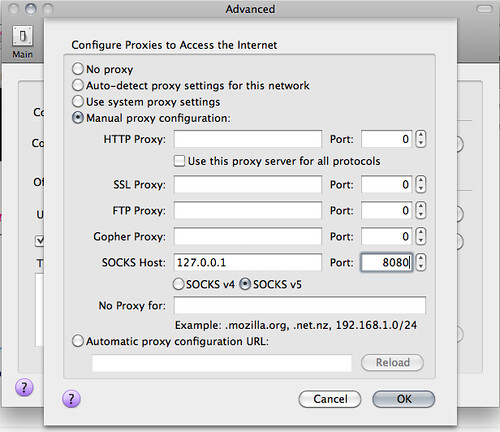
After this, you should be in action!
DNS Tunneling Series:
Part 1: Intro and Nameserver setup
Part 2: Windows Clients (using ozymandns)
Part 3: Linux, BSD and Mac OS X clients (using DNS2TCP)
2010-03-23
DNS Tunneling Part 3: Linux, Mac OS X and BSD clients
![]()
blog comments powered by Disqus
Subscribe to:
Post Comments (Atom)


