2007-11-30

November: Ax0n's Lost & Found

Things I stumbled across and kept in November:

  • A Nintendo DS Lite, found alongside a curb on my way to the November KC PHP User's Group Meeting. I picked up a few games for it including Brain Age and Need For Speed: Pro Street.
  • Two CCTV Cameras. One with bad horizontal sync but a good auto-iris lens. The other with a cheapo manual lens and otherwise good CCD imager and electronics. I borg'd them together to make one working camera with an auto-iris lens. Found in some nondescript dumpster.
  • And of course the slightly-broken 25" Television, which now replaces the piece of crap 13" TV I had in the bedroom. Found next to a dumpster in my apartment complex.
Tell us what you found and what you did with it.

2007-11-25

Sysadmin Sunday: A slightly more advanced intro to SUDO

Sudo is a neat utility which allows a computer to be administrated with out passing around the root password.

This article is meant for folks who are a step beyond the "Linux flavor of the week syndrome" and are needing to delegate responsibilities to other people with out letting the cat out of the bag. This document does not cover user and group restrictions only the run as super user aspect is covered.

1. Introduction
2. Basic demonstration
3. Configuration
4. Administrator Sluggo says ...
5. Informative resources
===========================================================
1 - Introduction
So here we are, we got a pile of people to take care of stuff for you but we need to limit each persons access to only what they need to do.

2 - Basic Demonstration
Most installations restrict sudo so it is un-useble. An admin needs to run the "visudo" command to add users or groups into sudo in order for it to allow some one to run an application as another user like root or some other powerful system user.

Sudo is similar in function to the switch user or "su" command. The difference is that where su is a dumb animal and asks for the target users password, sudo is configurable to authenticate to different account privileges in different ways and provides detailed logging and control to what applications can be executed with that users permissions.

One of the default setups which people choose is to allow all users in the wheel account to run as root privileges on all applications on all hosts. This is not an ideal setup obviously because any one in the wheel group becomes like root.

But lets say I am a backup administrator who for some reason needs root access to the whole machine.

somehost$ sudo tar -cvf /dev/tapedevice0 /
Then it will prompt me for my password (not roots) then execute tar with root privileges. With the same setup we could just as easily do this:

somehost$ sudo /bin/sh
It will then prompt me for my password, then give me a shell with root privileges.
This behavior can be changed of course which is the next topic.

3 - Configuration
The configuration file for sudo is typically in /etc/sudoers. But typically we would use the "visudo" command to configure the file.

USER or USER_ALIAS HOST or HOST_ALIAS = (TARGET USER OR USER_ALIAS) COMMAND OR COMMAND_LIST

Example:
Defaults!PAGERS        noexec //prevents shell escapes in pager programs
User_Alias ADMLIST = asmodianx
User_Alias USERLIST = will, wendy, wim
Runas_Alias TARGETLIST = root, operator
Host_Alias HOSTLIST = HOST1,HOST2
Cmnd_Alias PROGRAMLIST = /usr/bin/sh, /usr/bin/csh, \
/usr/local/bin/tcsh, /usr/bin/rsh, \
/usr/bin/ksh, /usr/local/bin/zsh
Cmnd_Alias PAGERS = /usr/bin/more, /usr/bin/pg, /usr/bin/less
#-------------------
USERLIST HOSTLIST=(TARGETLIST)PAGERS
ADMLIST HOSTLIST=(TARGETLIST)PROGRAMLSIT

In this example we prevent shell escapes in the pager programs (less, more ...etc).
We then allow access to the shells for the admin user. Sudo is also network aware
PAM modules should work seamlessly but LDAP groups look like local groups I believe.
NIS+ networks or using rsh is where the network aware settings come into play.

4 - Administrator Sluggo says ...
Some Linux distributions have some silly concepts when it comes to default sudo configurations. SUSE for some reason thinks that sudo is some kind of replacement for su, so it enables sudo commands for all members of the "users" group only if they know the target users password. Assigning root shells is generally a bad thing too but this depends heavily on your management style.

5 - Informative resources:
http://www.wlug.org.nz/SudoHowto
http://www.linuxhelp.net/guides/sudo/
http://www.gratisoft.us/sudo/man/sudo.html

2007-11-18

Sysadmin Sunday: Quick RBAC primer for AIX 6

A while back ago, I promised to revisit AIX's RBAC functionality to show what kind of cool features have been added for the latest incarnation of Big Blue’s enterprise server operating system. In this week’s Sysadmin Sunday, I’m going to deliver on that promise and take a stroll through the enhanced RBAC functionality in AIX 6. I have previously mentioned AIX 5L’s RBAC implementation was minimal. That’s certainly changed quite a bit. There are 263 default authorizations on my AIX 6 installation fresh out of the box, and you can add more. The real bonus, however, comes from you to give meaning to the authorizations. Prior to AIX 6, only a select few tools recognized roles and authorizations. Now, you can apply security attributes to practically anything on the system, and grant or restrict access based on the authorizations a given user has active.

Conventions
I will be using green block quotes to symbolize commands run as a normal user, and red to symbolize commands run as root. Bold, bright text represents user input.

Overview of RBAC
RBAC stands for Role Based Access Control. In AIX’s implementation, there are three pieces to the RBAC puzzle: Security Attributes, Authorizations and Roles. I'll use some commands in this section, but I'll outline the commands in more detail later on in the article.

Security Attributes
Security attributes may be set for any command (executable), file, device, or process. These attributes determine which authorizations get which privileges. Think of security attributes as a lock on certain parts of the system. For instance, this is the list of security attributes for the “passwd” command:

# lssecattr -F -c /usr/bin/passwd
/usr/bin/passwd:
egid=0
accessauths=aix.security.passwd
innateprivs=PV_AU_ADD,PV_AU_ADMIN,PV_AU_PROC,PV_DAC_O,PV_DAC_R,PV_DAC_W,PV_DAC_X,PV_DEV_QUERY,PV_FS_CHOWN,PV_FS_CNTL,PV_FS_MKNOD,PV_FS_MOUNT,PV_FS_RESIZE,PV_PROC_CRED,PV_PROC_ENV,PV_PROC_PRIO,PV_PROC_RAC,PV_PROC_RSET,PV_PROC_RTCLK,PV_PROC_SIG,PV_PROC_VARS
secflags=FSF_EPS

The innateprivs and secflags attributes look quite intimidating at first glance. They're actually quite simple, but there are so many different privileges that it would be preposterous for me to cover them here. They are well-documented in the IBM Redbook titled AIX V6 Advanced Security Features Introduction and Configuration.

The short and sweet version of it all is that you can run any command as the root user and use tracepriv to determine what privileges were used during the execution of the program. Then, when you go to add a new entry for a device, command, file, or process, you can specify the privileges that tracepriv displayed, adding them to innateprivs for the entry.

# tracepriv passwd axon
Changing password for "axon"
axon's New password:
Enter the new password again:

758004: Used privileges for /usr/bin/passwd:
PV_AU_ADD PV_AU_PROC
PV_DAC_O PV_PROC_TIMER
PV_TCB

The set of privs listed above is the bare minimum that would need to be added to run /usr/bin/passwd. Using this method to determine what's needed for other privileged commands (such as third-party software) is a trivial task.

Authorizations
Authorizations are assigned to roles. Think of authorizations as keys to the security attribute “locks”. There’s not much to the actual authorizations themselves. They are just handy labels for unlocking security attributes. The only things that really matter to us here are the name (aix.security.passwd) and the dfltmsg, which is a human readable description of the authotization. In order for our sysadmins to set passwords for other users, they must have a role which contains the aix.security.passwd role, shown below:

# lsauth -f aix.security.passwd
aix.security.passwd
id=6320
dfltmsg=Password Administration
msgcat=sysauths.cat
msgset=8
msgnum=40

Roles
You can’t just give a sysadmin user access to the aix.security.passwd authorization, though. There’s a role, in this case, SecPolicy, which contains this authorization and a bunch of other ones that are relevant to a sysadmins’ job.

Roles are assigned to a user or group of users, and themselves contain one or more authorizations. They can also inherit all of the authorizations within other roles. You could think of this as a keychain with only the keys that a user or group needs to do their job. In the case of a role that inherits other roles, it would be more like a keychain with other keychains on it. The important fields we're concerned about:

  • Authorizations is obviously the major item here, with a comma-separated list of auths that the role is capable of using.
  • Rolelist contains a list of sub-roles which this role can get permissions from as we'll see later.
  • Groups is a comma-separated list of groups that a user must be a member of in order to invoke the role.
  • Dfltmsg is, again, a friendly description, this time for the role itself.
  • auth_mode may be set to either NONE or INVOKER. If it's set to INVOKER, the swrole command will prompt the user for their own password (kind of like sudo). If set to NONE, swrole will simply create a new shell with the role's permissions.
# lsrole -f SecPolicy
SecPolicy:
authorizations=aix.security.audit,aix.security.auth,aix.security.cmd,aix.security.config,aix.security.device,aix.security.file,aix.security.kst,aix.security.network,aix.security.proc,aix.security.role,aix.security.passwd,aix.security.su,aix.security.tcb,aix.security.tsd
rolelist=
groups=
visibility=1
screens=*
dfltmsg=Security Policy Administration
msgcat=role_desc.cat
msgnum=8
msgset=1
auth_mode=INVOKER
id=8
Although, if you look, you can see that SecPolicy is inherited by another role, isso. So, if a user has the role of isso assigned to them, then it is not necessary to also grant them a role of SecPolicy.
# lsrole -f isso
isso:
authorizations=aix.device,aix.fs.chroot,aix.fs.manage.export,aix.fs.stat,aix.network,aix.proc.fuser,aix.proc.ipc,aix.proc.status
rolelist=DomainAdmin,SecPolicy,SysConfig
groups=
visibility=1
screens=*
dfltmsg=Information System Security Officer
msgcat=role_desc.cat
msgnum=1
msgset=1
auth_mode=INVOKER
id=1
Users and Roles
When creating a user (with mkuser) or modifying one (with chuser), you can set the roles or default_roles attributes. This is a comma-separated list of roles as found with lsrole ALL. default_roles defines roles that become active as soon as the user logs in. roles are additional privileged roles that require the user to activate the role with swrole.

Example: Adding a role to a user
# chuser roles=isso axon
Now, with my user-level account, you can see that I cannot change root's password until I've switched to the isso role:
$ passwd root
3004-664 You are not authorized to change "root's" password.
$ rolelist
isso Information System Security Officer
$ swrole isso
axon's Password:
$ passwd root
Changing password for "root"
root's New password:
Commands
AIX makes excessive use of mk (make), ch (change), rm (remove), and ls (list) commands. RBAC is no different, as you'll see. You'll see example of how to use these commands in the following sections of the article.

Auth commands:
lsauth - Lists an authorization. lsauth ALL lists all auths.
chauth - Changes authorization
rmauth - Removes authorization
mkauth - Make a new authorization

Example: Creating and listing a new authorization for the security team.
# mkauth dfltmsg="Test auth for security team" secauth
# lsauth secauth
secauth id=10013 dfltmsg=Test auth for security team
role commands:
lsrole - Lists a role's attributes. lsrole ALL lists all roles.
chrole - Changes a role's attributes.
rmrole - Remove a role
mkrole - Make a new role

Example: Creating and listing a new role for our security team staff members that contains the secauth authorization we just made
# mkrole authorizations=secauth dfltmsg="Security staff priv. commands" secstaff
# lsrole secstaff
secstaff authorizations=secauth rolelist= groups= visibility=1 screens=* dfltmsg=Security staff priv. commands msgcat= auth_mode=INVOKER id=11

Security attribute commands:
lssecattr -c -F [/file/path] | ALL - show priv. commands
lssecattr -d -F [/dev/path] | ALL - show priv. Devices
lssecattr -f -F [/file/path] | ALL - show priv. file access
lssecattr -p -F -h [pid] | ALL - show priv. processes
setsecattr - set security attributes

Example: Placing security attributes on a command
# setsecattr -c euid=0 egid=0 accessauths=secteam innateprivs=PV_SU_ROOT,PV_SU_UID /usr/bin/whoami

Whenever you modify any roles, authorizations or security attributes, you should run the setkst command to update the kernel security tables.
# setkst
Successfully updated the Kernel Authorization Table.
Successfully updated the Kernel Role Table.
Successfully updated the Kernel Command Table.
Successfully updated the Kernel Device Table.
Now that we have updated the security tables, the only thing we need to do is assign roles to a user to see how they work.

Example: Adding a new role to a user. axon was already a member of isso, so we add secstaff to the list:
# chuser roles=isso,secstaff axon

End-user commands:
rolelist - displays a list of roles on the system which you are authorized to swrole to.
swrole [rolename | ALL] - creates a new shell with all of the privileges of the selected roles. Will prompt for your password if auth_mode is set to INVOKER for any of the roles.

With my user-level account, I can now run "whoami" with root privileges thanks to the security attributes, authorizations and role that I added.

$ whoami
axon

$ rolelist
isso Information System Security Officer
secstaff Security staff priv. commands

$ swrole secstaff
axon's Password:
$ whoami
root
To remove security attributes, use the rmsecattr command.

# rmsecattr -c /usr/bin/whoami
# setkst
Successfully updated the Kernel Authorization Table.
Successfully updated the Kernel Role Table.
Successfully updated the Kernel Command Table.
Successfully updated the Kernel Device Table.

Now, my user-level account runs whoami with usual privileges, despite still being in the secstaff role.
$ swrole secstaff
axon's Password:
$ whoami
axon
This should be enough to get you started reaping the benefits of the completely revamped RBAC solution that comes out of the box with AIX 6.1.

2007-11-13

Dumpster Diving - TV Repair

-- OR --

One man's trash is another man's project.


Introduction
I dumpster dive. No, I really do. I do it quite frequently, and often find plenty of cool things. Locks. Electronics. Jackets. Tools. Jimmy Hoffa. Computers. All sorts of useful things.

This morning, it was a TV set, complete with the remote control. Throwaway TVs are so common that it's almost annoying. Usually, it's something minor that's failed. This day and age, people are always looking for a good reason to make the jump to some new 80-inch high-def whiz-bang wall ornament. If the most minor thing goes wrong with their current 5-year-old set, it's game over, and time to upgrade.

Warning about televisions and computer monitors
Devices with CRT screens can contain a dangerous amount of stored electricity. Keep your hands away from large transformers, thick red or black cables, and the soldered side of the PC board inside the CRT device. We don't want people getting hurt, so please do some research if you're unfamiliar with CRT devices.

My find and today's fun project
It was about 40 degrees this morning, so when I brought the TV set inside, it immediately began forming condensation. I left it alone until I could plug it in and check it out this evening. The last thing I need to do is destroy a good TV by plugging it in while it's soaking up moisture from the air in my apartment.

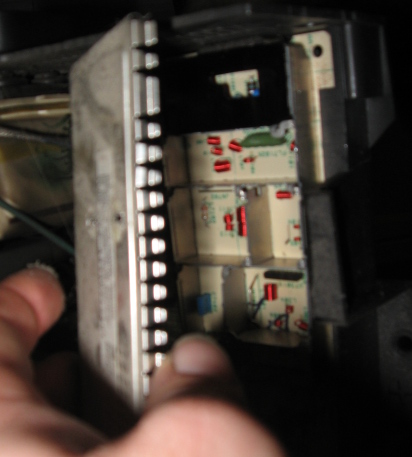
When I get home, I see that it looks to be in pretty good shape. Nice! I plugged it in, and it powered on with the power button. So far so good! When I went to plug the coaxial cable into it, though...


Great. So that's why this thing is in the dumpster! I went ahead and grabbed the coax cable anyways, and touched the center pin of the coax to the metal tab inside the hole, and to my surprise, I got a signal and a pretty good picture.

A quick trip to RadioShack should fix this pretty easily.


I plug in the Soldering iron so it's ready to go. Did you know I also found this soldering iron in a dumpster? That was about 5 years ago, but it's still going strong!


Then, I start hacking away...


Once the case is open, I see that the F-Connector's location is obscured within the tuner module, so then it's a fun game of "disassemble the tuner"


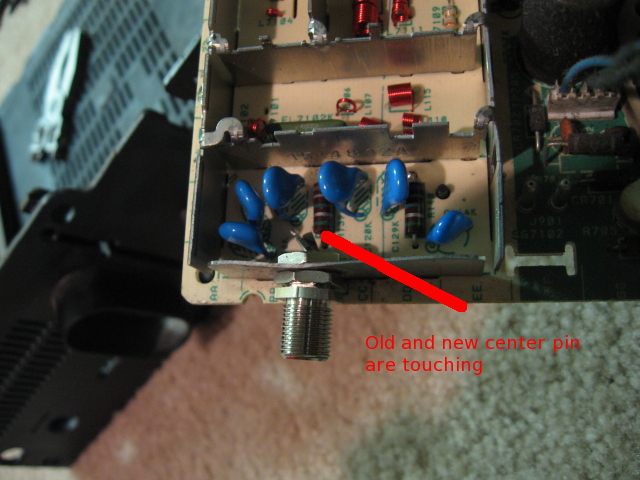
The back side of these F-connectors are too deep. To offset this problem, I put one more nut on the F-connector, then put the connector onto the tuner, hand-tightened. I leaned the old broken center pin against the new center pin tab.


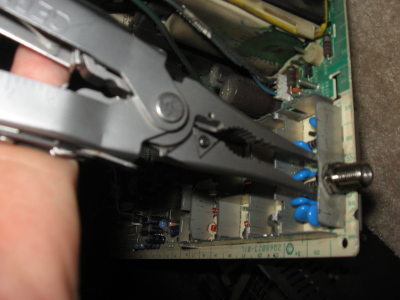
I threw the trusty needlenose attachments onto my Gerber Evolution, and went to work actually tightening the F-connector to the tuner housing.


I then applied a little bit of solder, making sure that the solder "flows" well, so we don't get a cold solder joint...


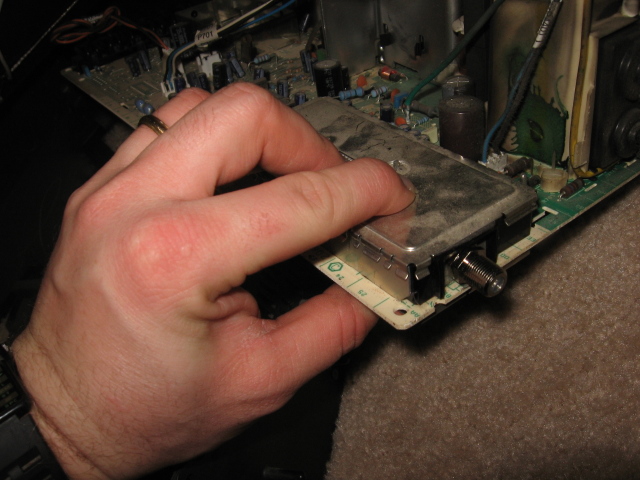
Final re-assembly begins with putting the tuner back together again. See the nice, new, shiny F-connector?


By the way, it worked perfectly once I put it all back together. :)

2007-11-11

The MBR Love Letter

First, this was Friday's XKCD comic:
And she put sweet nothings in all my .conf files.  It'll take me forever to get X working again.

Then today, I ran across someone who decided to actually pull it off, with a nifty how-to. Obviously, tweaking the MBR can render your system unbootable, so it's not recommended to do it unless you really know what you're doing, or if you're going to format and re-install anyways.

I laughed, which is always a good way to get an early start to the work week.

Sysadmin Sunday: Logical Volume Management on Linux

I'm starting a series of articles that are handy for system administrators -- mostly Linux, BSD, AIX, and Solaris. I'll be releasing the series over the next few weeks, and I've aptly named the series "Sysadmin Sunday." The first topic is on setting up and using the built-in logical volume manager in Linux. This is going to be a long article, so I apologize in advance. Let's dive in!

Introduction
LVM2 is the new Logical Volume Manager for the Linux 2.6 kernel. Logical volume management has been a key part of enterprise UNIX installations (such as AIX) for quite a while, but is a relatively new feature to Linux. LVM1 had some severe limitations. Many of them have been overcome with LVM2, but a few key features found in other operating systems are still missing. That said, Linux is really coming into its own these days, and this is a major step in the right direction. Once you've mastered the concepts of logical volume management, you will be able to understand it on other platforms as well, and learn it quickly.


Benefits of LVM
Logical volume management gives you a lot more flexibility in how you utilize storage on a system. For instance, If you're unsure how much space to allocate for various partitions on a new server, LVM provides a way to simply change the sizes of partitions, even if it means that a single logical partition is spread out across multiple hard disks. This is useful for casual LAMP server systems as well as large enterprise hosting installations.

There are two basic ways to set up a new system with LVM. The first philosophy is to simply partition the system the way that you would without an LVM. If the storage needs change later, a partition with excessive free space can be shrunken so that space can be added to the partition that needs it. The other philosophy is to partition the space to meet the immediate needs of the system. Only allocate what you know you will need, and leave room to grow. It's no problem if you need more room for software, databases, file server storage, or website content.

Hardware/Software Configuration
My staging environment for this project is an old Dell Optiplex GX150 Desktop which I've named "silence." It's got a 20GB EIDE drive and a plain old CD-ROM drive. I added a pair of 80GB EIDE drives to demonstrate how LVM handles physical volumes.

I'm using Ubuntu 7.10 Gutsy Gibbon Server Edition. During installation, I chose to manually partition the 20GB drive. You could simply choose the "Use full disk and configure LVM (guided)" installation option.

The reason I did a manual partition was to make an LVM setup that has room to grow. This is clearly the second philosophy. Partitioning is set up as follows, if you're interested:

  • 128MB was allocated as /boot (ext3)
  • 256MB was allocated as swap
  • The remaining 19GB or so was set up as one big LVM Physical volume
  • Within the LVM, I allocated 4GB as the root partition.
  • Within the LVM, I allocated 7GB as the home partition.


LVM structure
Each system can have one or more volume groups. The volume groups hold physical volumes and logical volumes. Physical volumes are simply disk space which has been allocated for LVM use. Logical volumes are actual formatted space that the system can use. One could say that physical volumes provide space to the volume group, and logical volumes are partitions of the whole volume group.


LVM Command-line tools
There are four sets of commands for using the LVM system. First, there are general LVM (lvm*) commands. Next, there are commands for manipulating the volume groups (vg*). Another set for managing the physical volumes (pv*). Then, a final set for logical volumes (lv*, minus the lvm commands, of course).


The lvm command is an interactive command environment which can be used instead of calling all of the other programs from within your shell. I usually launch lvm from sudo, then I don't need to use sudo prior to each LVM command, nor do I need to login as root. Also, typing "help" within lvm lists all of the LVM commands and a short description, which can come in handy if you're just getting started. Preceding each command with help gives you access to a quick help description for each command.


Let's see what the LVM configuration looks like:

axon@silence:~$ sudo lvm

lvm> vgs
VG #PV #LV #SN Attr VSize VFree
silence_vg 1 2 0 wz--n- 18.29G 7.23G

lvm> pvs
PV VG Fmt Attr PSize PFree
/dev/sda3 silence_vg lvm2 a- 18.29G 7.23G

lvm> lvs
LV VG Attr LSize Origin Snap% Move Log Copy%
silence-home silence_vg -wi-ao 7.05G
silence-root silence_vg -wi-ao 4.00G

As you can see, I have about 7GB free on my 18GB volume group The other drives in my system haven't been partitioned for use as LVM physical volumes yet, so they don't show up with the "pvs" commands.


Preparing new drives for LVM
After installing new hard drives, you should first partition them with type 8E (Linux LVM)

I'm going to use cfdisk to create lvm partitions on the two drives (/dev/sdb and /dev/sdc). There's an animation below to help you with partitioning if you need it.

axon@silence:~$ sudo cfdisk /dev/sdb
axon@silence:~$ sudo cfdisk /dev/sdc


Once the drives have been partitioned as LVM, you can initialize them with pvcreate.

axon@silence:~$ sudo lvm
lvm> pvcreate /dev/sdb1
Physical volume "/dev/sdb1" successfully created

lvm> pvcreate /dev/sdc1
Physical volume "/dev/sdc1" successfully created

lvm> pvs
PV VG Fmt Attr PSize PFree
/dev/sda3 silence_vg lvm2 a- 18.29G 7.23G
/dev/sdb1 lvm2 -- 74.53G 74.53G
/dev/sdc1 lvm2 -- 74.50G 74.50G

Now there are now three physical volumes present. The 80GB drives show up as only having 74GB free because a certain percentage of blocks are set aside to use in the place of any bad sectors that might be found. I haven't added the new drives to a volume group yet.

Creating a new volume group and logical volume
I'm going to create a new volume group for my web root files, and add sdb1 to it. This way, I can easily export the web data, take snapshots for backups, and all the other great things that LVM affords a sysadmin. Once I add the webroot_vg, I'll create a 20GB logical volume and format it with ext3. This should leave about 60GB free on the new volume group.

lvm> vgcreate webroot_vg /dev/sdb1
Volume group "webroot_vg" successfully created

lvm> lvcreate --size 20GB -n webroot webroot_vg
Logical volume "webroot" created

axon@silence:~$ sudo mkfs.ext3 /dev/webroot_vg/webroot
mke2fs 1.40.2 (12-Jul-2007)
... output truncated ...


Once that's complete, I have to create a place to mount it, and tell the system to mount it on boot up.

axon@silence:~$ sudo mkdir /webroot
axon@silence:~$ sudo vi /etc/fstab

I added the following line to fstab with vi:

/dev/webroot_vg/webroot /webroot ext3 defaults,errors=remount-ro 0 1

I mounted it.
axon@silence:~$ sudo mount /webroot
axon@silence:~$ df -h

Filesystem Size Used Avail Use% Mounted on
/dev/mapper/silence_vg-silence--root
4.0G 504M 3.3G 14% /
varrun 61M 40K 61M 1% /var/run
varlock 61M 0 61M 0% /var/lock
udev 61M 80K 61M 1% /dev
devshm 61M 0 61M 0% /dev/shm
/dev/sda1 122M 24M 93M 21% /boot
/dev/mapper/silence_vg-silence--home
7.0G 138M 6.6G 3% /home
/dev/mapper/webroot_vg-webroot
20G 173M 19G 1% /webroot

Resizing logical volumes
So, what happens when the space starts to get a little cramped? Add more space and resize it!

Unfortunately, this isn't something that can be done while the filesystem is mounted. You'd have to stop the web server, umount the directory, and do the resizing stuff. Here we go.

axon@silence:~$ df -h /webroot/
Filesystem Size Used Avail Use% Mounted on
/dev/mapper/webroot_vg-webroot
20G 19G 390M 98% /webroot

Ooops! 98% full! I'll umount it and use lvresize to add another 10GB from the webroot_vg to it.

axon@silence:~$ sudo umount /webroot/

axon@silence:~$ sudo lvresize -L +10G /dev/webroot_vg/webroot
Extending logical volume webroot to 30.00 GB
Logical volume webroot successfully resized

After that, we need to tell the filesystem about it with resize2fs. It's a good idea to run fsck first, though, to make sure that the filesystem is in a good, clean state before we go messing with stuff.

axon@silence:~$ sudo fsck -f /dev/webroot_vg/webroot
fsck 1.40.2 (12-Jul-2007)
e2fsck 1.40.2 (12-Jul-2007)
Pass 1: Checking inodes, blocks, and sizes
Pass 2: Checking directory structure
Pass 3: Checking directory connectivity
Pass 4: Checking reference counts
Pass 5: Checking group summary information
/dev/webroot_vg/webroot: 14/2621440 files (7.1% non-contiguous), 4880972/5242880 blocks

axon@silence:~$ sudo resize2fs /dev/webroot_vg/webroot
resize2fs 1.40.2 (12-Jul-2007)
Resizing the filesystem on /dev/webroot_vg/webroot to 7864320 (4k) blocks.
The filesystem on /dev/webroot_vg/webroot is now 7864320 blocks long.

Voila! 30 Gigs.

axon@silence:~$ sudo mount /webroot/
axon@silence:~$ df -h /webroot/
Filesystem Size Used Avail Use% Mounted on
/dev/mapper/webroot_vg-webroot
30G 19G 9.8G 66% /webroot

Similarly, if you had a reason to need to borrow space from an existing logical volume, lvresize and resize2fs would work for shrinking a filesystem, too.

Spanning multiple physical volumes with one logical volume
Let's try something different. There's about 7GB of free space on the main volume group, and there's still one 74GB physical volume in this system that we haven't done anything with yet. I'm going to go ahead and add it to silence_vg with vgextend.

axon@silence:~$ sudo vgextend silence_vg /dev/sdc1
Volume group "silence_vg" successfully extended

Taking a look at silence_vg, we can see that there is now 81GB of free space in the volume group.

axon@silence:~$ sudo vgs silence_vg
VG #PV #LV #SN Attr VSize VFree
silence_vg 2 2 0 wz--n- 92.79G 81.73G

I'll create another logical volume and take up the entire remaining amount of free space in silence_vg. Then, I'll put a filesystem on it, of course.

axon@silence:~$ sudo lvcreate -l100%FREE -n test-lv /dev/silence_vg
Logical volume "test-lv" created

axon@silence:~$ sudo lvs
LV VG Attr LSize Origin Snap% Move Log Copy%
silence-home silence_vg -wi-ao 7.05G
silence-root silence_vg -wi-ao 4.00G
test-lv silence_vg -wi-a- 81.73G
webroot webroot_vg -wi-ao 30.00G

axon@silence:~$ sudo mkfs.ext3 /dev/silence_vg/test-lv
mke2fs 1.40.2 (12-Jul-2007)
... output truncated ...

A quick look shows that I've created a filesystem that is actually larger than any of the drives in the system!

axon@silence:~$ sudo mount /dev/silence_vg/test-lv /backup

axon@silence:~$ df -h /backup
Filesystem Size Used Avail Use% Mounted on
/dev/mapper/silence_vg-test--lv
81G 184M 77G 1% /backup

Snapshots and backups
Snapshots are temporary time-frozen views of a logical volume. They appear as a copy of the logical volume, but don't change. Instead, you allocate space for any changes that will happen on the live volume, so that there's space to hold copies of the changed blocks as they were at the time of the snapshot. This is great for taking hot backups of data that is subject to frequent changes, without a service interruption. Passing the -s flag to lvcreate tells the LVM system that you're creating a snapshot. In this case, after the -n [name] option, you tell it which LV to create a copy of. Simple as that.

While a snapshot is active, the system needs to make two writes for every block it changes. This creates a slight performance impact. Also, if the space you allocate for tracking changes gets filled up, there's a good chance that your snapshot will fail, automatically un-mount itself, or have unreliable data within it. For this reason, I created a backup script that automatically creates and mounts the snapshot, gets a backup, then gets rid of the snapshot. I've pasted it below, although it's just a mock-up and I'd probably use something a little more resilient than a simple tar command in real life.

#!/bin/sh
lvcreate -L1G -s -n webroot-backup /dev/webroot_vg/webroot
mount /dev/webroot_vg/webroot-backup /snaps/webroot/
cd /snaps/
tar czf /backup/`date +%Y%m%d`-webroot-backup.tar.gz webroot
umount /snaps/webroot
lvremove -f /dev/webroot_vg/webroot-backup

Closing
Hopefully, this gives you enough to start with when it comes to configuring and managing LVMs on Linux.

2007-11-08

AIX 6 goes General Availability

AIX 6.1 was released earlier this week. During the initial beta phase, they were considering calling it AIX 5.4.  There was no AIX 5.4, nor was there a 6.0.  They're debuting AIX 6 as version 6.1. 


AIX is IBM's enterprise UNIX offering for their pSeries servers, which replaced the old RS/6000 line years ago. New features include:
  • Improved RBAC (Role Based Access Control) functionality
  • Workload Partition (WPAR) virtualization - multiple virtual environments within one AIX instance, versus Logical Partition (LPAR) virtualization, which is multiple AIX instances on one system.
  • Support for Encrypted Journaling file systems (JFS2/EFS)
  • Trusted Computing Base - An optional secure-by-default installation
  • AIX Security Expert - a template-based console for setting up security options
  • Concurrent kernel updates - no reboot needed for certain types of kernel upgrades
  • First-failure data capture functionality to aid in troubleshooting or reproducing obscure faults
  • System routines that can gracefully recover from certain kernel crashes
I've had some time to use AIX 6 while it was in beta, and I must say that I'm impressed by the enhancements that I've been able to use so far.  Built-in virtualization is slick and seems to be working well in the general available release of AIX 6.1 now that it's out of beta.  You won't likely be playing with AIX on your next workstation, but you'll start to see it rolling out to an enterprise environment near you.

2007-11-07

ArsTechnica reviews Ubuntu Gutsy Gibbon

Finally, there's a really good technical overview of Gutsy, thanks to Ryan at Ars. Read on to get the skinny on the next iteration of the so-called perfect desktop Linux distribution. 


http://arstechnica.com/reviews/os/ubuntu-gutsy-gibbon-review.ars

2007-11-05

Leopard is cheesing me off.

Just a quick update.

The in-place upgrade I did to MacOS X 10.5 Leopard simply wasn't working as well as I had planned. Never before have I encountered problems upgrading major versions of OS X.

The first thing I noticed is that operating system stability was hindered. The OS would go flaky for a few seconds at a time or just hang indefinitely with the "spinning beach ball o' DOOM!" Then, I started encountering problems with applications that would crash. GIMP wouldn't even start up. I installed a fresh version, which would start but would crash as soon as I even tried to modify images. Firefox would go non-responsive or just simply crash and exit disgracefully. A fresh install of Firefox including deleting its profile information didn't help. My Last.fm agent hasn't worked properly at all since the upgrade. This is just a smattering of the problems I've had in the last week.

With that, I went ahead and did a fresh install last night, completely formatting and erasing the drive. I wanted a mulligan. I finally bought a new external enclosure for my backup hard drive (my wife borrowed my old enclosure) and went to work backing up only what I really, really needed. I didn't use Time Machine or anything. I just salvaged my virtual machines from Parallels, my photos, my music, and my documents. I wrote down a list of the apps I use most often, and went to work.

After the fresh install, my MacBook feels much more lucid and rich. Now, I'm disappointed because I didn't realize that iLife doesn't come with Leopard. It came pre-installed on my MacBook when I got it back in December, so I'm hoping beyond hope that the iLife packages are on the disc that came with my MacBook and that they weren't just installed at the factory as a one-time thing. I rely heavily on iPhoto and GarageBand, as amateur photography and music composition are two hobbies of mine.

FireFox seems to be stable for a change, but GIMP still doesn't run properly. I haven't gotten the rest of my applications installed yet, so only time will tell what works and what fails miserably.

For the time being, I am a little miffed. I don't quite regret installing Leopard yet, but it definitely wasn't the smooth transition that I'm used to.

2007-11-03

Technical OS review round-up

I ran across some awesome, highly technical reviews on some of the recently released operating systems. Both go in-depth with the new features, and are definitely a step up on the geek scale from the reviews written for mere mortals.

OnLAMP
did a thorough interview of some developers to get information on the new features, performance enhancements and bug fixes that went into OpenBSD 4.2.

ArsTechnica is a great source of hardware and software reviews. Their coverage of the new stuff in Leopard is second to none.


Both are excellent reading material for those of us who are really interested in the more technical aspects of operating systems.

2007-11-02

Operating systems out the wazoo!

In a matter of two weeks, we've seen a plethora of new OS releases:

I know that I am currently playing with all three:

I'm currently working with a fresh, clean install of Gutsy Server, building an end-all, be-all shared host for a client of mine who wishes to give dozens of end-users their own web space and e-mail domains. I haven't messed with Gutsy on the desktop yet. In due time.

I did an in-place upgrade to Leopard on my MacBook, and it's everything I expected and then some. There are a few minor annoyances, but I'll chalk them up to Apple making an attempt to match and/or exceed Vista's user-interface flair. Unfortunately, I feel that the UI changes in Leopard traded friendliness and clarity for sex appeal. It looks slick, but the graphical changes are skin deep. Functionally, Leopard is still lean and mean. I don't feel like it took a performance hit, and there are boat-loads of new feaures - some of them long overdue (like Spaces, and QuickLook which I'm already a fan of). Things I'm looking forward to testing out: ZFS Support (which requires a developer download to fully implement on Desktop Leopard), Time Machine, and the new "Firewall."

I also did an in-place upgrade to OpenBSD on the virtual machine that I use most often. At first glance, it's the same deal as usual. More hardware support, more robust drivers for certain devices, and some new functionality. I haven't gotten to test it yet, but I'm eager to see the new features in pkg_add, which has never, ever worked the way I would like -- so much so that I actually wrote (and released) a set of scripts to make installing software a breeze in OpenBSD. Finally, I'm interested in seeing how sensorsd works in its new zero-configuration mode on my 1U servers, which have always given OpenBSD's sensorsd some trouble.

I'm sure that HiR will revisit some of these in more detail after really giving them a good shake down.

If you're in or around Kansas City, come join us at the 2600 meeting tonight, Friday October 2nd, 2007 in the Food Court at Oak Park Mall - half a mile east of I-35 on 95th street. The "Official" start time is 5:00PM, but people generally show up as their schedule allows. Look for laptops. That will be us.