I am by no means an expert on this stuff. A few weeks ago, I ran across some suspicious links in spam and decided to see where they led. Some of them claimed to be from financial institutions that I have absolutely no connection to, and claimed that some transaction had failed to occur. Others were variants of shipping confirmation scams, pharmacy junk, etc. I wish I could say that I have no idea how people fall for these, but the fact is that some people will literally click on anything that shows up in their inbox, open any attachment and follow any link, no matter how blatantly fake we professionals think these scams are.
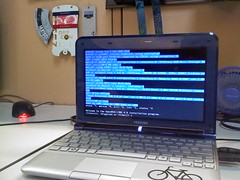
What lay at the tail end of all the script="http://some-site/whatever.js" includes and document.location redirects? A webpage that'd been owned, filled with a huge pile of nonsensical jibberish that could barely pass as javascript, which happened to be part of the Blackhole Exploit Kit.
I've done my share of picking apart obfuscated javascript before, but it had been a while. I gave a presentation of this same thing at KC2600 a few weeks ago. Then, this week, a colleague of mine who missed the meeting ran into the same thing in the wild. I passed on what I'd learned, and decided it might be time to write it up with a little more detail than I did a few weeks back. He made this quick video that covers how he was able to de-obfuscate this particular sample:
By now, I've seen several different obfuscation schemes for BlackHole, but once it's decoded, it all looks about the same.
The introductory basics are simple. Minimize the potential of infection by using a non-privileged account (and perhaps an OS other than Windows) and/or minimize the impact of a successful infection by running a virtual machine that you can blow away or revert to a snapshot of a known clean state. For the malware I'm using in this example, either (or both) of the above criteria will be ample to keep things from getting out of control. Other malware may be more insidious or may target non-Windows platforms. I have a few friends that have unwittingly infected their own workstations while trying to analyze things. Play safe.
Once you have a safe lab environment, your goal is to examine a suspicious link and dissect it.
In my case, I was able to find a few links to malware in my personal mail's spam folder. For the demo at KC2600, I used Malware Domain List to find some Blackhole samples.
In the wild, there may be any number of redirects ahead of the malware. You may see a shortened URL (through goo.gl, tinyurl, etc) which goes to a sparse HTML page with several calls to javascripts hosted on various sites, and those javascripts may simply be a document.location pointing to the malware. I usually stick with curl or wget to pull down suspicious links, and then I keep looking at the content and following the redirects until I strike gold.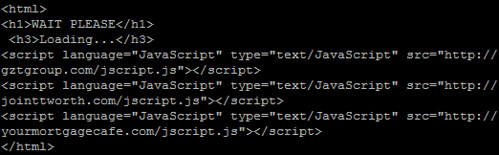
The javascript itself is ugly once you get to it. Sometimes, the byte array is only a few (really long) lines. Other times, like this sample, each byte of the obfuscated data is on a new line, like this: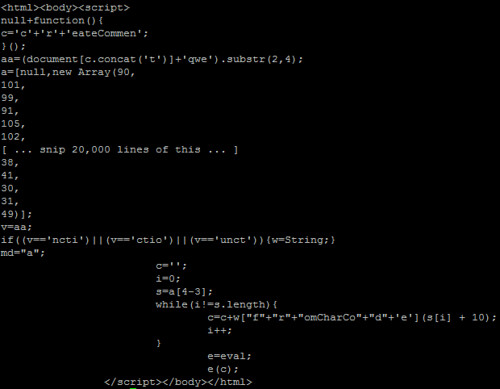
You'll see a few interesting things. There's an "e=eval;" line near the bottom, and then "e(c);" after that. It doesn't take a coding genius to realize that this is a way to call eval(c) without triggering some IDS signatures that look for "eval(". Many samples I saw weren't quite this obvious. In fact, the script in the video has the eval alias in a different part of the script and varies in several other ways if you look closely.
To turn this cryptic payload into something that resembles actual javascript, there's a post on SANS ISC from several years ago covering a few methods. I went with the so-called Tom Liston Method, essentially trying to wrangle the decoded stuff that was destined for the eval function into a document.write within a textarea box instead. Note: I ran into one sample of BlackHole that has a /textarea tag near the beginning, which would keep someone from using this trick to easily view the code with this trick, but I don't think it will eval the stuff behind it since it's been changed to a document.write.
In the above example (and in the video), the content that is destined for eval is stored in variable "c", so you simply replace "e(c);" with:
document.write("<textarea cols="150" rows="100">" + c + "</textarea>");
But obviously, you need to use some brain power here to figure out what trickery they're using to call eval, and what the variable is that needs to be wrapped up in the above document.write command. You may also wish to mess with the rows and columns on the textarea. I know on my netbook, that textarea size is far too unweildy. On my desktop, it's almost perfect.
Make sure the file is renamed as a .html, then load it up in your safe lab environment's browser, just in case something goes wrong.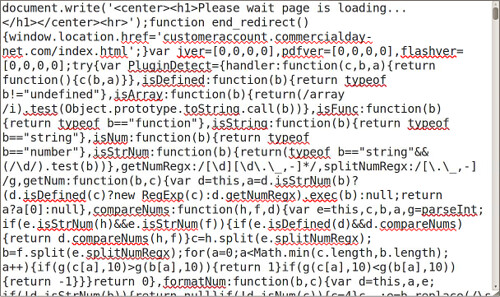
Voila. If you scroll through recent versions of BlackHole Exploit Kit, you'll see that it tries to load an embedded java applet and a PDF, both of which are designed to exploit recent vulnerabilities in JRE and Adobe Reader. Since I don't have Windows running in a VM environment (and I'm not keen on actually infecting any of my Windows boxes) I'm not entirely sure what gets loaded from there. I'm guessing the carberp trojan, given most of what I've read lately. If that's the case, a successful infection would likely block access to anti-malware sites, try to sabotage existing security software, and start gathering sensitive data such as card numbers and online banking credentials.
2011-12-16
Intro to javascript malware analysis
2011-12-04
UPS Battery Hackery: Not highly recommended
Step 1: Disassemble UPS (not shown). That includes unplugging it and removing the battery, and taking the outer shell off. This was a dumpster rescue that was missing the battery entirely. Be careful. Lots of capacitors and transformers inside. See the disclaimer in the title. Not highly recommended.
Step 2: Drill a hole in the case, near where the battery wiring harness enters the battery chamber. I used a 1/2" drill bit for this.
Step 3: Make a grommet. I used some silicone air hose for my aquarium, cut a length of it, then split it. I used a few separate pieces.

Step 4: Re-assemble, Hook up a much bigger battery than what's supposed to be inside.

I accept no blame for any of the many things that could possibly go wrong with this.
2011-11-18
Shell Script: Parse Juniper firewall logs
Juniper firewalls (at least the ScreenOS-based one I have in the lab) have an interesting format for their syslog entries. It's a whole line full of variable=parameter type stuff. Usually, these are in a pretty predictable order, but you can't rely on the nth parameter to be the same in every log entry just due to the fact that different types of traffic have different parameters. You don't see a source or destination port on ICMP traffic, for example. This script reads a log file (I'm using Syslog-NG in the lab), splits the entry up into one parameter per line, grabs only parameters matching the list you provide on the command line, then stitches it back together into one line. I saw no benefit in trying to make the output order match the order provided on the command-line, since some columns are prone to be blank in certain situations anyway. This is quick and dirty, but it does the job for what I need, and I thought I'd share.
axon@moo:~$ ./juniper-parse.sh
Parse columns from Juniper firewall logs
Syntax:
./juniper-parse.sh logfile column [column ...]
Common columns:
action, device_id, dst, dst_port, duration, ip,
policy_id, port, proto, rcvd, reason, sent, service,
session_id, src, src_port, start_time, zone
Here, you can see some of my lab machines trying to fetch updates from an Ubuntu mirror, getting denied because I only allow requests through my proxy server:
axon@moo:~$ sudo ./juniper-parse.sh /var/log/firewall.log action policy_id proto src dst dst_port
2011-11-13T08:35:09-06:00 policy_id=12 proto=6 action=Deny src=192.168.42.75 dst=91.189.92.169 dst_port=80
2011-11-13T08:35:09-06:00 policy_id=12 proto=6 action=Deny src=192.168.42.112 dst=91.189.92.169 dst_port=80
2011-11-13T08:35:10-06:00 policy_id=12 proto=6 action=Deny src=192.168.42.171 dst=91.189.92.169 dst_port=80
2011-11-13T08:35:13-06:00 policy_id=12 proto=6 action=Deny src=192.168.42.171 dst=91.189.92.169 dst_port=80
2011-11-13T08:35:15-06:00 policy_id=12 proto=6 action=Deny src=192.168.42.77 dst=91.189.92.169 dst_port=80
2011-11-13T08:35:18-06:00 policy_id=12 proto=6 action=Deny src=192.168.42.75 dst=91.189.92.169 dst_port=80
2011-11-13T08:35:18-06:00 policy_id=12 proto=6 action=Deny src=192.168.42.77 dst=91.189.92.169 dst_port=80
...
Script below:
#!/bin/sh
#juniper-parse.sh
if [ $# -lt "2" ]
then
echo "
Parse columns from Juniper firewall logs
Syntax:
$0 logfile column [column ...]
Common columns:
action, device_id, dst, dst_port, duration, ip,
policy_id, port, proto, rcvd, reason, sent, service,
session_id, src, src_port, start_time, zone
"
exit 1
fi
filename=$1; shift
until [ $# = "0" ]
do
pattern="$pattern -e ^$1="
shift
done
while read line
do
timestamp=`echo $line | cut -f1 -d" "`
echo "$timestamp `echo $line | tr ' ' '\n' | grep $pattern | tr '\n' ' '`"
done < $filename
2011-11-12
OpenBSD 5.0: Apache, PHP and MySQL
The basic steps for taking a bare-bones install of OpenBSD and adding an AMP stack for web applications hadn't changed much in the past 2 years. Although 5.0 is not seen as a "major update", but simply a continuation of the normal development cycle, the OpenBSD team did a few things that make the installation a bit different this go around. I'll cover some of the recent changes to OpenBSD and its packages in this post, then you can dive right into the updated OpenBSD Chroot Apache, PHP, MySQL setup guide.
Initialization scripts: Starting with OpenBSD 4.9, the RC scripts became modular. This is similar to how NetBSD and FreeBSD have worked for many years. Individual daemons have startup scripts in /etc/rc.d, but rc.conf, rc.local and rc.conf.local still work the same, so it wouldn't surprise me if many OpenBSD users didn't even notice the change. It seems like OpenBSD 5.0 packages for most of the popular services (samba, cups, postgres, etc) are actually creating these startup scripts now. If a third-party application from packages installs a startup script in /etc/rc.d, you can add it to the pkg_scripts variable in /etc/rc.conf.local like so, and it'll magically start.
pkg_scripts="mysqld cups samba"
See the OpenBSD man page for rc.d for more details.
MySQL and chroot: I'm not sure why it didn't dawn on me before, but one really simple way around hard-linking MySQL's socket file into the chroot environment is to simply have your web applications connect to MySQL's TCP port on 127.0.0.1 (not localhost, because that means "use the socket file" in MySQL-ese) I think I'll be doing it this way in the future.
PHP: PHP 5.3 added a lot of features, such that PHP 5.2.x and PHP 5.3 might as well be different major version numbers when complex web applications are considered. OpenBSD 5.0 adds packages for PHP 5.3 for the first time, but PHP 5.2 is still available in the repository. For this reason, the PHP core and module packages are no longer prefixed by php5-, they're just php, php-mysql, etc. Since PHP 5.2 is still supported, the version numbers are used to distinguish them, like this:
$ sudo pkg_add php-mysql
Ambiguous: php-mysql could be php-mysql-5.2.17p3 php-mysql-5.3.6
Further, some configuration file locations have been changed. If you pay attention to the text after installing packages, this shouldn't make much difference. Hint: you can always re-read the post-install notes afterward by using pkg_info -M.
All in all, the recent changes to OpenBSD are welcome. Some of the things I outlined here are areas where OpenBSD had some catching up to do. They've managed to do a lot of proactive stuff in the realm of hardware support and (of course) security and encryption. This is still one of my favorite platforms to tinker with.
2011-10-26
BSidesKC Videos
I actually didn't get to present anything this year. Not for any particular reason. All the talks were awesome and they tied together pretty well. It took me a while to get UStream working on my phone, via 3G. Also, not all the videos worked or uploaded properly, so my apologies in advance for not getting all the talks, and for the crappy video quality, especially on the slides. Slides should be online soon, though.
Here are my archived UStream videos, though. There are only 4 from BSidesKC, and then some older stuff from Maker Faire.
As for my talk on remote pentest appliances: It's probably best I didn't get a spot this year. Turns out that those 1 million writes (or whatever) that USB flash drives are good for go by pretty fast when you're running a full operating system (with databases, etc) direct from the drive for a few months straight. My demo platform died a week ago. I had backups, but I have some re-thinking to do. I'd probably best stick with external 2.5" drive enclosures for this project. I'll be documenting it properly.
2011-10-12
Bulk date conversion with GNU Date
GNU's version of the date command (which ships with almost all Linux flavors) can accept an arbitrary date and/or timestamp as input to display. Combined with the output formatting feature found in all posix flavors of the date command, you can use it to convert almost any format of date or time to a standard format.
axon ~$ date --date "yesterday"
Tue Oct 11 07:47:33 CDT 2011
axon ~$ date --date "Saturday, August 19, 1989"
Sat Aug 19 00:00:00 CDT 1989
axon ~$ date --date "21-APR-2001" +%Y-%m-%d
2001-04-21
So if you have a bunch of dates or timestamps, one per line, that you wish to convert:
axon ~$ cat file
1/21/2011
2/5/2011
2/10/2011
2/20/2011
3/7/2011
3/22/2011
4/16/2011
4/21/2011
4/26/2011
5/21/2011
1/24/2011
2/1/2011
3/6/2011
3/9/2011
May 25, 2011
6/23/2011
7/23/2011
8/10/2011
9-SEP-2011
Sat Sep 10 00:00:00 CDT 2011
... say to ISO 8601 Year-month-date format , you can knock it out easily like this:
axon ~$ cat file | while read line; do date --date "$line" +%Y-%m-%d; done
2011-01-21
2011-02-05
2011-02-10
2011-02-20
2011-03-07
2011-03-22
2011-04-16
2011-04-21
2011-04-26
2011-05-21
2011-01-24
2011-02-01
2011-03-06
2011-03-09
2011-05-25
2011-06-23
2011-07-23
2011-08-10
2011-09-09
2011-09-10
2011-09-21
wpa_supplicant on the command line
Here's the quickest and dirtiest guide you'll see to getting connected to a WPA/WPA2 PSK wireless network from the command line on Linux. Obviously, replace the SSID, passphrase and interface (in my case, wlan0) with the appropriate settings for your configuration. I've never really had to bother with hopping on a WPA network on Linux without the GUI Network Manager before. I was surprised at how easy it was. Tested on BT5 and Ubuntu Server:
$ wpa_passprase mynetwork secretpassphrase > wpa_supplicant.tmp.conf
$ sudo wpa_supplicant -iwlan0 -c wpa_supplicant.tmp.conf&
$ sudo dhclient wlan0
A few notes:
* wpa_passphrase will prompt you for a password if you don't use it on the command line. You may want to clear your history out or rely on this prompting feature to keep network credentials from being stored insecurely. You should also remove the plaintext version of the password from the resulting configuration file.
* If the SSID is "hidden" (which is actually less secure!), you need to add another line to the configuration file: "scan_ssid=1"
2011-08-30
Installing OpenVAS on BackTrack 5
In preparation for a talk I'll be giving at BSidesKC in October, I've been playing with BackTrack 5 and OpenVAS. OpenVAS was a little bit of a pain to get compiled on Ubuntu, but now that the OpenSUSE guys have built .DEB packages of a fairly recent version of OpenVAS (4.x), it's pretty easy to install on most modern Debian-derived systems. In fact, this works on Ubuntu Server as well, and I have tested it on 10.04 LTS. You just have to do it as root, like you'd do on BackTrack, because I was too lazy to write these instructions with "sudo" in front of each line (and using "| sudo tee -a" instead of the append-redirect for adding a quick line to the sources.list file).
This will be a rough post just to get my install notes down. The instructions on OpenVAS' website do not currently work as designed (however, I'm basing this post on them) and at the time of writing, the OpenSUSE build packages are broken in a number of ways that are easily fixed. For example, the openvas-scanner package provides a startup script in /etc/init.d, but the greenbone-security-assistant, openvas-manager and openvas-administrator packages do not. Some of the binaries are built to read files from /var/lib/openvas while others go for /usr/local/var/lib/openvas. Whatever. We'll deal with it. Also, a lot of these command lines are insanely long and probably will get cut off or line-wrapped by HiR's template. Copy. Paste. View Source. I trust our readers to be smart enough to figure that out.
Before starting, I recommend making sure you're up to date:
apt-get update && apt-get upgrade
Add the OpenVAS branch of the OpenSUSE Build Service to your apt sources, get the apt key and update your repository cache:
echo "deb http://download.opensuse.org/repositories/security:/OpenVAS:/STABLE:/v4/Debian_5.0/ ./" >> /etc/apt/sources.list

apt-key adv --keyserver hkp://keys.gnupg.net --recv-keys BED1E87979EAFD54

apt-get update
Next, install all the fun packages and dependencies needed in one run of things. Consider adding "gsd" to this package list if you think you'll want to use the Greenbone Security Desktop GUI interface. I plan on doing no such thing.
apt-get -y install greenbone-security-assistant openvas-cli openvas-manager openvas-scanner openvas-administrator sqlite3 xsltproc texlive-latex-base texlive-latex-extra texlive-latex-recommended htmldoc alien rpm nsis fakeroot
Make some directories and some symlinks to compensate for the clustercoitus of path discrepancies in the OBS packages.
mkdir -p /var/lib/openvas/private /var/lib/openvas/CA

mkdir -p /usr/local/var/lib/openvas /usr/local/var/lib/openvas/users

ln -s /var/lib/openvas/users /usr/local/var/lib/openvas/users

ln -s /var/lib/openvas/CA /usr/local/var/lib/openvas/CA

ln -s /var/lib/openvas/private /usr/local/var/lib/openvas/private
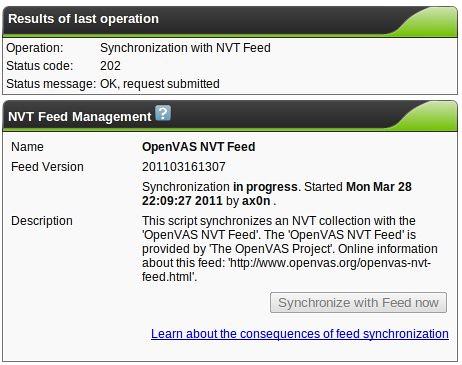
Make the openvas server cert, fetch the latest NVT plugins, and make the client cert used by openvas-manager:
openvas-mkcert -q

openvas-nvt-sync

openvas-mkcert-client -n om -i
Start the OpenVAS Services manually, rebuilding the OpenVAS Manager database once your get openvassd started (it'll take a good couple of minutes to load all the plugins), and all that jazz. Hey, Greenbone Security Assistant (the Web UI) works over https when you install it this way! It would only do HTTP when I installed it from source.
openvassd

openvasmd --rebuild

openvasmd

openvasad

gsad
Add an admin-level account for yourself. I suggest a different username for the -u argument. -r specifies the role, and you want to leave that value set to "Admin" if you want to be able to do much with OpenVAS.
openvasad -c add_user -n axon -r Admin
At this point, you should be good to go. Hit https: on your machine and have a blast.
Look for another article related to BackTrack 5 and OpenVAS right after BSidesKC. I've got something fun up my sleeve. If you're anywhere in the region, you should probably just show up. It'll be a good time.
2011-08-29
Store extra MicroSD cards in the original case
This is quick and silly, but useful to me. Maybe it'll help others.
A lot of my gadgets use MicroSD and SD cards. I've found you can get MicroSD's pretty cheap, so now I just buy those and carry an SD adapter around for the times I need to put a MicroSD into my digital camera or laptop. I bought my SD Card Adapter in a set (with two 8GB microSDs included), so it had space for the adapter with one MicroSD already inserted, and another space for one MicroSD card. The case is conveniently-sized, but I wanted it to be able to hold more MicroSD's.
I started by placing one MicroSD on the inside edge of the open case, resting on the plastic tabs that are designed to hold the original MicroSD in place. I faced the new one pointing the opposite direction (broad end to the right) from how the original MicroSD is supposed to sit (broad end to the left). Then, as shown below, I made two slices in the plastic with a box cutter to trim the tabs to the right length to allow more MicroSD cards to fit in the case.

Not shown: I removed the SD card and used the box cutter to cut the tabs loose from the bottom of the case.
Now, two SD cards can fit stacked on top of one another in the space next to the original MicroSD. With one SD card in the adapter, another in the original spot and two stacked next to it, I can now carry a total of four MicroSD's and the adapter in this small and convenient case.


2011-08-10
2011-08-05
Awesome HNN Schwag!
HNN came into existence around the same time we did. They went dormant around the time time we did. They came back a while after we did. Back when HiR was just getting started, HNN would diligently and without fail link to our new e-Zine releases. They've always been better at maintaining a consistent news schedule than we have, though.
We were surprised and thrilled to get this little care package in the mail this week:
Thanks!
2011-07-28
Banned by Google+

That didn't take as long as I thought it might. A rundown of what happens: Your google profile goes wonky as shown in the photo. GMail, Docs, Picasa, Voice and Talk all work fine, although anywhere you would expect to see your profile photo, it will be missing. You can view other people's content in Buzz, Reader ans Plus, but you cannot share, post, comment or otherwise produce any content on those services, nor, apparently, can you follow new contacts either.
Most people that I collaborate with elsewhere know me as ax0n. My real name, address, phone number etc are no secret, but most people don't even know who I am by my given name.
By for now, Google+.
2011-07-24
Lock Fail
Simplex-style pushbutton locks are ubiquitous in the medical industry. They're used on medicine carts, cabinets, lockers and doors. This is a cabinet that is designed to hold a thin-client workstation and/or patient record portfolios, and restrict access to ethernet ports.


Yep. You can open this one by sliding the exposed latch with your finger.
2011-07-17
Sysadmin Sunday: parse strings with spaces using shell script
I run into this once in a while: I'm trying to perform some operation on a bunch of files or a big line of text, and a space in the filename or text file janks everything up. Take for example all these recordings from a podcast that got batch-named with spaces in them.
2011-05-23
OAMP Update: Secure OpenBSD, Apache, MySQL and PHP
I got tired of essentially re-writing the same article over and over again, yet it seems with each release of OpenBSD and each OAMP install I do, things get just a little more refined. So I present to you a living document on its own page here at HiR Information Report. It's been written so that it is not specific to a distinct architecture or version of OpenBSD, so long as the proper packages exist on the OpenBSD mirror sites. This has been updated and tested on OpenBSD 4.8 and the recently-released OpenBSD 4.9, i386 architecture only.
Secure OpenBSD, Chroot Apache, MySQL and Suhosin Hardened PHP Installation Guide
2011-05-19
Why I'm coming home to OpenBSD
Although those who know me will tell you I love OpenBSD, I'm generally an operating system agnostic. I enjoy tinkering with OSes, and always have. There have been a few I tried and couldn't enjoy for the life of me (Mac OS versions prior to OS X, PalmOS, HP-UX and plan9 among them) but since 1997, OpenBSD has always felt like home to me, and I've long been a little bit of a fan.
2011-04-25
Using Severe Weather WX Alert on Yaesu Handhelds
I have a Yaesu VX-7R and VX-2, both of which are great handheld radios. Deep in the menu system, each one has a "WX Alert" option. It's item 20 in the VX-7R's menu, and the VX-2's menu items are in alphabetical order, so look for "WX ALT" there. After enabling this option, my radios still failed to alert me when the National Weather Service issued alerts via their NOAA Weather Radio system. What gives? The manuals that came with my radios are very vague about how to use this feature, and Googling around, it seems like a lot of people have the same problem.
The trick is that you have to be scanning!
On the VX-7R, you have to be scanning the weather band for this to work. If you scan the weather band with WX Alert enabled, it will silently pause on any NOAA Weather Radio stations it finds, listening for the alert tone without breaking squelch. If it finds one, it will stop, open the squelch and play the weather alert. I recommend using the SUB band for this. Here's how you do it.
* Press [F] then [0] to enter the menu, and scroll to item 20. Enable WX Alert by pressing the [MAIN] or [SUB] buttons, then momentarily press PTT to exit the menu.
* If you have only the MAIN tuner up, press and hold the [MAIN] or [SUB] button to see the dual tuners. Momentarily press [SUB] to select the SUB tuner.
* Press [F] then [3] to move the SUB tuner to the WX band.
* Press [F] then [1] to start scanning the WX band for weather alerts.
* Press [MAIN] to start controlling the MAIN tuner, and use the radio as normal.
On the VX-2:
* Press and hold the H/L button to enter the menu, scroll to "WX ALT"
* Press H/L momentarily, then use the VFO knob to enable it.
* Press PTT Momentarily to save the setting.
* Press [F] followed by the [WIRES] button in the bottom left corner to enter special memory mode
* If needed, press [BAND] repeatedly until the weather band shows up.
* Press and hold the [BAND] key to scan the weather band.
The VX-2 will silently pause on any NOAA Weather Radio stations it finds, listening for the alert tone without breaking squelch. If it finds one, it will stop, open the squelch and play the weather alert. I also found that if this option is enabled on the VX-2 and you're scanning other memory frequencies, the radio will occasionally jump over to the weather band and listen for the alert tone. You should probably have the WX band tuned to the frequency of the nearest weather radio transmitter, because I don't think it scans the whole weather band, only the station that was last used in the WX Special memory mode.
Of course, not all Yaesu radios have these features, and these steps may not work exactly the same for all Yaesu radios that support WX Alert.
2011-04-18
The Real Insider Threat
Today, I saw this interesting piece on insider threats posted to CERT, and was somewhat baffled. I stewed on it a bit, but a Google Reader comment by Carnal0wnage spun up my rant engine. Here, people are actually being urged to spy on their peers then name them and shame then, as if it's totally normal to put bear traps in the server room and roll your own ECHELON, lynching in the commons anyone who dares to raise the ire of the great and awesome security team. They titled their session "What's working to stop these attacks?" It's us versus them.
When I was still a student, years before my real career in information security would take hold, it was commonplace to hear that some unfathomable percent of attacks are from malicious insiders. Maybe it was true in the 1990s. After years of leaving corporate workstations and academic lab computers hanging out on the Internet with public IP addresses and no firewalls, administrators were finally getting a clue, NATting workstations and putting up chintzy first-generation port-blocking firewalls. Students and curious employees were suddenly the ones with unrestricted access to internal systems protected -- if you wish to call it that -- by these prototypical security systems. Maybe this logic made sense back then.
Be that as it may, I've seen more data loss from people bypassing draconian security policy than I've seen data loss from the rare disgruntled trade-secret packrat with one hand in the cookie jar and one foot out the door. That's not to say these things don't happen. They do! But they're not the typical modern insider threat.
At my last job, I would occasionally have the option to work remotely for server maintenance, or instead drive 15 miles to the office at 11:00 PM on a Saturday night, and stay there until 4:00 AM Sunday morning. Working from home meant this:
- Firing up some proprietary piece of VPN software that only ran on Windows.
- Using a 2-factor authentication token to get into the VPN.
- Using RDP to access a "secure" sandbox server, which was pretty much the only thing the VPN would let you access remotely. This required the use of the 2-factor token again, but you had to wait to make sure you didn't use the same one-time key twice in a row.
- Using RDP from that server to get to my desktop, which also ran Windows.
- SSHing from my workstation to a central administration server that was dual-homed and could actually access the servers I needed to work on.
- Performing the work on the servers.
2011-03-29
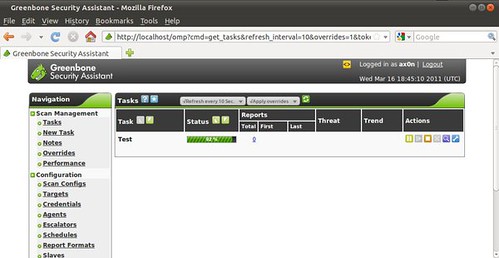
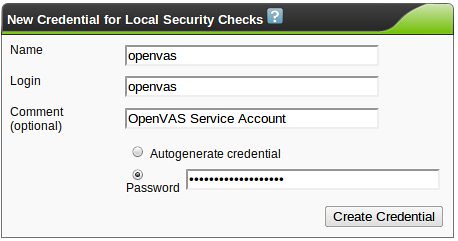
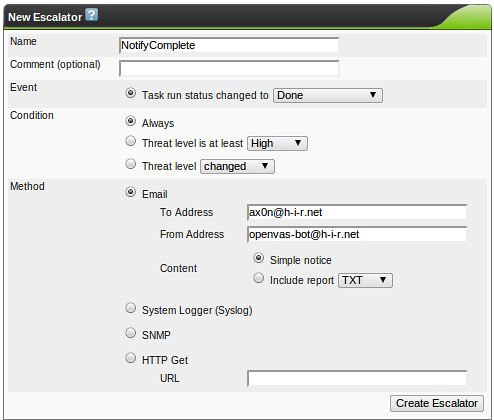
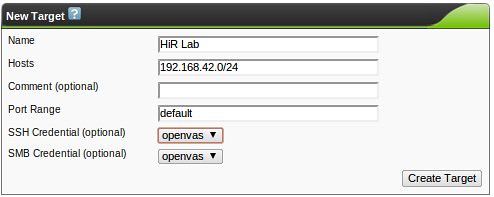
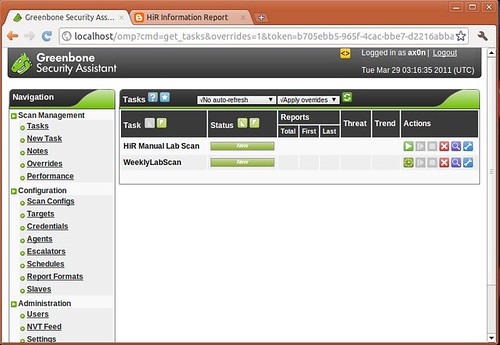
OpenVAS & Greenbone Security Assistant Basics
This is the second part of a series on OpenVAS, the open-source vulnerability scanner. In my last post, I walked you through compiling the various pieces of OpenVAS and getting it up and running. Now it's time to talk about the fundamentals. For this and future posts, we'll be using the web front-end to OpenVAS, called Greenbone Security Assistant, and we'll assume it's running on your local machine.
Why bother with OpenVAS, or vulnerability scanning in general?
echo "Starting OpenVAS Scanner Daemon..."/usr/local/sbin/openvassd && echo [ OK ]echo "Starting OpenVAS Manager Daemon..."/usr/local/sbin/openvasmd && echo [ OK ]echo "Starting OpenVAS Administrator Daemon..."/usr/local/sbin/openvasad && echo [ OK ]echo "Starting Greenbone Security Assistant Web Interface..."/usr/local/sbin/gsad --http-only && echo [ OK ]echo "Downloading NVT Updates..."/usr/local/sbin/openvas-nvt-sync && echo [ OK ]
0 4 * * * /usr/local/sbin/openvas-nvt-sync
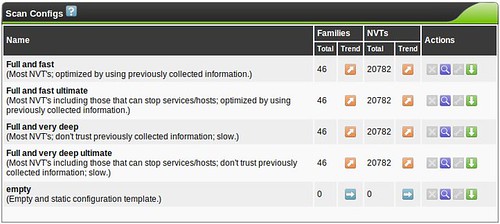
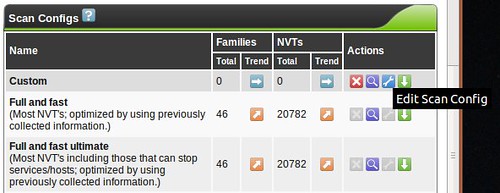
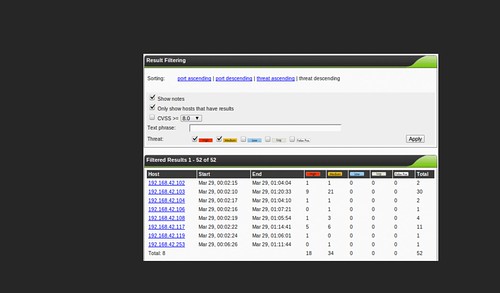
You don't need to create a custom scan config to get started with OpenVAS, but If you decide to create a new Scan Config, you'll have the ability to edit it (the wrench will not be greyed out)
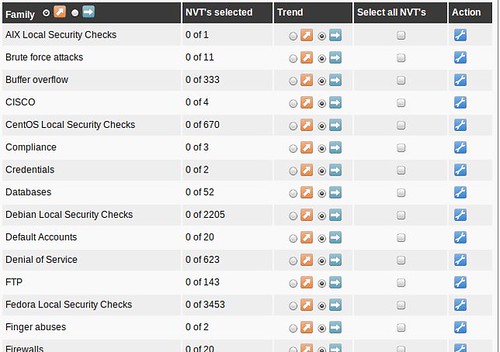
and you'll be faced with a huge assortment of scanning options allowing you to fine-tune your scan. You'll also see options for so-called NASL Wrappers, which are scripts that help OpenVAS utilize third-party tools such as nmap, nikto, w3af and others. Tuning your scan parameters is important, but complicated enough that it's beyond the scope of this series. Most vulnerability scanners I've used (Nessus, ISS, etc...) have a configuration section like this, and it's always a very, very deep rabbit-hole. Mastering this is a bit of an art, but I usually break the enterprise up into "classes" so that like-systems are scanned with relevant checks so I'm not throwing 5,000 futile Windows checks at the Linux servers in the DMZ, for example. Feel free to leave me a comment if you want me to discuss this kind of classification setup in more detail.
When building custom configs, I recommend using the existing scan configs as a template, and tweaking things from there to get your bearings. Try the "Full and very deep" scan first if you have any doubts. It's unlikely to knock anything off the network, but be careful! The "Trend" radio button selects whether this scan config will grow and import new NVT plugins or remain static with only the plugins you selected for that particular plugin family. If you start using OpenVAS frequently, you'll probably want to become familiar with tuning scan configs to get rid of false positives or enable more features.


2011-03-21
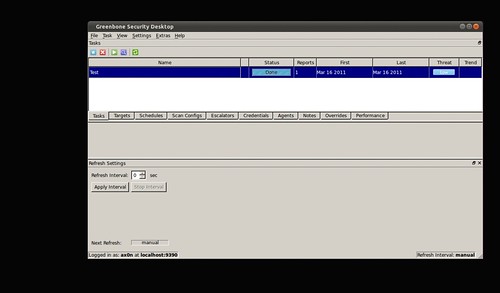
OpenVAS on Ubuntu 10.10 Maverick Meerkat Install Notes
When Tenable took Nessus through a code re-write and closed its source, the old code was forked a few times. As far as I can tell, OpenVAS is the strongest surviving variant. There's a really old version in most Linux distributions' package repositories, but it's out of date, the 2.x version.
- Greenbone Security Desktop, which looks a lot like the older Nessus GUI
- Greenbone Security Assistant, a clean web UI similar to the new Nessus, except more feature rich
- OpenVAS-cli, a tool that's good for lightweight scheduled scanning
# bindings/
# doc/
# gsa/
# gsd/
# image-packages/
# openvas-administrator/
# openvas-cli/
# openvas-client/
# openvas-compendium/
# openvas-libraries/
# openvas-manager/
# openvas-packaging/
# openvas-plugins/
# openvas-scanner/
# sladinstaller/
# tools/
# winslad/
Create a CA (walk through the prompts):
sudo openvas-mkcert
2011-01-22
Building 2D Movie Glasses
3D movies have gained ridiculous ubiquity in the theater lately. Some movies tend to use the effect to a more pleasant degree than others, but I think most of us can agree that many movies don't need to be released in 3D. Some people get headaches or feel distracted by the over-use and exaggeration of the stereoscopic effects of these movies.
If you've watched a 3D movie, You've probably taken your glasses off in the middle, only to see a double-vision mess caused by being able to perceive both video channels at the same time with both eyes. Watching a movie this way is likely even more frustrating than enduring the side-effects of 3D.
Obviously, I'd suggest not seeing movies in 3D if you are prone to these side-effects, but perhaps your group of friends just HAS to see this movie in 3D, or maybe your schedule makes it more convenient to see a 3D showing. Here, I'll show you how to take two normal pairs of disposable RealD glasses and hack them so that your eyes only see one of the two video channels, effectively stripping the 3D effect from the big screen. The sad part: you still have to wear the stupid glasses.
There are several families of 3D video. RealD(tm) is currently the most commonly deployed 3D cinematic technology, and it uses something called circular polarization. Some of you might be familiar with polarized lenses used in sunglasses and camera filters. Those are usually linear polarizers. Linear polarizers are also used on LCD screens and have a number of other commercial applications. It would be possible to show movies with the left and right channels polarized linearly at right angles to one other, but this would force moviegoers to hold their head in such a way so that the lenses remained perfectly level, or else video brightness and channel separation would fall to pieces, although brightness always suffers a little when using polarized lenses.
Circular polarization works similarly, but the light is polarized in a helical fashion. This is a much more complicated process that solves several of the problems with linear polarization. One channel is polarized in a clockwise helix while the other channel is polarized counter-clockwise, allowing the lenses to filter out the other channel without being constrained the way linear polarizing lenses would as I mentioned above. The easiest ways to demonstrate this are to look through a pair of these disposable goggles and into a mirror, or look at one pair of 3D glasses through another pair. Apologies in advance for using crappy camera phone pictures for this. It's all I had on hand.


You would think all we have to do is take one of the lenses out and flip it over, so that both lenses only show the clockwise or counter-clockwise channel. I thought so too, but there seems to be more at play than I suspected and that won't work. Edit: each lens contains two filters bonded together, a polarizer and a "quarter wave plate", and flipping one lens over puts these filters in the improper order.
You'll have to tear into two pairs of 3D glasses, but the good news is that you can make two pair of 2D glasses out of them and give one to a friend. In a pinch, you could probably do all of this right there in the theater with nothing more than a simple Classic Swiss Army Knife. I'd recommend making these ahead of time, though.
If done correctly, this will get rid of most of the artifacts of stereoscopic cinematography, and hopefully relieve any side effects you might suffer.
RealD frames are snapped together in two pieces. With a small screwdriver, knife or other prying device, you can separate the inner part of the frame. We just need the lower part of one side of the frame to come apart far enough to slip the lens out.
Slide the lens out of the frame, being careful to not scrape it up.
Perform the two above steps on the opposite lens of the second pair of glasses.
Using scissors, trim the thin lens material so that you can fit each lens into the "wrong" side of the other frame. Don't trim so much that it's prone to fall out of the frame, but trim enough that it won't bend or crease when you put it back into the frame.
Carefully slide the lens into the other frame, being sure it slides into the thin slot snugly. Remember, we're taking the left lens of one frame and putting it into the right side of another frame, and/or vise versa. You don't really need to put the second frame together if you only need one set of 2D glasses.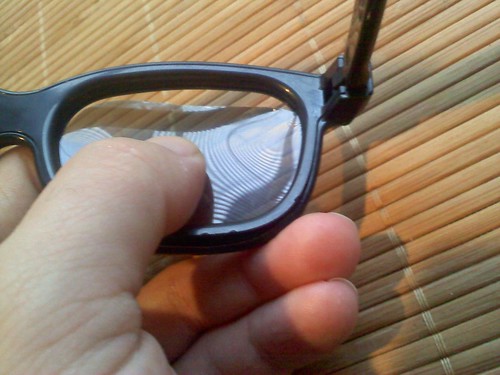
Snap the frames back together, then wipe the lenses clean, as they're sure to have fingerprints all over them.

If you did it right, you should see that the movie looks the same through both eyes, and that looking at yourself in the mirror shows both dark lenses through both eyes, instead of just the lens you're looking through being dark.
2011-01-20
Introduction to encrypted Internet chat
In the middle of a discussion about IRC chat, I mentioned SILC, which apparently, quite a few people haven't heard about yet. It's not terribly surprising. Once quite popular, IRC is now a fringe communications platform in the wake of instant messaging. If IRC users represent the fringe of Internet society, then SILC users are the consummate outliers.
This post was made mostly to go along with a quick presentation I'm doing for Cowtown Computer Congress this evening. This is a quick and dirty rough draft that will likely be edited for speling and grammer err0rz.
SILC is Secure Internet Live Conferencing, and it borrows many things directly from Internet Relay Chat, fixing some of the weaknesses of IRC by using certificates, key exchange algorithms, digital signatures and encrypted connections. The end result is a chat platform capable of being used by groups or one-on-one communication where you can be absolutely sure you are communicating with the person you think you're communicating with. With the appropriate measures, you can also be certain that messages can't be trivially intercepted or forged by outsiders, even if the SILC server or network has been compromised. When talking in public groups (equivalent to IRC channels), only those in the group can see the messages due to a shared session key. People sniffing your local network segment won't know what's being said or with whom you're communicating.
While on the topic of encrypted chat, I'll also discuss Off-The-Record, a cryptographic plug-in that sits on top of certain instant messaging platforms (like AIM) by sending strong-crypto messsages over base64-encoded strings between users. To this end, it's usually easy for someone monitoring the network to tell with whom you're communicating, but nearly impossible to determine the actual contents of said communication.
Of course, some of these things have been recently been addressed, albeit not nearly as thoroughly, by using SSL/TLS. Several modern IM protocols rely on SSL/TLS, and certain IRC implementations also can use SSL now. These are beyond the scope of this article, but worth mentioning in passing.
There are two actively-developed clients that I will cover:
- A SILC plugin for irssi, a popular IRC client, which works best on Linux
- Native SILC support in Pidgin IM, which works on Mac OS X, Linux and Windows. Pidgin plugins for Off-The-Record exist for Mac OS X, Linux and Windows as well.
Irssi is my favorite IRC client. It's a curses-based program that runs in the terminal. The SILC plugin for irssi can be found in many package repositories. For example, installing it (and all dependencies, including irssi itself) in Ubuntu is as easy as:
$ sudo apt-get install irssi-plugin-silc
If you're familiar with IRC, it uses some familiar derivatives of commands:
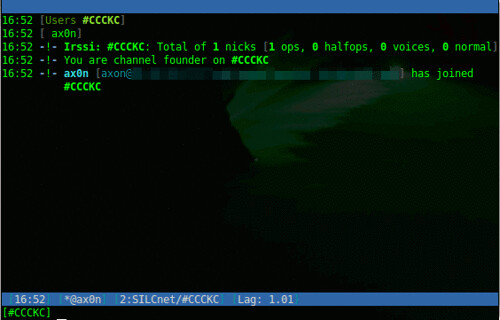
Load the SILC plugin, prompts for your private key passphrase
/load silc
Connect to a SILC server
/connect -silcnet SILCnet [silc-server]
Join a group (or channel)
/join [group]
Grant operator status to a user in a group you control
/cumode [group] +o [user]
Send a one-on-one message to another user
/msg [user] [message]
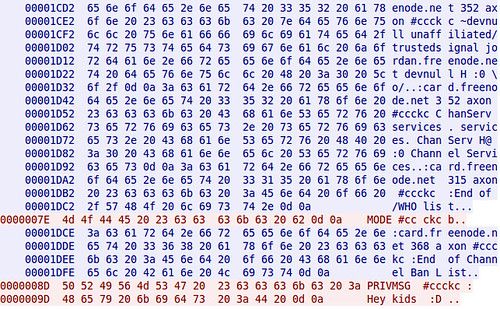
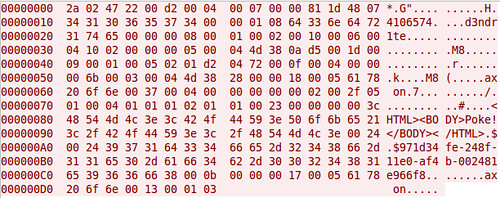
To compare, this is a screen shot of captured traffic from plain-text IRC, followed by one from SILC.
Pidgin
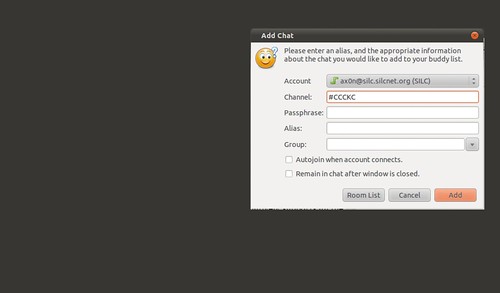
Pidgin is a cross platform open source chat application that natively supports all the major Instant Messaging protocols, including AIM, SILC and IRC. Once you've added a SILC server (via Accounts), you simply go to the Buddy List and select "Add chat" to join a group.
Off-The-Record
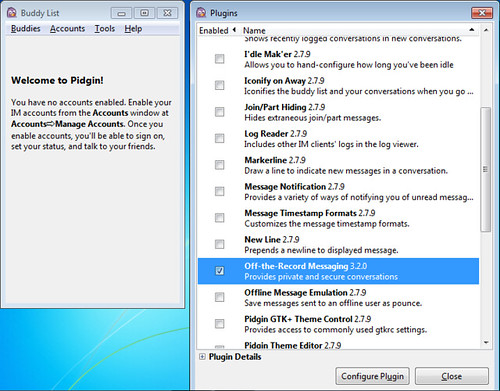
Adium, the Pidgin port for Mac OS X comes with OTR built right in!

Installing on Ubuntu is easy, as this will install Pidgin and the OTR plugin and all dependencies.
$ sudo apt-get install pidgin-otr
To get it up and running on Windows, first install Pidgin, then run the OTR plugin installer.
On Linux and Windows, you'll have to enable the plugin and generate a key before you can use it.
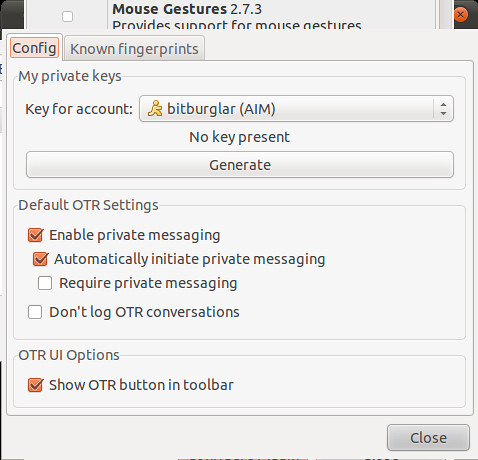
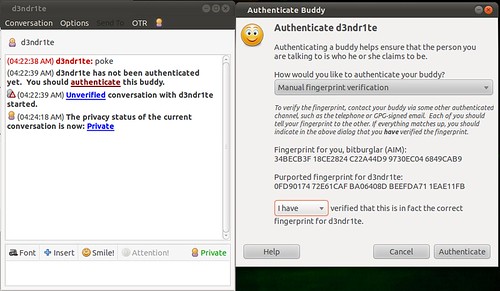
And then, once you initiate a chat with someone who also has OTR, you will need to verify their key. The best way to do this is in person or over a trusted communications platform. If you know their voice well enough, a phone call would probably work just fine.
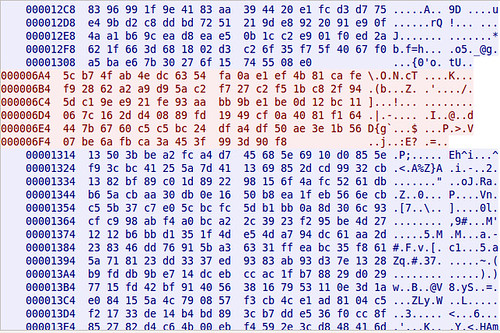
Although AIM uses SSL by default these days, it's not uncommon to see AIM go across the wire in cleartext. Here's a screen shot comparing packet captures from a cleartext AIM session and one using OTR. You can't see it in the screen shots because of how large the OTR message is, but the OTR session only encrypts the message content itself. You can still see the names of the parties communicating.
That's all I've got for now.


