nginx (see also
nginx(8))
has been added to OpenBSD, ultimately to replace the Apache 1.3 derived
httpd(8).
For new installations, you are encouraged to utilize nginx rather than
httpd, existing installations are encouraged to start planning replacing
the stock httpd with nginx.
With Apache 1.3 being awfully long in the tooth, most of us saw something like this coming. With that, there's a new walk-through that covers the basic configuration of nginx, MySQL and php-fpm to create a working, secure and chroot-enabled web application environment in OpenBSD 5.2.
Some changes I noticed right away while updating the walk-through:
pkg_add defaults to interactive mode. For example, when trying to resolve ambiguous packages (multiple versions available in the repository), it prompts you for which package you want to install. It will also do this for dependencies, and may ask other questions during installation.
The MySQL Server package comes with an optional-use script to help lock down MySQL and remove all test data.
You can see the detailed changelog for more details. I noticed that nginx ships by default now, and that there have been other improvements all around. This post is even coming from within Chrome on OpenBSD 5.2.
From their website: "OSSEC is an Open Source Host-based Intrusion Detection System that
performs log analysis, file integrity checking, policy monitoring,
rootkit detection, real-time alerting and active response."
I use OSSec in several places. In my home lab and on my web servers (hosted elsewhere) for starters. While OSSec alone can't take the place of an enterprise-grade SIEM, the HIDS component can work well with them. If you're running a relatively small shop on a limited budget, it might be good enough, especially if you're willing to invest some time into tinkering.
I thought it'd be easier to report on OSSec's alerts if it were somehow able to store them in a database. As it turns out, OSSec can be made to log much of its information to either MySQL or PostgreSQL, but the documentation is a bit spread out and hard to follow.
First things first, you'll have to (re)compile OSSec, and and you'll need the MySQL bits and pieces for both OSSec MySQL connector as well as a working MySQL server, assuming you want MySQL to work locally with the OSSec server. So make sure you have all the packages you'll need:
On Ubuntu 12.04 LTS and with OSSec 2.6.0, I had to apply this patch: http://pastebin.com/Pg3pDtr0 - It changes one line in a single Makefile, but it wouldn't compile properly otherwise.
In the "src" directory of the OSSec source code, run "make setdb" and if the proper libraries are installed, you should see something like this:
Error: PostgreSQL client libraries not installed. Info: Compiled with MySQL support.
Before you install OSSec, you need to create the database, add a MySQL user for OSSec to use, and import the schema. You can change the username and password below to suit, obviously.
mysql -uroot -p[password] mysql> create database ossec; mysql> grant INSERT,SELECT,UPDATE,CREATE,DELETE,EXECUTE on ossec.* to ossec@localhost; mysql> set password for ossec@localhost=PASSWORD('53Cr37p4ss'); mysql> flush privileges; cd src/os_dbd (in the OSSec source code directory) mysql ossec -uossec -p53Cr37p4ss < mysql.schema Go back tothe OSSec source code base directory, and run install.sh (as root or with sudo) - Your options will vary, but the defaults are usually sane.
Once OSSec is installed, you need to add the following snippet to the end of ossec.conf (usually in /var/ossec/etc) - Remember to make sure you edit this to reflect your actual database information.
To enable the ossec-dbd database logging, you must run /var/ossec/bin/ossec-control enable database
Restart ossec (/etc/init.d/ossec restart) and you should be good to go. On my installation, OSSec immediately begun populating the "signatures" table, and after a short while, alerts were logging to the "alert" and "data" tables.
My next step is to generate some scheduled email summary reports, but all in all, having logs in a database will certainly make poring through them a much easier task.
Being an amateur radio operator and a nerd in general, I make sure I have emergency power available. This is in the form of gel cells, several UPS units and of course the obligatory inverter for road trips. I have a solar panel that can put a reasonable charge back into my gel cells with one bright day's worth of sunshine. I don't feel like I need a generator. If the power goes out for a week or two over a wide area, most of my gadgets will be marginally useless, and I'm pretty comfortable living without electricity, as I go backpacking and camping frequently.
I do use my netbook for certain digital modes with amateur radio, and I could see it coming in handy for emergency operations. Considering the electronics I might choose to use sparingly in a power outage, I did some experimentation over the weekend.
My netbook requires 19VDC, and It seemed silly to me to turn DC into AC, and step it all the way up to 120 volts, just to step it back down, rectify and filter it for devices that fundamentally operate on DC to begin with. The same goes for desktop PCs that take 120VAC and turn it into +-12VDC, 5VDC and 3.3VDC. The rest of my "ham shack" runs fine on car batteries. Why not my computers?
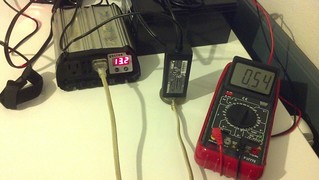
In all of the following photos, you'll see amperes on the display, but I'll reference watts. The battery pack was sitting at 13.2 volts for all of these tests.
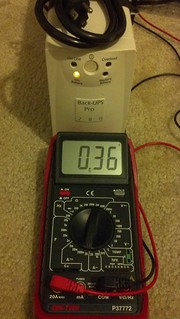
To baseline this thing, I went with the obvious choice of plugging into one of my UPSes. I have a feeling this is how most folks would choose to operate their computer in a power outage if it were an option.
The UPS consumes a paltry 5 watts without a load. This is looking pretty good.
Plugging the power brick in bumps consumption up less than a watt for a total of about 5.7 Watts.
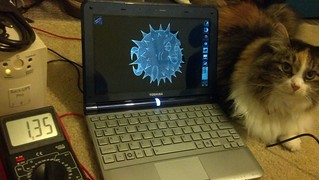
With the laptop booted up and running on the UPS, battery consumption tops out at around 20 watts. I noticed numbers higher than 1.5 amperes momentarily. One of our cats also has some obsession with laying on warm electronics such as power bricks.
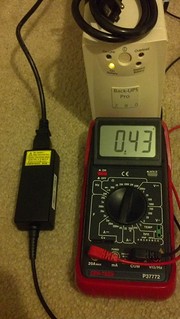
Next, I tried my 450 Watt inverter. Without a load, it uses about 6.6 watts. Not terribly surprising. It has two noisy fans and a display to power as well.
Plugging the power brick in without any load bumped consumption up to 7.1 watts. This is similar to what happened with the UPS, but still less efficient.
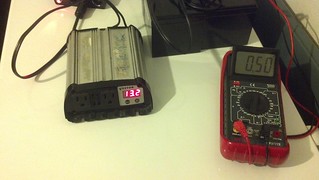
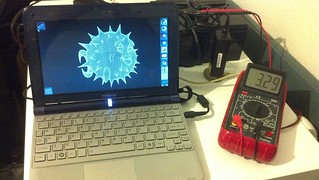
Attaching the netbook spiked the load to about 43 watts total. Ouch!
Finally, I tried operating my laptop on a DC-to-DC power supply. This was vastly more efficient than relying on an inverter, and considerably better than my UPS as well. The DC-DC converter consumed 11 watts from my battery pack.
The clear winner is obviously the DC-to-DC converter. If the laptop were the only thing in use, I could expect about four times the run time from the DC converter compared to using my inverter.
The DC converter I used was originally for a Macintosh G3 PowerBook, and was set for 24 VDC. My netbook requires 19VDC, and I was fortunate enough to find a set of potentiometers on my old DC-DC supply to allow me to adjust the voltage, and then I hacked a plug onto it that works for my netbook.
Most laptops require somewhere between 15-24 VDC, and are sensitive to dirty power. Good DC-DC converters are capable of dealing with 10-30+ volts of input and provide stable, clean power on the output suitable for sensitive electronics. They're easy to find, if a little pricey compared to traditional transformer bricks. They are often sold as "Laptop Car Chargers"
Similarly, a company called PicoPSU makes a tiny solid-state DC-to-DC power supply that plugs directly into a computer motherboard's ATX connector and provides power cables for a few hard drives or other peripherals as needed. They're not designed to run powerful desktops or servers, but work fine for lower-power workstations or "book PCs." You'll have to find a way to power a monitor, though. Hint: many LCD displays can be powered by a DC-DC converter, too.
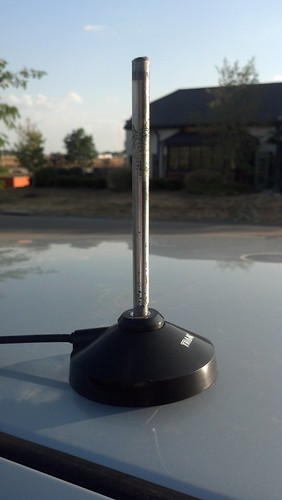
It started as a simple trip to the hardware store. My mission was to find some 3/8" threadrod at 24 threads per inch. I was going to chop it with my dremel to a length of 6 and 9/32 inches long and use it as a 1/4 wavelength antenna in a mount similar to the one shown above. What I found were many kinds of threadrod, but nothing that would screw into either of my antenna bases.
I opted for a piece of 3/8" smooth rod without threads, figuring I could just wander over to the hardware store's selection of threading dies and pick up the one I needed to cut a dozen or so threads into the rod. There, I found many dies, but not the 3/8" x 24 I needed for the project. There was a spot for the die I needed, but it was empty.
I finally cornered a sales associate, who looked up the part number, said they had one in stock, and even scoured the shelves looking to see if someone had placed it in the wrong spot. What happened next took me by surprise. The associate went around to the back shop, pulled a full set of dies out of the tool chest, found the one I needed, and brought me around to the vise and tossed me some cutting oil and gloves so I could tap threads onto the rod myself. While I was working away, curiosity got the best of him. "What are you building?" he asked. I explained that I was building a very cheap antenna, and explained that I was going to take it home and cut it to length so that it resonated at about 448 MHz. That's about the time he took me over to the chop saw with a cutoff wheel and a bench grinder. He found a couple pair of goggles and we got to work.
So there you have it. I walked in, spent a few bucks on a steel rod, got about 20 minutes of free shop time and left with a finished product. Westlake, you're like having a hackerspace a mile from home!
At work, I frequently deal with both UNIX and Windows servers. My UNIX background has taught me to avoid logging in to systems -- even workstations -- with an administrative account unless you really need to use the power, even if you're a sysadmin. This works really well until it's time to start managing enterprise-wide settings like AD, DNS and DHCP. There are a variety of ways to solve the problem. Most places provide sysadmins with a user-level account and then an administrative-level account. You can log off from your workstation and log in with a domain administrator account to manage things. That's a genuine pain. You can remote desktop to a domain controller and log in with your admin account. You can even set up a terminal server with RSAT and other useful tools, and have your admins log in to that for routine enterprise maintenance.
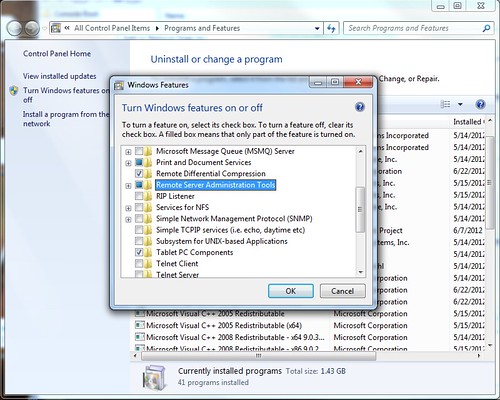
Alternatively, you can install Remote Server Administration Tools onto Windows 7 Enterprise, and using a few quick tricks, you can have all of the MMC Snap-Ins you like at your fingertips, while still using an unprivileged domain account on your workstation.
Once you get RSAT installed, you may need to also use "Programs and Features" to enable the Remote Server Administration Tools roles or its sub-roles as desired.
After installing RSAT, you'll notice an "Administrative Tools" item in your start menu, but the tools won't work unless you have domain admin privileges.
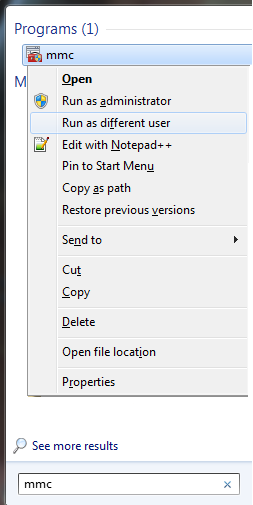
There's a trick to launching an authentication prompt before running any program on Windows. Hold shift, then right-click the program, and select "Run as different user." While you can do this to any of the Administrative Tools items in the start menu, We're going to use this trick to launch the Microsoft Management console so that we can make life even easier. Hit Start, then use the search to find mmc.exe. Hold shift. Right click it. Run as different user.
Here, provide a domain administrator account. If you have UAC enabled (as you well should!) you'll be asked if you wish to allow mmc to make changes to your computer. Obviously, you do.
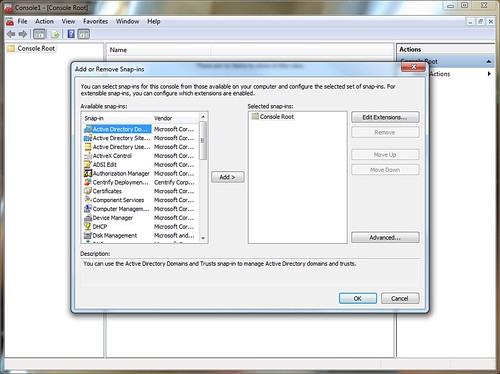
Once MMC is running, select "Add/Remove Snap-Ins" from the File menu. Here, you'll be able to load up a bunch of the individual modules from Start->Administrative Tools all into one MMC window.
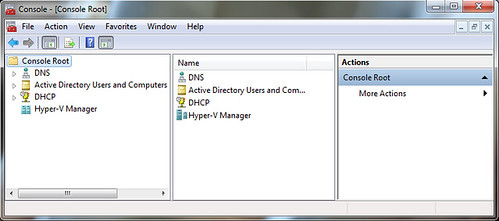
Once you have selected the tools you use frequently, you'll have a tree view of your favorite utilities, kind of like this:
Be sure to connect the individual snap-ins to the servers you need, if they require it (Hyper V, DNS and DHCP in the above example need to connect to other servers) and once you have everything configured the way you plan to use it, use the File-> Save menu to stash the configuration file somewhere handy, such as on your network profile or hard drive.
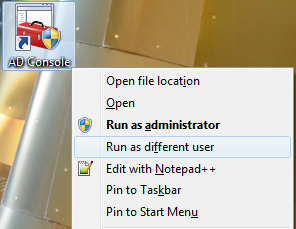
I opted to create a shortcut on my desktop that launches mmc.exe C:\console.msc and I titled it "AD Console." When I run it, I have to remember to launch it with my domain admin account using the trick above. Now, taking care of the day to day tasks on the enterprise is simple.
A little more than a year ago, I switched my netbook over to OpenBSD 4.9. From the start, the netbook had been set up to dual-boot with Ubuntu or XUbuntu, so those 6 months running only OpenBSD really exposed how much I've come to rely on Windows, even if it's only occasionally. That's fine. I'm not an anti-Windows zealot and I use it every single day at work.
I decided to start from scratch one more time when OpenBSD 5.0 came out, and to attempt to dual-boot Windows 7 and OpenBSD. As it turns out, setting up Windows 7 and OpenBSD to coexist was covered in surprisingly fine detail in the OpenBSD FAQ. I've been running Windows 7 and OpenBSD side by side now for more than half a year. This setup has proven to be more stable than Ubuntu and Windows 7 dual booting, and I'm very pleased with this setup. I urge anyone interested in this to read the FAQ, but this post should give you a taste of what you're in for.
Before I nuked the whole system, I rsynced all of my data to a file server at home, then re-installed Windows from the recovery media. From Windows, I set aside a FAT32 partition for sharing files between the two operating systems, since OpenBSD can only read NTFS, and I left 10GB blank for OpenBSD. From there, the rest of the instructions worked great. Once you have Windows installed and your partitions set up, the short version goes something like this:
Install OpenBSD. DO NOT tell it to use the whole disk. I opted to use only one root partition and a swap partition. For a netbook, this makes quite a bit of sense. You'd rarely want to set up a server that way.
After the installer finishes and before you reboot, copy the partition boot record (first block of the openbsd partition) to a file called openbsd.pbr using dd as in the example below. Be certain to use the raw device and get the partition right. The example command below was taken from the FAQ and is probably going to differ for you.
# dd if=/dev/rsd0a of=openbsd.pbr bs=512 count=1
Copy openbsd.pbr to somewhere useful. I copied it to the Fat32 partition I created earlier on. You could copy it to a usb stick or upload it to another location. You'll need this on the Windows machine. When you reboot into Windows, move this file to the root of c:
Start a cmd.exe window as administrator (Start -> use text box to search for cmd.exe -> right-click it -> Run as Administrator), then set up the boot loader. Ripped directly from the OpenBSD FAQ again:
    C:\Windows\system32> bcdedit /create /d "OpenBSD/i386" /application bootsector
    The entry {0154a872-3d41-11de-bd67-a7060316bbb1} was successfully created.

    C:\Windows\system32>

As admonished before, the {0154a872-3d41-11de-bd67-a7060316bbb1}
GUID is system-dependent. Note the value you receive when executing,
and copy it into the following commands:

    C:\Windows\system32> bcdedit /set {0154a872-3d41-11de-bd67-a7060316bbb1} device boot
    The operation completed successfully.

    C:\Windows\system32> bcdedit /set {0154a872-3d41-11de-bd67-a7060316bbb1} path \openbsd.pbr
    The operation completed successfully.

    C:\Windows\system32> bcdedit /set {0154a872-3d41-11de-bd67-a7060316bbb1} device partition=c:
    The operation completed successfully.

    C:\Windows\system32> bcdedit /displayorder {0154a872-3d41-11de-bd67-7060316bbb1} /addlast
    The operation completed successfully.

    C:\Windows\system32>
Additionally, since OpenBSD is going to be my primary OS, I used the bcdedit command line options to further modify the Windows Boot Loader so that OpenBSD is displayed first and loaded by default after a brief prompt.
Upgrading OpenBSD is usually pretty easy. There's only one pitfall when you're upgrading OpenBSD in a multi-boot environment: Make sure you copy the PBR to C:\openbsd.pbr as you did in the initial multi-boot setup before you reboot after the upgrade installer exits. Failure to do this might render your openbsd install difficult to boot. You should still be able to boot your system from the install media if all else fails.
If you've installed packages, you'll need to upgrade them separately. Set the pkg_path variable to a repository for the version of OpenBSD you're installing (5.1 as of this writing) or if you're using my preferred method of using /etc/pkg.conf, edit that file since it'll still be pointing to the older package repository from before the upgrade. Then simply run "pkg_add -ui" through sudo or as root. This will find the new packages and upgrade all that are available. the "i" in the above command tells pkg_add to prompt the user for any questions (resolving dependencies, etc).
A few folks asked how I put together the password hash checker yesterday. Understand that I was sick and in bed most of the day, and did most of this from my Motorola Droid 4. It was really ugly.
A local KC2600'er found a link to the hash dump on a shady Russian website. If you really want the dump of hashes and haven't found it yet, look for combo_not.zip and/or combo_not.txt. I downloaded the file via wget on one of my OpenBSD web servers.
The text file was likely made from a Windows environment because it has telltale CR/LF line breaks. The first thing I did was fix the line breaks with sed. This cute little one-liner replaces all CR/LF line breaks with traditional UNIX line breaks so that command-line wizardry will work on it.
sed -i "" 's/.$//' combo_not.txt
Then, I figured I should cram it all into MySQL to make queries against the data less of a pain in the ass. I created a database and user named lihash, then created the DB with only an auto-incrementing ID and a hash column:
create table lihash (id int primary key auto_increment, hash varchar(40));
And then I used some more sed stuff to turn each hash into an "insert" line for MySQL. Here's what the output looks like (limited to the first 10 lines with head):
$ sed 's/^/insert into lihash values (NULL,"/;s/$/");/' combo_not.txt | head
insert into lihash values (NULL,"000000a94d47b9ca82c58a3b092a50263b40f66e");
insert into lihash values (NULL,"000000a9876203148923f97c6f1a0635472e1e38");
insert into lihash values (NULL,"000000a9bf60e7f17fcac444a54791af780743a3");
insert into lihash values (NULL,"000000a97e734e7ed9766d1ce08ebc68d3e93ab2");
insert into lihash values (NULL,"000000a9b4b1b3497aac51e212ac9efdb00e7f4e");
insert into lihash values (NULL,"000000a9affc26ed1b0ef2956825e85f9a2567ff");
insert into lihash values (NULL,"000000a93c829bab8c40f805bd3adec3302edf06");
insert into lihash values (NULL,"000000a9e3686034e4f7a1f5b8d6de92679dba5c");
insert into lihash values (NULL,"000000a966dd229cbdd0c4ccc524f0aff6c0fc31");
insert into lihash values (NULL,"000000a9317a995cb16dec71edf0d3aa4b918de6");
With that looking all fine and proper, I piped all that straight into MySQL.
$ sed 's/^/insert into lihash values (NULL,"/;s/$/");/' combo_not.txt | mysql lihash
It took several minutes to munch through the data and created many megabytes of MySQL binary logs. While that was processing, I scoured the web looking for a decent javascript SHA-1 hashing method so that I didn't have to worry about handling peoples' passwords via my site. You can simply view the source of this page to see how that works. It was mostly copypasta.
Finally, there's the PHP that drives it on the back-end. You can see the PHP Source HERE. When I was testing, I had it displaying the hash that was passed. I got rid of that part to keep XSS shenanigans at bay. I'm probably doing all sorts of things wrong with the SQL queries, but I copied some of that database code from another project on that server (I was using a phone for this, remember?)
By now, you may have heard that a list of 6.5 million hashes have been posted to the Internet, and that they appear to be password hashes from LinkedIn. CNet has some of the deets, but there's a great thread on YCombinator Hacker News where some observations are made. Namely, SHA1 hashes for easily-guessed passwords (such as "linkedin" or "password") do not show up in the list, but if you replace the first five characters of the hash with "00000", then hashes do match for simple passwords. This leads to speculation that the attackers have already cracked some of the easy ones and truncated them in the list.
I've made a really quick and dirty web page that will help you check if your password is on the list. It features a nifty javascript SHA-1 digest hash generator so that the password you check never gets sent over cleartext. It will check hash and truncated hash against the dump. If it detects the entire hash, then your LinkedIn password hash is now in the wild, and it's likely only a matter of time until it's cracked. If the truncated version is in the password dump, it's almost certain your password is compromised.
OpenBSD 5.1 was released last week, so the update is a bit overdue. HiR's Secure OpenBSD + AMP guide has been updated. OpenBSD 4.x is officially unsupported now, so we've dropped the 4.x parts from the guide and refined the rest.
Since we've started covering the setup of an AMP stack on OpenBSD, the process has gotten considerably easier. OpenBSD is a completely viable and stable environment for running almost any PHP/MySQL web app, with a little extra consideration given to the chroot environment and Suhosin hardening patches while you're setting up your applications or programming new ones.
My wife and I have identical phones. She actually got hers before I got mine. Occasionally, I have to tether for troubleshooting, and I set hers up tonight to do the same.
I encountered a number of stumbling blocks the first time around. Fortunately, other people did all the hard work. Here are links I found helpful.
Download the latest SuperOneClick package. You'll have to root your phone. There's no easier way than this: SuperOneClick - Shortfuse
At this point, if you try to tether, you'll run into a similar issue as I've described in previous tethering posts: the authentication string will cause tethered traffic to bounce up against Verizon's wrath warning page.
You'll need to download RadioComm, and the best way to find that is Google. You'll probably find fresh links to recent versions on XDA Devs or MotorolaFans. Caveat Emptor and all that. Shady download links galore, so be on your guard with good backups and malware protection. Here are the instructions to patch your phone's baseband configuration for tethery goodness.
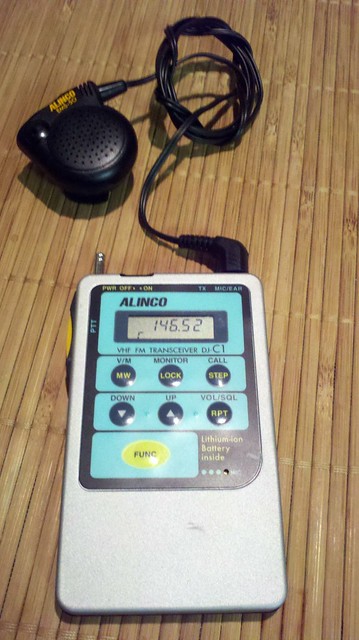
The Alinco DJ-C1 was made in the 1990s and was a groundbreaking ham radio micro-transceiver about the thickness of an iPhone 4 and with a smaller footprint nearly identical to that of a credit card. It was designed to work on the 2m FM Voice band at 300mW. It featured an integrated microphone, but had no internal speaker from the factory; One had to rely on an earphone or an external speaker/microphone unit such as the one shown above.
Over time, these micro radios evolved. The DJ-C4 came out at the same time as the C1, and was made for 440 MHz (70cm FM Voice). The DJ-C5 was a bit thicker and was the first to have an integrated speaker and work on both of the above bands. The latest one, the DJ-C7, lacks resemblance to these tiny relics of the late 90s aside from being smallish.
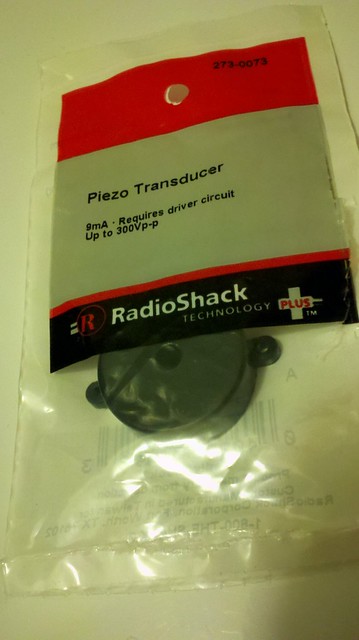
You can still find these micro-handheld transcievers at hamfests, swap meets and online auctions. I got mine from a friend that's happened upon two C1s and a C4 in the past year. I was immediately somewhat frustrated by the lack of a built-in speaker. I opened it up and found plenty of room in the back for a piezoelectric element, similar to what you find as the alarm speaker in digital wrist watches.
I couldn't find anything to salvage a piezo speaker out of, so I coughed up a couple of bucks at Radio Shack for one. I used a tiny screwdriver to pry the back cover off and to pry the element out of the case.
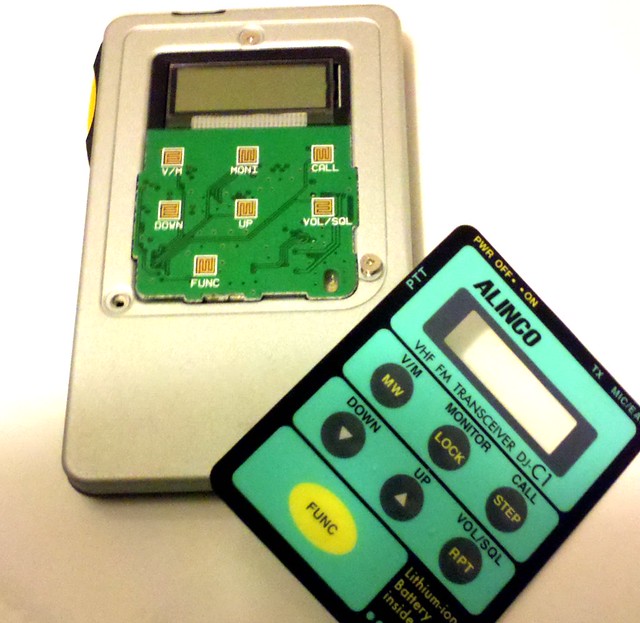
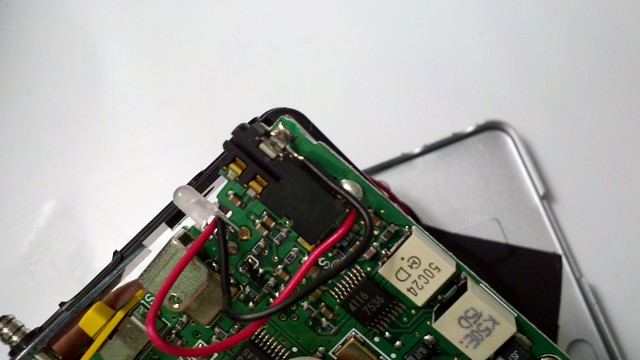
Disassembly of the DJ-C1 initially looks pretty straight-forward. There are three small philips screws on the back which give you access to the battery and the back of the circuit board. You'll have to open the back up and you'll want to disconnect the battery before proceeding. Unfortunately, most of the stuff we need access to is on the other side of the circuit board. You can't get the board out from the back, so leave the screws through the circuitboard attached. To remove the front plate, carefully peel the sticker and membrane buttons off, then remove the three screws found underneath.
There aren't many places to pass wires from the back of the radio where the speaker will be to the front of the radio where they can attach to the solder pads for the audio jack, so I ran them between the legs of the transmit LED. With the front and back removed, you can slide the circuit board out of the rectangular plastic frame enough to get access to the solder pads with almost any kind of soldering iron. You can see the red and black wires here:
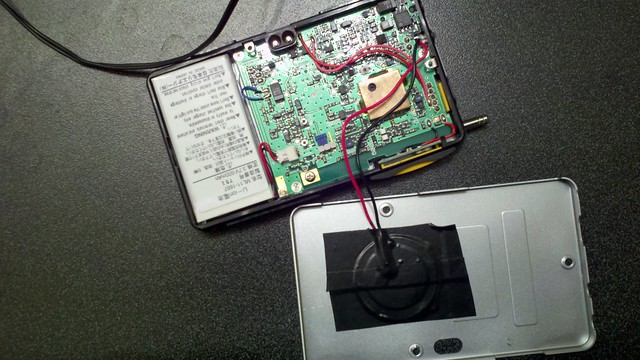
I taped the piezo element to the back case toward the bottom. The copper shield in the middle of the circuit board seen below will sit flush against the back case, so keep the speaker and wires clear of it. The piezo speaker is actually louder when it's taped to the back case than it is when it's hooked up to the audio jack by itself.
Gently re-assemble everything, making sure everything fits neatly inside. Re-position the speaker and wires as needed. I ended up placing a bit of tape inside to keep the speaker wires from getting in the way. Re-connect the battery, screw the front plate back on, re-attach the membrane buttons to the front, and test it before you button the thing back up.
The resulting speaker works, but isn't terribly loud. It's loud enough to get your attention from the office desk, and if you hold it up next to your ear, you can make out what's being said. This is all I expected from this hack. You'll want to hold on to that earphone or external speaker, though.
Here's some crappy cell phone video of it in action.
It's that time again! Bring your questions, projects, interesting topics of discussion, war stories and conspiracy theories. As a reminder, the official 2600 meeting start time is 5:00 PM local time, but the Greater Kansas City folks tend to start trickling in at 5:30 or so.
If people are interested, I'll go over some of the common complaints of this lock and how so many people manage to lock themselves out of it forever. I might live stream it on uStream. I might actually lock myself out of this lock forever, too, but hopefully not.
I've spent the past two weekends re-writing old, horrible, ugly code that I wrote as a kid. I still have a lot of work ahead of me, and there's still no guarantee that the code I'm writing now will be great, but it'll be better than the stuff I wrote before. I'm not a web developer by any means, but it won't keep me from having some nerdy fun on the weekend. I've learned some tricks, and figured I'd share them here in a few short entries. Today, it's so-called "Clean" URLs.
In most dynamic web scripting languages such as PHP, dynamic pages can be accessed by passing parameters through a query string. As an example: http://foo.somesite.com/article.php?p=42
You've undoubtedly seen dynamic websites that don't pass query strings, but instead generate nice, friendly URLs that look more like this: http://foo.somesite.com/article/Hello_World
Clean URLs are easier to link to, they're better for search engine optimization, and with proper implementation provide a few security features as well. The project I'm working on is a custom CMS that was my very first Apache/PHP/MySQL project. It ended up getting kind of popular among a niche crowd, so I left it online in all its ugly glory. I have an article list script that can filter articles by category, and another script to display the articles. I'll just call them list.php and article.php here for the sake of discussion.
Removing .php from the URL
The first part of the problem is the fact that I'd rather not have ".php" show up in the URL, so that "article" and "list" would appear to be sub-directories of my site.
After playing around with a bunch of promising hacks that tended to work fine, including mod_rewrite, I decided that the most elegant way to tackle this was to rely on Apache's "FilesMatch" directive. I created symbolic links from list.php and article.php to strip the .php extension. You could just as easily rename them, though. Then I added the FilesMatch directive to .htaccess for "article" and "list" as shown below. Make sure "AllowOverride All" is set in your Apache configuration, too.
At this point, pulling up http://foo.somesite.com/list will try to run "list" as a PHP script. In my case, it shows a list of articles.
Parsing URI parameters with PHP
The next part is mostly easy. As far as I know, any PHP script will let you add a bunch of parameters to it with slashes like this: http://foo.somesite.com/index.php/testing/1/2/3/4/5. It may not render well, but it doesn't keep it from executing. Above, we got list to show a list of articles, so now it's time to set up filtering. As you can see below, the last element of the URL (split by /) is considered to be the category. The following URL would show a category of "Widgets": http://foo.somesite.com/list/Widgets
To avoid the problem of getting a category of "list" or "list.php" (remember, I chose to symlink my .php files), I included logic to check to see if the category matches the script name. If so, it assumes that it should instead display the Table Of Contents. You'll also see I am setting the title based on what happens here. As the category types are stored in the database and displayed with spaces, I am using str_replace to replace underscores in the URI with spaces. This means that I have to ensure spaces are turned into underscores elsewhere in the code and in all links to my site. That's beyond the scope of this article, though. What matters is that a URL of http://foo.somesite.com/list/Arts_and_Crafts would pull up a category of "Arts and Crafts".
From here, the rest of my PHP code can query the database for articles. getlist() is a function that I wrote. If its parameter is null, it gets all of them, otherwise it (safely!) queries the database for a category.
I used similar code in the article php script, which queries the database for the title of an article, so I get nice-looking URLs for individual articles as well, such as:
Amateur radio is called "ham radio" by many. Ham isn't an acronym, but the origin of the sobriquet is a topic of debate. The most plausible explanation I heard is that professional telegraph operators considered amateur radio operators to be inferior, ham-fisted tinkerers. In this case, "ham" is actually a derogatory remark. Despite the fact, it's been adopted by the community now and is synonymous with "amateur radio." Amateur doesn't mean neophyte, however. It is the antonym of "professional radio," in that amateur stations are not commercial, and hams cannot recieve compensation for operating their equipment.
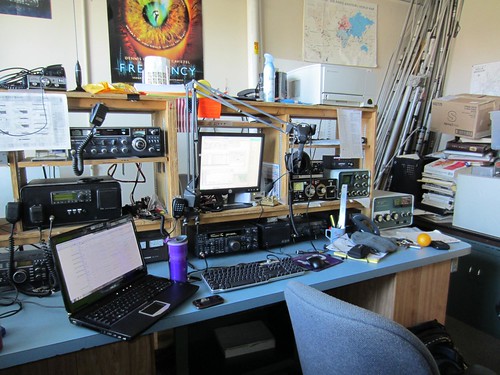
(The ham shack at MST's Amateur Radio Club, W0EEE)
Several co-workers and friends flaunted their amateur radio gear and goaded me into joining their ranks last year. Many hackers carry a ham license, or are getting interested in the hobby. Still, some people occasionally ask me "what's the point? We have smartphones and the Internet now." It's true. The telephone as we know it has indeed enjoyed evolution at a breakneck pace. My co-worker's Nexus LTE sucked 20 megabits per second out of thin air the day he got it. I don't even get that kind of pipe to my home. Still, to me, there's always been something about amateur radio that can't quite be compared with the Internet or mobile phones. I'll explain just a few of those things, from my own novice perspective.
In 1987, I saw an amateur radio demonstration that was given to my scout troop in the middle of Nebraska. With a brick-like walkie-talkie weighing more than a pound and about the size of two Wiimotes side by side (not counting the big rubber antenna on top of it), the presenter was able to communicate with others several counties away, and even place telephone calls. He said that with a bigger antenna and more powerful radio at home, he could talk to people all over the world, all without relying on telephones or even the power grid, because much his radio equipment could be powered by car batteries.
This blew my 8-year-old mind. It was nothing like my little walkie talkies at home. I wanted to be a ham, and even put in some work toward it, but I simply wasn't ready. The urge hit me in waves on occasion. In high school, I experimented with CB. In college, I took some interest in those FRS walkie-talkies that are now ubiquitous in every department store. A few classmates were amateur radio operators, and I got the itch again, but never really got the motivation to get licensed. It would go on like this for many years. For me, it took a friend in California selling me some of his used radios for cheap. At that point, I had the equipment in my hot little hands, but I didn't have a license to use them for anything other than listening. That lit a fire under me.
Aside from their size (owing to advances in surface-mount electronics and battery performance), the most basic hand-held ham radios haven't changed a whole lot in the last 20 years. For reference, my smallest radio is about the size of a closed Motorola StarTAC, but packs nearly as powerful a transmitter as the giant brick radio that had me awestruck more than 20 years ago. Most hand-helds work on the FM Voice part of the VHF band (~144 MHz) or the UHF band (~440 MHz), or both. Some operate on other bands as well. Transmit power from 300mW to 5W is common. Although these smaller radios are most often used to contact a high-power repeater, they can also be used directly between licensed amateurs over shorter distances with some rules and restrictions noted. They have more power and better antennae than FRS radios, and can be connected to an externally-mounted antenna if desired. They're great for highway convoys and outdoor activities. Many hand-held transceivers are capable of tuning in a very wide range of frequencies, so they can be used somewhat like analog non-trunking scanners and frequency counters for finding and listening to public safety, railroad, airport or rent-a-cop chatter. More on that in a separate article.
Repeaters are usually mounted on radio towers, tall buildings or up in mountains. They recieve on one frequency (an input frequency), then transmit what's received in real-time on the output frequency, allowing one-to-many conversations over a relatively large region within a 20-50 mile radius. Radios designed to be used with repeaters are able to automatically switch to a repeater's input frequency when transmitting. Repeaters are often linked together via high-power point-to-point radio links, telephone lines or digitally over the Internet. Some repeaters are actually built into satellites in space, covering extremely wide areas, but those can be a challenge to use as they traverse the sky. Many repeaters have redundant power, via battery and generator backup. And yes, a lot of this stuff is very similar to what existed 30 or more years ago, save for the Internet-connected repeaters.
Hams are often called upon to help where efficient communications are desired. You're likely to find amateur radio operators volunteering behind the scenes helping marathon or charity bicycle ride officials locate event participants in need of assistance, providing the National Weather Service with critical storm data from the ground, or establishing point-to-point radio links with nearby hospitals and participating in relief efforts in communities whose infrastructure has been crippled by floods, tornadoes, hurricanes or earthquakes. All of this is made possible because hams know how to communicate efficiently in groups, and their equipment isn't completely disabled by disruptions of complex infrastructure (although, as noted, infrastructure such as the power grid and telecom is often used when available.)
Many people think of morse code when they think of ham radio. Morse code is still in use, but you no longer need to know it to get licensed by the FCC. Morse code is essentially a human-comprehensible binary mode of communication. There are several other digital modes available, allowing you to blend technologies, and some common modes rely on AX.25 packet data. You can run a packet radio BBS over the air if you like, or transmit your GPS coordinates while hiking through the woods or helping disaster relief efforts. Some of these digital modes are extremely efficient, use very little bandwidth, and can be easily received from long distances, even if they aren't transmitted with much power. Conversely, hams can also enjoy many parts of the amateur bands, including parts of the 2.4 GHz spectrum (with some overlap on WiFi channels) with up to 1500 watts.
Although some hams might seem like retro-grouches with their morse code conversations, technology doesn't stand still with amateur radio! There's a very hearty "do it yourself" spirit here. Many participants might very well be considered radio hackers. They build their own transmitters, recievers and repeaters, and most of them are -- by nature -- gifted problem solvers.
Check out this video from ARRL for some more info.
What's it take to get licensed? There are three classes of amateur radio licenses in the US. In order from lowest to highest, they are Technician, General and Extra class. The exams are multiple-choice quizzes, each coming from a pool of several hundred possible questions. The Technician and General exams have 35 questions each, while the Extra exam is 50 more challenging questions covering material that's ostensibly arcane. The test to get each license requires progressively more depth of knowledge in safety (RF exposure, antenna towers, grounding), electronics, FCC rules, transciever and antenna designs and other information that proves the licensee understands the craft well enough to safely operate their own station. Each higher license class grants access to transmit on more frequencies, usually in the lower frequency bands that are more useful for reliable long-distance communication.
Since the question pools and study materials for licensing are publicly available, I studied the Technician material on my own for a few weeks before acing the technician exam. Most major metro areas have groups that give frequent classes, and all metro areas have volunteer examiners who will administer the test to those who have studied on their own.
I may upgrade to the General class license this year, but I'm honestly a lot more interested in the merge of digital technology with amateur radio. The Technician class license allows me to operate digital and "sideband" voice on the 10 meter band, but there's a lot of digital stuff in the higher frequencies that Technicians are allowed to use.
If you are interested in learning more about amateur radio but can't seem to find anything in your area, post away in the comments and I'll see if I can help you out.
HiR is what happens when 1990s-era e-Zine writers decide to form a blog. Most of us hail from the Great Plains region of the United States.
Ax0n, HiR founder and editor-in-chief is an information security specialist currently working in the luxury goods industry.
Asmodian X joined HiR in December 1997 and currently works as a web developer and SysAdmin in the education industry.
Frogman has been on board since May 1998 and has many technical passions. When not experimenting with obscure hardware, he can be found leaping from one rooftop to the next, making the world his office.
TMiB has also been helping since 1998. Also our resident Physicist and go-to guy for xkcd jokes we don't get, The Man in Black currently works in the Internet industry in an east-coast data center.