We're taking a few weeks off to spend the holiday season with our friends and families, so postings might be sparse. We'll pick Sysadmin Sunday back up after the new year.
2007-12-22
2007-12-21
Kansas Citians: KC BSD User Group starting in '08
 Yes, that's my license plate. Just call me a fanboy. Actually, it's my 2000-2004 plate. My 2004-2008 plates are on my car right now, but they say the same thing.
With that, it should come as no surprise that I'm excited to announce KCBUG: A *BSD user group meeting here in town. Thanks to Frogman for tipping me off. Right now, it looks like KCBUG's inaugural meeting is going to be Wednesday, Jan 9 2007 at 6PM located at the Plaza Library at 48th and Main.
I'm going to try to make it to the first meeting. Hopefully we'll see you there!
2007-12-16
Sysadmin Sunday: Fun with find
Introduction
find is a ubiquitous utility found on every single UNIX variant known to man. It is fast, efficient, and extremely powerful. Its main purpose is to locate files on the system based on criteria passed to it in the command-line arguments.
This week in Sysadmin Sunday, I'll extol find in all it's glory... or most of it, anyways.
Basics of find
find requires a path and nothing more. find . would show all files in the current directory, while recursing all the way through every subdirectory. There are a great many options to find, though. We'll work through some of them.
Find's syntax is usually as follows:
find [path] [options] [actions]
Actions
-print
Simply prints the matching filenames to standard output. -print is implied if no action is specified. You could, in theory avoid using -print, and on most modern implementations of find, it would be fine.
-print0
Separates each returned file with a null character instead of a carriage return. This is useful when the list of files returned may have spaces or other unusual characters in the filenames which may cause inconsistency in how files are handled. This works primarily with xargs, and I'll cover it at the end of the article.
-exec
I generally don't recommend using find's "exec" flag, simply because it's easier to make errors with it. You'll get more predictable results using xargs or shell escapes. See "Acting on output" later on in this article.
-prune
Stops recursion in the current directory if the option is matched.
-o (OR) allows you to perform some other option/action combination. This is particularly useful when you do a ! (NOT) operator for an option.
Options
-name
If you know the name of a file (or part of it) but you have no idea where in the hell it is on your system, find -name is here to save you. On my webserver, I know there's this absolutely hilarious gif animation of a guy trying to get out of a room. The sign next to the door says "pull to open" in some asian script. Or that's what someone told me, since I can't read it myself. I remember naming it "pulltoopen.gif" but I can't remember where I buried it, though -- and I have gigs of pictures and other random stuff on my web server.
$ find ~axon -name pulltoopen.gif -print
/home/axon/public_html/temp/pulltoopen.gif
There it is! Hey, you guys have to see this:
Okay, enough goofing around.
-follow Instructs find to follow symbolic links when recursing through subdirectories. Usually, you won't need this functionality, but occasionally it comes in handy.
-mtime, -ctime, -atime [days ago]
mtime, atime, and ctime are modification, access and change to the file respectively. What's the difference between modification and change? Well, modification means that the file's contents were altered. Change means that the permissions and/or ownership have been updated. Access times are obvious. Any time the file is read, atime gets altered. Find can tell you when a file was last looked at, modified or changed. To see what files I've modified (including newly created files) in the last day, I use -mtime 0. You can see the screenshots I uploaded for the Google Spreadsheets article which were uploaded the same day I wrote this article:
$ find public_html -mtime 0 -printThe key here is that these will only show things in 24-hour slices of time. -mtime 3 would only show stuff that's changed 36-47 hours ago. If you wish to see everything that's changed in the last 3 days, you can use a minus in front of the argument. find [path] -mtime -3 would show everything that's changed not only 3 days ago, but from now until 3 days ago. This comes in handy for use in making backup scripts, or finding something that you know you recently downloaded.
public_html/hir
public_html/hir/gs-explore.html
public_html/hir/gs-explore.phps
public_html/hir/gse-1-login.png
public_html/hir/gse-2-sslist.png
public_html/hir/gse-3-wslist.png
public_html/hir/gse-4-cells.png
-user [username], -group [groupname], -nouser and -nogroup
-nouser and -nogroup are great for locating stray files on the filesystem that no longer have an owner or a group associated with them. This can happen when you extract a tar file as the root user, or if you remove a user from the system without cleaning up all of their files first. Similarly, -user and -group can be used to limit find to only files owned by a specific entity.
-type [x]
Type will locate only a specific type of file. Values for [x]:
b block specialFor example, if you wanted to find all symbolic links in /etc:
c character special
d directory
f regular file
l symbolic link
p FIFO
s socket
$ find /etc/* -type l -print
/etc/aliases
/etc/localtime
/etc/resolv.conf
\!
Any option can be preceded by \! (also called "NOT") to return the opposite of an option.
Acting on output
In the end, find merely creates a list of files. In and of itself, find is pretty useless unless -- like my examples -- you're just looking for a few files among gigabytes of content. By its very nature, UNIX relies on the flexibility of other utilities, command-line construction, piping and redirection of output to really get things done.
xargs method
Find and xargs go together like two peas in a pod. xargs is a little-known utility that takes piped input and builds a huge command-line argument out of the contents. When you have thousands and thousands (or just a few dozen) of files listed from find, and wish to do something with them all at once, xargs is a great utility to have around. For example, if I wanted to create a backup of all of my files including my crontab, mail, and temporary files, this would work nicely:
# find / -user axon -print | xargs tar czf axon.tgzcommand-line construction (quick 'n' dirty shell escape) method
You can directly use find's output by using backticks around your find command. All the output from find will be passed on the command line. This is a different method to do the same thing as the above example, without xargs:
# tar czf axon.tgz `find / -user axon -print`Iterating through the list (for loop) method
If there's something a little more complicated that you want to do with the list of files, you can make a little miniature shell script on the command line, or a standalone script which takes action on each file one at a time. This is particularly useful if you need to do multiple actions on a file, or if you're using a utility that can only handle one file at a time, for example, converting all .gif files to PNG format with imagemagick's convert utility:
for file in `find . -name "*.gif" -print`Using \!, -prune, and -o
do
convert $file `echo $file | sed s/"gif"/"png"/`
done
Occasionally, you want to exclude certain files or directories from find. Maybe you don't want it to descend and scan networked drives or temporary files. \! returns only things that do not match the options. Alone, this might be a huge amount of files. -o (or) allows you to continue processing with additional conditions. -prune is similar that it will take whatever the options match and quit descending further.
Find all files owned by root in the /home directory and subdirectories, but prune (don't descend into) any directories named "tmp":
$ find /home -name tmp -prune -o -user root -printFind everything in /dev that is not a symbolic link:
$ find /dev \! -type l -print
Complications
If the list that find returns contains any spaces (or occasionally other bizarre characters) in the filenames, all of the above methods of dealing with the list will fail, as space and return both may be used to symbolize a break of filenames. A file named "My file.txt" will be handled as two files, "My" and "file.txt", neither of which is correct.
Here are 3 files in a directory, 2 with spaces in the name:
$ lsUsing find and xargs to do a long listing on them fails because of the spaces:
My File.txt My File2.txt MyFile3.txt
$ find . -type f -print | xargs ls -lBy replacing "-print" with "-print0" (that's a Zero, not an "o") and using xargs with the -0 (Zero) option, find and xargs will once again work together in harmony. Filenames will be separated by a null character from find, and xargs will handle all input literally, acting on filenames separated by a null.
ls: ./My: No such file or directory
ls: ./My: No such file or directory
ls: File.txt: No such file or directory
ls: File2.txt: No such file or directory
-rw-r--r-- 1 axon staff 1800 Dec 15 00:04 ./MyFile3.txt
$ find . -type f -print0 | xargs -0 ls -l
-rw-r--r-- 1 axon staff 4847 Dec 15 00:04 ./My File.txt
-rw-r--r-- 1 axon staff 13444 Dec 15 00:04 ./My File2.txt
-rw-r--r-- 1 axon staff 1800 Dec 15 00:04 ./MyFile3.txt
2007-12-15
December KC PHP User Group meeting
Usually, KCPUG's December meeting is either non-existent or of sparse attendance. The third Saturday of December is pretty close to the holidays, and many people have other plans. As such, I hadn't prepared anything to discuss, and neither had anyone else. I was pleasantly surprised when -- despite a snow storm -- we gathered more people than I'd expected. 2 of them came all the way out from Clinton, MO. It was nice to see some new faces among the regulars.
I demonstrated my Spreadsheet browser, and we all discussed some other projects we're working on. After that, it was mostly a discussion of various server platforms, web design software, and programming languages, both viable and not. This included Microsoft IIS, Apache, DreamWeaver, Front Page, PHP, ASP.NET, LOLCode, and BrainF---. Sometimes, a meeting without a lot of structure can be a great one.
2007-12-09
Sysadmin Sunday: A somewhat secure quick and dirty network backup with ssh, rsync, tar and cron
Greetings and salutations.
In this article I will cover a method of backing up a small number of servers to a central storage server for daily, weekly and monthly archiving. This is good for under 10 machines needing a basic backup solution. It is not meant for large installations due to limitations of rsync and space considerations.
-=- Index -=-
1...... Summary2...... Description of the process
3...... Server Setup Details
4...... Client setup details
5...... Sripts
6...... Security Concerns
7...... Informative resources
1. Summary
This article is intended for system administrators with intermediate experience with Un*x environments. You will require a server with a large stable amount of space. Bonus points for raid and other storage redundancy features. You will also need an up to date version of sshd installed on the server as well as tar, gzip and rsync. You also will need up to date versions of ssh and rsync on each of the machines to be backed up. I say somewhat secure because it uses ssh to shuttle the files to the server and thus is granted a level of security from eavesdropping. Its a simple way of backing up a server with out the hassle of implementing a full blown backup server software on a multi-unix-platform environment. SSH, rsync, gzip, tar and split are all usually available in a unix or unix-like installation and for the most part compatible with each other. Thus, very little compiling is needed to implement this.
2. Description of the process
Each client will be configured with a time slot and at the given time it will open a ssh connection to the backup server to an un-privileged account. It will then start rsync and synchronize a list of folders with a corresponding set of folders on the remote server. It will then disconnect and continue on its business.
The server, during off-peak hours will perform weekly differential tar backups of the
rsync archive. The server will roll the whole archive into a compressed tar archive and move it to an archive directory either on the server or using some other attached storage.
3. Server Setup Details
SSH needs to be available to the machines needing to backed up. I'm leaving the security details fuzzy here because there are so many ways to secure this setup, setting the ssh server to only use trusted host keys, certain usernames, groups ...etc In this case we are using public key authentication so this option needs to be enabled on the sshd server.
Our backup user is a regular user (no special groups, just the basic usergroup). For this example our backup user is "backupuser" who belongs to group "backupuser".
Our backup user's quota setup and home directory need to have lots of storage space available.
Inside their home directory we need a directory structure similar to this:
-SERVERBACKUPS
- SERVER1
+ Daily
+ Weekly
- SERVER2
+ Daily
+ Weekly
- SERVER3
+ Daily
+ Weekly
NOTE: Security precautions you should look at taking is switching on the no-execute feature on the file system (if the folder resides some where that wont need scripts being executed from). The backup user account needs to have a restricted shell (ex. /bin/rbash). Security is beyond the scope of this article so use your best judgement.
Then configure cron to run your roll scripts. (see section 5)
You will want to run crontab on the backup server as root or some other user with enough permissions to manipulate the backup data owned by our backup user.
Run :
#crontab -e
(It will then run vi or the other default editor)
... add the following lines
# 12:30pm on Saturdays
30 12 * * 6 /root/scripts/weekly_diff.sh
# 12:30pm on Sunday once every month
30 12 * 1-12 0 /root/scripts/monthly_roll.sh
(Save the file and exit the editor)
We will now need to make the ssh private key.
#ssh-keygen -t dsa
***You will not want to put a password on this key (just press enter).
Then place the public key into the backup users ~/.ssh/authorized_keys and chmod 700 on the .ssh directory and chmod 600 on the key itself. (this would be a good time to verify that sshd is configured for public key logins)
You can also put multiple public keys into the authorized keys list (one for each client).
4...... Client setup details
Each client needs to have a copy of the private key we made in section 3. You will want to run chmod 600 on the key to prevent other system users access to the key. Then put the backup.sh script and the private key into a folder accessible only to the root account (like /root/scripts) and run chmod 700 on the script so only the owner (root) can execute it.
make sure the file is where the script expects to to find it
You will then want to put in a cron job for the root account.
#crontab -e
(it will then launch the system default editor like vi)
insert the following commands:
# Backup the fs at 11:30pm every day of the week
30 23 * * * /root/scripts/backup.sh
Save the file and exit. Now it will now execute the /root/backup.sh script at 11:30pm every day.
5...... Scripts
#!/bin/sh
#--------SERVER WEEKLY ARCHIVING SCRIPT (weekly_diff.sh) -----------
#!/bin/bash
DATE=`date +%V%g`
cd /data/serverbackups
for file in *; do
tar --create \
-z \
--file=$file/weekly/$file$DATE.tar.gz \
-g $file/weekly/weekly-diff.snar \
$file/daily
done
#end weekly script
#--------SERVER MONTHLY ARCHIVING SCRIPT (monthly_roll.sh)-----------
#!/bin/bash
DATE=`date +%b%g`
cd /path/to/serverbackups
mkdir /path/to/archive/$DATE
for file in *; do
rm $file/weekly/*
FILENAME=$DATE.tgz
tar -zcvf $file/weekly/$FILENAME -g $file/weekly/weekly-diff.snar $file/daily/.
cp $file/weekly/*.tgz /path/to/archive/$DATE
done
#end monthly script
#--------SERVER OFF SITE ARCHIVING SCRIPT -----------
MOUNT_CMD="/path/to/mount"
MOUNT_DEV="/path/to/external/storage/device"
MOUNT_POINT="/path/to/mount/point"
MOUNT_FS="filesystem name -t "
MKNOD_CMD="/path/to/mknod /tmp/tar_pipe p"
SPLIT_CMD="/path/to/split -b 512000000"
ARC_PATH="/path/to/monthly/archive"
TAR="/path/to/tar -cvf"
GZ="/path/to/gzip"
DATE=`/path/to/date +%m%Y`
$MOUNT_CMD $MOUNT_FS $MOUNT_DEV $MOUNT_POINT
mkdir $MOUNT_POINT/$DATE
$TAR $MOUNT_POINT/$DATE/archive_$DATE.tgz /tmp/tar_pipe &
$SPLIT_CMD /tmp/tar_pipe $MOUNT_POINT/$DATE/archive_backup_$DATE.tar.
#end of archive script
#------------------CLIENT BACKUP.SH-------------------
#!/bin/sh
RSYNC=/usr/bin/rsync
SSH=/usr/bin/ssh
KEY=/path/to/key
RUSER=backupuser
#SERVER IP
RHOST="11.22.33.44"
RPATH="/path/to/serverbackups/servername/daily"
LPATH=/
$RSYNC -az --links --safe-links --exclude /dev --exclude /proc --exclude /mnt $LPATH -e "$SSH -i $KEY" $RUSER@$RHOST:$RPATH
#end of backup.sh
6...... Security Concerns
Obviously, having an account which contains all of your network data available to any one who has the secure key is a problem. Having an rsynced archive of everything also has other file related issues. You could use different backup server local users, keys or tack on some countermeasures which chmod the files to something less offensive.
Then we have concerns about ssh itself. Internet sites are vulnerable to scripted ssh probes using dictionary attacks ..etc
You could move ssh to a different port and avoid some of the scripted attacks. Once again this is all outside the scope of this article.
If these concerns are a bit too much for your environment consider using a backup system like Baccula or Amanda or one of the commercial backup solutions.
7...... Informative resources
Johnson, Troy. "Using Rsync and SSH." Accessed December 2007
http://troy.jdmz.net/rsync/index.html
Linux-Backup.net "Examples." Accessed December 2007
http://www.linux-backup.net/Example
OpenSSH.org "Manuals." Accessed December 2007
http://openssh.org/manual.html
2007-12-05
Rickrolling with mod_rewrite

Comic Credit:XKCD
Rickrolling is one of the latest goofy internet pranks, memes, or whatever you want to call it. By strictest definition, to rickroll someone is to send them a link that seems to be for something interesting, but actually takes them to a video of Rick Astley's "Never gonna give you up". These can be via e-mail, instant message, or even discussion forums.
Example of rickroll bait:
Did you see the video of the new spy plane the military is working on?!
Fast forward to today. I find out that some morons have planned to have a little fun with one of the websites that I help with. It's not my site, but run by a client and friend of mine. Not too big of a deal, just some bored teenagers, probably. Not sure what they were up to, but it probably involved lots of forum trolling, trash talking, or spamming. Who knows? I figured I would rickroll these twerps. If they click on the URL they posted in their little forum, they won't get the site they wanted. They will get Rick Astley instead. Meanwhile, the site works fine for everyone else.
In order to do this, I used Mod_Rewrite for apache, and added this to my .htaccess file. In this example, people who click on a link to my site from anywhere on http://www.evil.net will get rickrolled:
RewriteEngine on
RewriteCond %{HTTP_REFERER} ^http://www\.evil\.net [NC]
RewriteRule .* http://www.youtube.com/watch?v=eBGIQ7ZuuiU [R]
The first line just initializes the rewrite engine.
The second line checks the HTTP_REFERER server variable to see if it starts with "http://www.evil.net" (It's a regular expression, "^" means "starts with" and the periods have to be escaped with a backslash or else they're treated as wildcard characters) The [NC] simply means "no case" so that the referer URL is case-insensitive.
The third line tells apache what to do. In this case, it replaces the entire url (.*) with a link to the video on YouTube. The code at the end specifies what kind of rewrite. In this case, [R] means that the web server passes an HTTP 302 status, telling the browser that the URL has been temporarily moved. And you just got rickrolled.
This can be tweaked to keep certain sites from deep-linking your image/media files as well. Keeping EVERYONE from deep-linking requires a different recipe, but in short, you ALLOW only your site to link to the images and media files. Everyone else sees something else of your choosing.
Related Links:
Mod_Rewrite Tips site
Regular-Expressions.info (for forming good RegEx rules)
XKCD.com
Related Links:
Mod_Rewrite Tips site
Regular-Expressions.info (for forming good RegEx rules)
XKCD.com
2007-12-02
Stegnagraphy overview
-Stegnagraphy Introduction-
I think we’re all guilty of drawing up the plans in our heads, with the thermite charge on your hard drive and the big red panic button. But all of these plans essentially have the problem of having to detect a breach of security. An interested party need only be just as creative to detect and thwart your carefully laid booby trap. Nothing quite says "I contain incriminating information" like a booby-trapped PC.
There are some classical methods of hiding communication in plain sight using pre-arranged coded speech an writing patterns which at first look appear as mundane however in actuality the people as saying something completely different. The Russian black market and crime syndicates developed a language using certain chess movements. Prison detainees used vulcanized rubber and crude utensils to draw elaborate tattoo’s denoting rank and other qualities.
By itself stegnagraphy is only good for covert communications to one or more parties. Much has been said about the presence of stegnagraphy laced content in news groups and other public content. Granted the amount of actual covert communications is very exaggerated. The difficulty in using stegnagraphy is that many stegnagraphy techniques can be scanned for just like you would scan for a virus or malware. The very presence of a stegnagraphic utility on your computer or some one accessing a known security website or downloading a known utility can raise a flag to a security analyst that covert communication is likely occurring.
When addressing the topic of including stegnagraphy into freenet (an open source anonymous network) "...Steganography is an ongoing battle of attrition, obscurity and constantly updating are sadly the best defenses in it. Again it's down to `better
the way we do it than the way you don't...' " Basically, the same defenses that viruses use to avoid detection are the only strengths that stegnagraphy by itself has. Another strength it has is that it is not part of the popular user-land security dogma which states that firewall + anti virus + anti spy ware == secure. (which is like saying that its okay not to wear a seat belt in a car because your wearing a condom). So it is only effective against passive detection but thats about it.
-=- TABLE OF CONTENTS -=-
x .......... Introduction
1 .......... Use and purpose
2 .......... Mediums and How it works
3 .......... Utilities currently available
A .......... Works Cited
=======================
1 .......... Use and purpose
=======================
Covert communication is where bandwidth is stolen from a legitimate communication to create a secret channel of communication. So the purpose of stegnagraphy is to create a parasitic hidden communication, carried by a legitimate communication. This is done so that communication can be made in a public space with out drawing attention to it self.
A person who would want to make use of this would be a human rights violation observer who is passing information to an international human rights advocacy group like Amnesty International or the UN. The local authorities would very likely be suppressing information of that sort. If the local authorities would catch a communication a report on an incident, its very likely the reporter would be silenced in one way or another.
(rant)
In the US we enjoy freedom of speech, these rights are being whittled away at under the guise of national security. In other countries, un-censored speech has dire and deadly consequences. Just because what I write may be unpopular, that is not a valid excuse for killing or torturing me. Yet untold numbers of people suffer those consequences daily just because they say something not deemed acceptable by their locality/nation/culture. Development of covert communications and cryptography may seem trivial to us now, but development of these tools can save lives. Allowing the public the use of these tools may have serious consequences for law enforcement, but criminalizing their use and possession has vast and horrible consequences for us as society.
(/rant)
=======================
2 .......... Mediums and How it works
=======================
A good example is a chess game, in the previous example of criminal elements use of coded speech and mannerisms, a chess game is interpreted in a different game, certain reactions to moves are communications, the moves are all valid moves, only their context has changed. This is a high bandwidth covert channel, it uses a lot of the bandwidth of the communication. High bandwidth is where the legitimate communication itself is placed into a different context and interpreted to mean something else. If one of the players affixed a microdot containing private information and affixed it on to the other players chess board then this would be low bandwidth.
The Trusted Computer Security Evaluation Criteria (aka TCSEC) is a set of criteria established by the National Computer Security Center which is managed by the NSA. According to TCSEC there are two types of covert communications. The first is a storage channel, which modifies a stored object into something else less sensitive. The second is a timing channel which manipulates the timing in a communication to transmit the sensitive information.
An example of the two is Jsteg and tcp/ip timing. Jsteg hides information in an existing jpeg in the formatting of the picture which does not significantly change the original picture. Tcp/IP timing is where a normal mundane tcpip request is carried out but it is delayed in a pre-determined fashion which the timing of the transmition of the packets is the medium of communication. A less technical example would be the chess example where the microdot would be the storage channel and the timing of chess movements would be the timing channel.
Another example of using a parasitic medium is communicating using stegnagraphy using what is called chaffing and winnowing. This sends out multiple hidden communications using a secondary channel to provide a key to identify which communication is correct. This method utilizes the previous forms and adds in a code which authenticates the communication.
Lastly, the weakness of stegnagraphy is that it relies on constant change to maintain the communications secrecy. Companies like SARC are using watermarking technologies which are similar to anti-virus technologies to detect both stegnagraphic content and utilities, it is vital that cryptography be used in order to maintain the secrecy of the information within the hidden communication.
=======================
3 .......... Utilities currently available
=======================
From Wikipedia (http://en.wikipedia.org/wiki/Steganography#Implementations)
Online (Hiding text)
* mozaiq Has a large library of stock photos it provides if you can't supply a photo of your own. A good starting point for creating simple steganographic examples.
* spammimic.com will take a sentence that you provide and turn it into text that looks to all the world like spam.
* Hide text in a PNG or BMP image and its corresponding decoder.
** Online (Hiding files)
* Stegger, PHP Steganography—PHPClasses Repository—An open source, feature rich, secure implementation of image steganography written in PHP.
** Downloadable (Hiding text)
* Concealar ...coz a picture speaks a thousand words! The software "Concealar" hides text into images & pictures by a password using cryptographic and steganographic techniques. Encryption algorithm used for text is AES (Rijndael) and the password is hashed with SHA512. The software don't create any noise in the resultant image so pattern-finding & pixel-mapping techniques of steganalysis don't work on this software.
* Bapuli Online—implementing steganography using Visual Basic.
* BitCrypt BitCrypt is one of the easiest to use encryption tools which at the same time provide ultra-strong encryption. It uses up to 8192 long bit key ciphers to encrypt the text, and then stores the encrypted text within bitmap images.
** Downloadable (Hiding files)
* Hiding Glyph: Bytewise Image Steganography: Hides any file (or folder) into any losslessly compressed image (BMP, PNG, etc…). (freeware)
* BestCrypt Commercial Windows/Linux disk encryption software that supports hiding one encrypted volume inside another
* Crypto-Stego Utility for the Zillions of Games program.
* Digital Invisible Ink Toolkit An open-source cross-platform image steganography suite that includes both steganography and steganalysis implementations.
* FreeOTFE Free, open-source Windows/PocketPC/Linux disk encryption software that supports hiding one encrypted volume inside another, without leaving any evidence that the second encrypted volume exists. This probably resists any statistical analysis (as opposed to tools that conceal data within images or sound files, which is relatively easy to detect).
* MP3 Steganographic File System, a description of an approach to create a file system which is implemeted over MP3 files.
* OutGuess A steganography application to find data in Jpeg images.
* PCopy A steganography commandline tool with a userfriendly wizard which can produce lossless images like PNG and BMP. Special features are RLE, Huffman compression, strong XOR encryption and the Hive archiving format which enables the injection of entire directories.
* Phonebook FS protects your disks with Deniable Encryption
* RevelationA platform independent tool created in Java that can hide any data file within a 24-bit bitmap image. Features a unique wizard style interface in the encoding and decoding process.
* stego and winstego Steganography by justified plain text.
* Stego-0.5, a GNOME/GTK+ based GUI for LSB algorithm. License (GPL)
* Stego Archive Source for a large variety of steganography software.
* Steghide Free .jpeg and .wav encryption for Linux and other operating systems.
* SteGUI Free GUI for Steghide for Linux.
* TrueCrypt Free, open-source Windows/Linux disk encryption software that supports hiding one encrypted volume inside another, without leaving any evidence that the second encrypted volume exists. This probably resists any statistical analysis (as opposed to tools that conceal data within images or sound files, which is relatively easy to detect).
* Peter Wayner's website—sample implementations of steganographic techniques, by the author of Disappearing Cryptography.
* NetTools Steganography by hiding data in pictures, archives, sounds, text files, html, and lists.
* Qtech Hide & View v.01 is the newest BPCS-Steganography program for Windows. This is an image steganography. (Free to use)
* ZebDisk ZebDisk is a free software, and you can store, and share your files on the internet with it using Google’s Picasa service.
* SteganoG a simple program to hide a text file in a .bmp file.
(Wikipedia, on Implemenataions of Stegnagraphy, Dec 2007)
We also mentioned Jsteg which can be found at "http://www.theargon.com/achilles/steganography/jpeg-steg/"
=======================
A. .......... Works cited
=======================
Sarc Website. Accessed March 2007
http://www.sarc-wv.com/default.aspxn-
Toad "Attacks and weaknesses." Accessed March 2007
http://www.freenethelp.org/html/AttacksAndWeaknesses.html
Engle, Sophie. (Viewed March 2007). "CURRENT STATE OF STEGANOGRAPHY:
USES, LIMITS, & IMPLICATIONS"
http://wwwcsif.cs.ucdavis.edu/~engle/stego.pdf
Wikipedia.org (Accessed March 2007). "Steganography"
http://en.wikipedia.org/wiki/Steganography
Wikipedia.org (Accessed March 2007). "Covert Channel"
http://en.wikipedia.org/wiki/Covert_channel
Wikipedia.com (Accessed March 2007). "Russian Criminal Tatoos."
http://en.wikipedia.org/wiki/Criminal_tattoo#Russian
http://www.theargon.com/ (Accessed December 2007). "theargon stegnagraphy web archives."
http://www.theargon.com/achilles/steganography/jpeg-steg/
Sysadmin Sunday: Process Accounting
Introduction
lastlog, last, and the contents of the various text log files are a good start for backtracking on suspicious activity and performance issues, but what if you need more detail? Does the system seem to really slow down at certain times of the day? Do you think that call center plebe might be using his shell account for something other than that decade-old CRM tool? Has an account has been compromised and used to leverage more access to your systems? If so, what is the attacker trying to run? It's pretty hard to diagnose those problems with the traditional tools provided.
This week, I'll walk you through using the basic process accounting tools that are available for many UNIX-Like operating systems out there. Process accounting affords the system administrator a totalitarian view of what exactly users are up to -- or, more importantly, what they have been up to!
These tools are included by default on Solaris as well as all BSD systems (including OpenBSD, FreeBSD and even the BSD-derived Mac OS X), and might come standard with some Linux distributions. It's never enabled by default, however. This is partially because the amount of data generated can be quite bulky. I recommend adding the process accounting log file to the log rotating scheme (which varies from flavor to flavor and is beyond the scope of this article)
As usual, green fixed-width text is in a user-level shell, red fixed-width text represents commands run as root (or with sudo).
Enabling Accounting
Once you properly configure and enable accounting, you will begin seeing the logs work their magic.
Debian
On Debian-based Linux distributions such as Ubuntu, you'll have to install the acct package. Once you install it, the accounting will enable by itself, without any further action needed by you.
# apt-get install acct
Red Hat
On Red-Hat based Linux distributions such as (well, duh) Red Hat Enterprise Linux or CentOS, you may need to manually enable it after installing. The package is known as psacct on most RH based Linux distros. The exception that I know of is SuSE, which still calls it acct. On SuSE, I believe you may replace "psacct" below with "acct" and it should work.
# yum install psacct
# chkconfig psacct on
# /etc/init.d/psacct start
BSD
In BSD, you need to first create and set permissions on the file used for accounting information and manually start it:
# touch /var/account/acct
# accton /var/account/acct
To enable accounting by default in FreeBSD, put the following line in /etc/rc.conf:
accounting_enable="YES"
For OpenBSD, add the following line to /etc/rc.conf:
accounting=YES
After installing process accounting packages, I highly recommend finding the nearest opportunity to reboot the system and test to ensure that accounting starts after reboot.
Using the reporting tools
There are 3 main commands used by the process accounting system.
lastcomm (report on commands that have been run by users)
sa (report on system accounting logs)
ac (connect time accounting)
The most obvious of these commands is lastcomm. If you are suspicious of a user's activity, or are simply bored and want to see what's been running recently, lastcomm is the hot ticket. by default, it shows the last commands that have been run at the top of the list and works its way back through time. It's almost too granular at times, so your mileage may vary. Here's a look at lastcomm's output while root is in the middle of installing something with pkg_add on OpenBSD:
Lastcomm's command-line options allow you to manually filter things out by command, user, or terminal as well. I truncated output to 5 lines in the following examples:$ lastcomm | less
lastcomm -X axon ttyp2 0.03 secs Sat Dec 1 13:01 (0:03:28.75)
less - axon ttyp2 0.05 secs Sat Dec 1 13:01 (0:03:28.75)
arch -S root ttyp1 0.03 secs Sat Dec 1 13:02 (0:00:00.02)
gzip -SX root ttyp1 0.34 secs Sat Dec 1 13:01 (0:00:19.42)
ftp -S root ttyp1 1.08 secs Sat Dec 1 13:01 (0:00:19.42)
arch -S root ttyp1 0.03 secs Sat Dec 1 13:01 (0:00:00.03)
gzip -S root ttyp1 0.12 secs Sat Dec 1 13:01 (0:00:13.02)
ftp -S root ttyp1 0.34 secs Sat Dec 1 13:01 (0:00:12.97)
arch -S root ttyp1 0.02 secs Sat Dec 1 13:01 (0:00:00.02)
gzip -S root ttyp1 0.08 secs Sat Dec 1 13:01 (0:00:06.25)
ftp -S root ttyp1 0.11 secs Sat Dec 1 13:01 (0:00:06.25)
arch -S root ttyp1 0.03 secs Sat Dec 1 13:01 (0:00:00.03)
less - axon ttyp2 0.03 secs Sat Dec 1 13:01 (0:00:20.05)
...
sa is a very, very powerful tool with quite a few options. Check out the sa(8) man page to get a feel for all of the capabilities. Some useful highlights are as follows.$ lastcomm user axon
xterm - axon __ 0.23 secs Sat Dec 1 13:11 (0:00:26.91)
bash -X axon ttyp3 0.06 secs Sat Dec 1 13:11 (0:00:26.19)
WPrefs - axon __ 0.36 secs Sat Dec 1 13:11 (0:00:18.25)
lastcomm - axon ttyp2 0.03 secs Sat Dec 1 13:11 (0:00:00.06)
head - axon ttyp2 0.03 secs Sat Dec 1 13:11 (0:00:00.06)
$ lastcomm command sendmail
sendmail -F smmsp __ 0.02 secs Sat Dec 1 13:00 (0:00:01.03)
sendmail -S smmsp __ 0.11 secs Sat Dec 1 13:00 (0:00:01.12)
sendmail -SF root __ 0.03 secs Sat Dec 1 12:46 (0:00:01.03)
sendmail -F smmsp __ 0.00 secs Sat Dec 1 12:30 (0:00:01.03)
sendmail -S smmsp __ 0.11 secs Sat Dec 1 12:30 (0:00:01.11)
$ lastcomm terminal ttyC0
xdm -S root ttyC0 0.08 secs Sat Dec 1 11:16 (0:00:00.36)
sh -S root ttyC0 0.25 secs Sat Dec 1 11:15 (0:00:10.58)
date -S root ttyC0 0.02 secs Sat Dec 1 11:16 (0:00:00.08)
ifconfig -S root ttyC0 0.00 secs Sat Dec 1 11:16 (0:00:00.00)
cron -S root ttyC0 0.02 secs Sat Dec 1 11:16 (0:00:00.05)
Get a system utilization stats for each user:
$ sa -m
root           131         0.43cpu         9168tio           0k*sec
smmsp            9         0.01cpu          165tio           0k*sec
sshd             1         0.00cpu            4tio           0k*sec
_identd          1         0.00cpu            1tio           0k*sec
_x11             3         0.00cpu           67tio           0k*sec
axon           182         0.11cpu          721tio           0k*sec
Show the processes with the most CPU Time:
$ sa -t
     360      143.90re        0.57cp   252.09re/cp       29avio        0k
      18       13.19re        0.16cp    84.11re/cp        5avio        0k   ftp
       4       13.43re        0.12cp   107.85re/cp     1788avio        0k   perl
      29        3.72re        0.08cp    47.93re/cp       67avio        0k   ***other
      16       13.04re        0.06cp   231.90re/cp        0avio        0k   gzip
      45        4.08re        0.03cp   140.01re/cp        2avio        0k   lastcomm
      36        0.16re        0.02cp     7.54re/cp        7avio        0k   sa
      20        1.92re        0.02cp   120.72re/cp        0avio        0k   sed
       3       58.33re        0.01cp  3929.74re/cp       18avio        0k   ssh
       7        0.15re        0.01cp    10.27re/cp       25avio        0k   sendmail
      38       18.59re        0.01cp  1552.26re/cp        3avio        0k   sh
...
Finally, ac shows how long each user has been connected to the system. This uses the normal wtmp log (not the process accounting log) just like the "last" command. By default, it shows the connect time for all users totalled up. The -d argument gives day-to-day totals, and -p displays the totals for each user. These stats aren't very exciting since I just recently enabled it for the purpose of documenting it:
$ ac
total                               13.51

$ ac -d
Nov 30  total        9.73
Dec  1  total        3.78

$ ac -p
axon                                13.51
total                               13.51
Locking it down
It's worth mentioning that if you're on a system that's not yours to administer (for instance, as a user) with process accounting enabled, there's also a good chance that you can gather potentially sensitive information about the system with these tools. The same goes for all the users on your systems. While the information stored is generally benign, there's not much use in leaving them out in the open. Note that in all of the above report examples, I was using my user level account. I highly recommend setting mode 600 on the accounting files and the directory they're in, and making sure they're owned by the root user. This should keep prying eyes out of the accounting logs. In the example below, I use /var/account which is the default for BSD. It varies from one distribution to the next. For example, on Ubuntu, the accounting logs are stored in /var/log/account.
Now, I must be root to run sa and lastcomm. They don't work with my user-level account.# chmod -R 600 /var/account
# chown -R root /var/account
$ sa
sa: retrieving process accounting summary: Permission denied
sa: process accounting initialization failed

$ lastcomm
lastcomm: /var/account/acct: Permission denied2007-12-01
Upgrade your mobo BIOS without Windows or DOS.
Sometimes you find a nifty piece of hardware that you just can't let go into disuse. This time around it was a Tualatin Pentium 3-S 1266MHz CPU new-old stock, new-in-box. I got it some time ago to upgrade a PC for family that it turns out just upgraded the whole system instead. Thus it sat around in the box until I ran across a mobo to drop it in. Recently I found a system at my favorite shopping destination (Surplus Exchange) that had a Tualatin capable mobo; the DFI CM33-TL just so happens to max out a the 1.26Ghz P3-S I already had. Even nicer is that it is the Rev C board which with the newer BIOS updates can boot from USB and can do 48-bit ATA addressing. Alas, no AGP slot. So why all the love for an old P3 server chip? The later P3-S could outperform the early P4 chips and use half the wattage! So what do we do when all that we have to boot the system with is a non-Microsoft OS and most BIOS update utilities run in Windows, or use disk creation software the runs in Windows/DOS? Luckily it seems that is is possible to update some mobos without having to resort to using an unwanted OS. DFI has made the CM33-TL able to boot from a floppy or run a program under Windows to flash the BIOS - or enter an update mode that simply reads the flash utility and BIOS file from a floppy. It turns out that it is a good thing they enabled all three. Under a fairly standard Ubuntu Linux install I was able create a floppy the the DFI board could update from by combining the BIOS update features in a way DFI didn't document.
Several steps that worked for me:
1. Nab the BIOS update of choice for your mobo & revision. Be sure your file is correct - close doesn't cut it with a BIOS. It's either an exact match or something won't work right. In my case I could nab the smaller download intended for a Windows-based update utility.
2. Extract the .zip file containing the utility and BIOS image. Many of the .exe files manufacturers supply are programs meant to run under DOS or a DOS shell to create a disk image. By having the .zip we can get around that.
3. Copy the extracted files to a freshly formatted and tested floppy (basic FAT12/MS-DOS format is fine). Having a good floppy is very key to a successful flash. GIGO is an important point to consider when doing something that can brick a system.
4. Reboot the system and be ready to press the BIOS flash key(s) when prompted. On the CM33-TL you press Alt-F2 just after the RAM test and floppy seek.
5. The BIOS will then enter the flash update mode and read the floppy. If it determines the BIOS image is compatible it will begin to flash it to the BIOS chip.
6. Once it's done enter the BIOS setup and "Load Safe Defaults". This will let the BIOS set any settings that might cause the system to fail to boot. Go though the menus and set things as you need.
7. Test boot to be sure it works as before. Test boot again using the new features and marvel at the sudden uses that have opened up.
I had been concerned about having to make a bootable floppy for the update but the BIOS option to enter the update mode does not need a fully bootable floppy to operate.
With a system like this it is possible to operate a NAS system with large drives on a chip that boots from a USB thumb drive, operate on older, cheap RAM and uses little power. Having a system that boots from USB allows you to configure the server to spin down drives that are idle and save more power; an OS on a USB device will not need to spin up the main/RAID drives to write logs, etc. Smart choices of hardware can make a cobbled together server operate more efficiently.
Zend Framework and Google Spreadsheets
I've been tinkering with Zend Framework specifically for the purpose of dealing with Google Spreadsheets for the past couple of days. I know that most of my code is a complete bastardization of PHP. The examples I saw were using classes and objects. I'll be frank with you: I am not a developer, and I haven't taken the time to really wrap my brain around that stuff. The ZF Google Data tools return objects, and I worked my way through those enough to get the data out that I wanted, just in order to make this little project work.
I may build on this a little bit later, but for now I'd like to show you what I threw together, then how it works. Sorry, this is kind of big for a blog post so I put it in a scrolly iframe. Each little block of code has some documentation. It's worth reading my comments.
You can also download it here: Google Spreadsheets Explorer (php source, 4kB)
I don't actually have Zend Framework on any production servers right now, so I did a fresh install of PHP5 and Zend Framework on my OpenBSD virtual machine. If you want to test this yourself, you can easily get Zend Framework up and running easily if you have PHP 5.1.4 or newer running anywhere. Currently, PHP is up to 5.2.5.
When you first fire it up, there's no session, so it displays the login screen. You login with your google account information: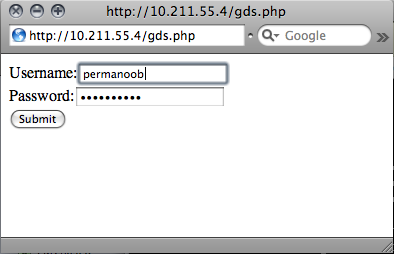
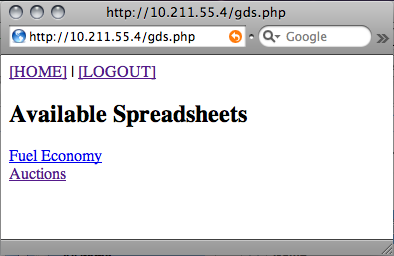
After logging in, a session is established. How this session information is stored varies from one PHP installation to the next. It might be in a client side cookie, a server side database, etc. Behind the scenes, the script is authenticating your stored session information to Google and creating the $client construct, which is what we'll use to bounce queries off of the mothership.
Once authenticated, its default action is to fetch a list of spreadsheets. This is an XML feed that Zend Framework essentially makes into an object. It contains one entry per spreadsheet. Spreadsheets are called by the key, which is a string unique to the creator of the spreadsheet, a period, then a string unique to the sheet itself. These are all properties of the "entry" within the feed object. I made a quick function that returns a basic array. Each element contains the URL to pull up the spreadsheet in my GS Explorer script, and the title of the spreadsheet. This gets displayed to the user.
function getsss($client) {
# Gets a list of spreadsheets; Returns an array.
 $spreadsheet = new Zend_Gdata_Spreadsheets($client);
 $feed = $spreadsheet->getSpreadsheetFeed();
 foreach ($feed->entry as $entry)
 {
     $id=split("/",$entry->id->text);
 $key=$id[5];
 $url="http://".$_SERVER['HTTP_HOST'].$_SERVER['REQUEST_URI']."?key=$key";
 $availss[$url]=$entry->title->text;
 }
return($availss);
}
Clicking on one of the spreadsheets will give you a list of the sheets (or pages) within it. The code for getting the list of sheets is very similar to the code for getting the list of spreadsheets, so you can reference the source if you're interested.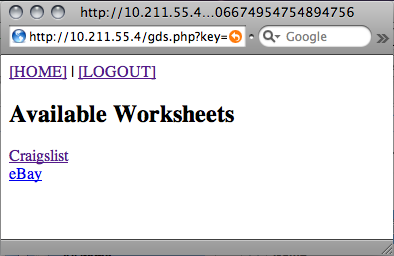
I threw something together that just rips through the sheet and pulls the cell data out, dumping them in order, left to right, top to bottom. I could clean it up a bit, but this demonstrates reaping data out of Google Spreadsheets. Obviously, you could automate this to pull data down.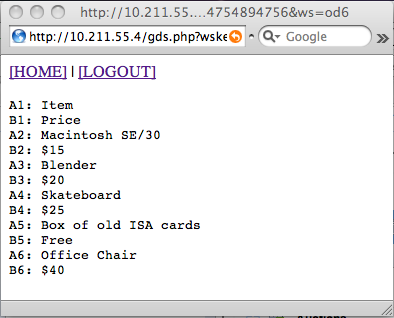
Unfortunately, the GData API, while slick, can be a bit sluggish. You probably wouldn't want to run a production site using live data from Google Spreadsheets. I'll cover writing to GS at a later time. That could come in handy, as you could use a web front-end or scheduled PHP script to occasionally update the values of a spreadsheet.
2007-11-30
November: Ax0n's Lost & Found
Things I stumbled across and kept in November:
- A Nintendo DS Lite, found alongside a curb on my way to the November KC PHP User's Group Meeting. I picked up a few games for it including Brain Age and Need For Speed: Pro Street.
- Two CCTV Cameras. One with bad horizontal sync but a good auto-iris lens. The other with a cheapo manual lens and otherwise good CCD imager and electronics. I borg'd them together to make one working camera with an auto-iris lens. Found in some nondescript dumpster.
- And of course the slightly-broken 25" Television, which now replaces the piece of crap 13" TV I had in the bedroom. Found next to a dumpster in my apartment complex.
2007-11-25
Sysadmin Sunday: A slightly more advanced intro to SUDO
Sudo is a neat utility which allows a computer to be administrated with out passing around the root password.
This article is meant for folks who are a step beyond the "Linux flavor of the week syndrome" and are needing to delegate responsibilities to other people with out letting the cat out of the bag. This document does not cover user and group restrictions only the run as super user aspect is covered.
1. Introduction
2. Basic demonstration
3. Configuration
4. Administrator Sluggo says ...
5. Informative resources
===========================================================
1 - Introduction
So here we are, we got a pile of people to take care of stuff for you but we need to limit each persons access to only what they need to do.
2 - Basic Demonstration
Most installations restrict sudo so it is un-useble. An admin needs to run the "visudo" command to add users or groups into sudo in order for it to allow some one to run an application as another user like root or some other powerful system user.
Sudo is similar in function to the switch user or "su" command. The difference is that where su is a dumb animal and asks for the target users password, sudo is configurable to authenticate to different account privileges in different ways and provides detailed logging and control to what applications can be executed with that users permissions.
One of the default setups which people choose is to allow all users in the wheel account to run as root privileges on all applications on all hosts. This is not an ideal setup obviously because any one in the wheel group becomes like root.
But lets say I am a backup administrator who for some reason needs root access to the whole machine.
somehost$ sudo tar -cvf /dev/tapedevice0 /somehost$ sudo /bin/shThis behavior can be changed of course which is the next topic.
3 - Configuration
The configuration file for sudo is typically in /etc/sudoers. But typically we would use the "visudo" command to configure the file.
USER or USER_ALIAS HOST or HOST_ALIAS = (TARGET USER OR USER_ALIAS) COMMAND OR COMMAND_LIST
Example:
Defaults!PAGERS        noexec //prevents shell escapes in pager programs
User_Alias     ADMLIST = asmodianx
User_Alias     USERLIST = will, wendy, wim
Runas_Alias    TARGETLIST = root, operator
Host_Alias     HOSTLIST = HOST1,HOST2
Cmnd_Alias     PROGRAMLIST = /usr/bin/sh, /usr/bin/csh, \
                    /usr/local/bin/tcsh, /usr/bin/rsh, \
                    /usr/bin/ksh, /usr/local/bin/zsh
Cmnd_Alias     PAGERS = /usr/bin/more, /usr/bin/pg, /usr/bin/less
#-------------------
USERLIST     HOSTLIST=(TARGETLIST)PAGERS
ADMLIST      HOSTLIST=(TARGETLIST)PROGRAMLSIT
We then allow access to the shells for the admin user. Sudo is also network aware
PAM modules should work seamlessly but LDAP groups look like local groups I believe.
NIS+ networks or using rsh is where the network aware settings come into play.
4 - Administrator Sluggo says ...
Some Linux distributions have some silly concepts when it comes to default sudo configurations. SUSE for some reason thinks that sudo is some kind of replacement for su, so it enables sudo commands for all members of the "users" group only if they know the target users password. Assigning root shells is generally a bad thing too but this depends heavily on your management style.
5 - Informative resources:
http://www.wlug.org.nz/SudoHowto
http://www.linuxhelp.net/guides/sudo/
http://www.gratisoft.us/sudo/man/sudo.html
2007-11-18
Sysadmin Sunday: Quick RBAC primer for AIX 6
A while back ago, I promised to revisit AIX's RBAC functionality to show what kind of cool features have been added for the latest incarnation of Big Blue’s enterprise server operating system. In this week’s Sysadmin Sunday, I’m going to deliver on that promise and take a stroll through the enhanced RBAC functionality in AIX 6. I have previously mentioned AIX 5L’s RBAC implementation was minimal. That’s certainly changed quite a bit. There are 263 default authorizations on my AIX 6 installation fresh out of the box, and you can add more. The real bonus, however, comes from you to give meaning to the authorizations. Prior to AIX 6, only a select few tools recognized roles and authorizations. Now, you can apply security attributes to practically anything on the system, and grant or restrict access based on the authorizations a given user has active.
Conventions
I will be using green block quotes to symbolize commands run as a normal user, and red to symbolize commands run as root. Bold, bright text represents user input.
Overview of RBAC
RBAC stands for Role Based Access Control. In AIX’s implementation, there are three pieces to the RBAC puzzle: Security Attributes, Authorizations and Roles. I'll use some commands in this section, but I'll outline the commands in more detail later on in the article.
Security Attributes
Security attributes may be set for any command (executable), file, device, or process. These attributes determine which authorizations get which privileges. Think of security attributes as a lock on certain parts of the system. For instance, this is the list of security attributes for the “passwd” command:
# lssecattr -F -c /usr/bin/passwd
/usr/bin/passwd:
egid=0
accessauths=aix.security.passwd
innateprivs=PV_AU_ADD,PV_AU_ADMIN,PV_AU_PROC,PV_DAC_O,PV_DAC_R,PV_DAC_W,PV_DAC_X,PV_DEV_QUERY,PV_FS_CHOWN,PV_FS_CNTL,PV_FS_MKNOD,PV_FS_MOUNT,PV_FS_RESIZE,PV_PROC_CRED,PV_PROC_ENV,PV_PROC_PRIO,PV_PROC_RAC,PV_PROC_RSET,PV_PROC_RTCLK,PV_PROC_SIG,PV_PROC_VARS
secflags=FSF_EPS
The innateprivs and secflags attributes look quite intimidating at first glance. They're actually quite simple, but there are so many different privileges that it would be preposterous for me to cover them here. They are well-documented in the IBM Redbook titled AIX V6 Advanced Security Features Introduction and Configuration.
The short and sweet version of it all is that you can run any command as the root user and use tracepriv to determine what privileges were used during the execution of the program. Then, when you go to add a new entry for a device, command, file, or process, you can specify the privileges that tracepriv displayed, adding them to innateprivs for the entry.
# tracepriv passwd axonThe set of privs listed above is the bare minimum that would need to be added to run /usr/bin/passwd. Using this method to determine what's needed for other privileged commands (such as third-party software) is a trivial task.
Changing password for "axon"
axon's New password:
Enter the new password again:
758004: Used privileges for /usr/bin/passwd:
PV_AU_ADD PV_AU_PROC
PV_DAC_O PV_PROC_TIMER
PV_TCB
Authorizations
Authorizations are assigned to roles. Think of authorizations as keys to the security attribute “locks”. There’s not much to the actual authorizations themselves. They are just handy labels for unlocking security attributes. The only things that really matter to us here are the name (aix.security.passwd) and the dfltmsg, which is a human readable description of the authotization. In order for our sysadmins to set passwords for other users, they must have a role which contains the aix.security.passwd role, shown below:
# lsauth -f aix.security.passwd
aix.security.passwd
id=6320
dfltmsg=Password Administration
msgcat=sysauths.cat
msgset=8
msgnum=40
Roles
You can’t just give a sysadmin user access to the aix.security.passwd authorization, though. There’s a role, in this case, SecPolicy, which contains this authorization and a bunch of other ones that are relevant to a sysadmins’ job.
Roles are assigned to a user or group of users, and themselves contain one or more authorizations. They can also inherit all of the authorizations within other roles. You could think of this as a keychain with only the keys that a user or group needs to do their job. In the case of a role that inherits other roles, it would be more like a keychain with other keychains on it. The important fields we're concerned about:
- Authorizations is obviously the major item here, with a comma-separated list of auths that the role is capable of using.
- Rolelist contains a list of sub-roles which this role can get permissions from as we'll see later.
- Groups is a comma-separated list of groups that a user must be a member of in order to invoke the role.
- Dfltmsg is, again, a friendly description, this time for the role itself.
- auth_mode may be set to either NONE or INVOKER. If it's set to INVOKER, the swrole command will prompt the user for their own password (kind of like sudo). If set to NONE, swrole will simply create a new shell with the role's permissions.
# lsrole -f SecPolicyAlthough, if you look, you can see that SecPolicy is inherited by another role, isso. So, if a user has the role of isso assigned to them, then it is not necessary to also grant them a role of SecPolicy.
SecPolicy:
authorizations=aix.security.audit,aix.security.auth,aix.security.cmd,aix.security.config,aix.security.device,aix.security.file,aix.security.kst,aix.security.network,aix.security.proc,aix.security.role,aix.security.passwd,aix.security.su,aix.security.tcb,aix.security.tsd
rolelist=
groups=
visibility=1
screens=*
dfltmsg=Security Policy Administration
msgcat=role_desc.cat
msgnum=8
msgset=1
auth_mode=INVOKER
id=8
# lsrole -f issoUsers and Roles
isso:
authorizations=aix.device,aix.fs.chroot,aix.fs.manage.export,aix.fs.stat,aix.network,aix.proc.fuser,aix.proc.ipc,aix.proc.status
rolelist=DomainAdmin,SecPolicy,SysConfig
groups=
visibility=1
screens=*
dfltmsg=Information System Security Officer
msgcat=role_desc.cat
msgnum=1
msgset=1
auth_mode=INVOKER
id=1
When creating a user (with mkuser) or modifying one (with chuser), you can set the roles or default_roles attributes. This is a comma-separated list of roles as found with lsrole ALL. default_roles defines roles that become active as soon as the user logs in. roles are additional privileged roles that require the user to activate the role with swrole.
Example: Adding a role to a user
# chuser roles=isso axonNow, with my user-level account, you can see that I cannot change root's password until I've switched to the isso role:
$ passwd rootCommands
3004-664 You are not authorized to change "root's" password.
$ rolelist
isso Information System Security Officer
$ swrole isso
axon's Password:
$ passwd root
Changing password for "root"
root's New password:
AIX makes excessive use of mk (make), ch (change), rm (remove), and ls (list) commands. RBAC is no different, as you'll see. You'll see example of how to use these commands in the following sections of the article.
Auth commands:
lsauth - Lists an authorization. lsauth ALL lists all auths.
chauth - Changes authorization
rmauth - Removes authorization
mkauth - Make a new authorization
Example: Creating and listing a new authorization for the security team.
# mkauth dfltmsg="Test auth for security team" secauthrole commands:
# lsauth secauth
secauth id=10013 dfltmsg=Test auth for security team
lsrole - Lists a role's attributes. lsrole ALL lists all roles.
chrole - Changes a role's attributes.
rmrole - Remove a role
mkrole - Make a new role
Example: Creating and listing a new role for our security team staff members that contains the secauth authorization we just made
# mkrole authorizations=secauth dfltmsg="Security staff priv. commands" secstaff
# lsrole secstaff
secstaff authorizations=secauth rolelist= groups= visibility=1 screens=* dfltmsg=Security staff priv. commands msgcat= auth_mode=INVOKER id=11
Security attribute commands:
lssecattr -c -F [/file/path] | ALL - show priv. commands
lssecattr -d -F [/dev/path] | ALL - show priv. Devices
lssecattr -f -F [/file/path] | ALL - show priv. file access
lssecattr -p -F -h [pid] | ALL - show priv. processes
setsecattr - set security attributes
Example: Placing security attributes on a command
# setsecattr -c euid=0 egid=0 accessauths=secteam innateprivs=PV_SU_ROOT,PV_SU_UID /usr/bin/whoami
Whenever you modify any roles, authorizations or security attributes, you should run the setkst command to update the kernel security tables.
# setkstNow that we have updated the security tables, the only thing we need to do is assign roles to a user to see how they work.
Successfully updated the Kernel Authorization Table.
Successfully updated the Kernel Role Table.
Successfully updated the Kernel Command Table.
Successfully updated the Kernel Device Table.
Example: Adding a new role to a user. axon was already a member of isso, so we add secstaff to the list:
# chuser roles=isso,secstaff axon
End-user commands:
rolelist - displays a list of roles on the system which you are authorized to swrole to.
swrole [rolename | ALL] - creates a new shell with all of the privileges of the selected roles. Will prompt for your password if auth_mode is set to INVOKER for any of the roles.
With my user-level account, I can now run "whoami" with root privileges thanks to the security attributes, authorizations and role that I added.
$ whoamiTo remove security attributes, use the rmsecattr command.
axon
$ rolelist
isso Information System Security Officer
secstaff Security staff priv. commands
$ swrole secstaff
axon's Password:
$ whoami
root
# rmsecattr -c /usr/bin/whoamiNow, my user-level account runs whoami with usual privileges, despite still being in the secstaff role.
# setkst
Successfully updated the Kernel Authorization Table.
Successfully updated the Kernel Role Table.
Successfully updated the Kernel Command Table.
Successfully updated the Kernel Device Table.
$ swrole secstaffThis should be enough to get you started reaping the benefits of the completely revamped RBAC solution that comes out of the box with AIX 6.1.
axon's Password:
$ whoami
axon
2007-11-13
Dumpster Diving - TV Repair
-- OR --
One man's trash is another man's project.
One man's trash is another man's project.
Introduction
I dumpster dive. No, I really do. I do it quite frequently, and often find plenty of cool things. Locks. Electronics. Jackets. Tools. Jimmy Hoffa. Computers. All sorts of useful things.
This morning, it was a TV set, complete with the remote control. Throwaway TVs are so common that it's almost annoying. Usually, it's something minor that's failed. This day and age, people are always looking for a good reason to make the jump to some new 80-inch high-def whiz-bang wall ornament. If the most minor thing goes wrong with their current 5-year-old set, it's game over, and time to upgrade.
Warning about televisions and computer monitors
Devices with CRT screens can contain a dangerous amount of stored electricity. Keep your hands away from large transformers, thick red or black cables, and the soldered side of the PC board inside the CRT device. We don't want people getting hurt, so please do some research if you're unfamiliar with CRT devices.
My find and today's fun project
It was about 40 degrees this morning, so when I brought the TV set inside, it immediately began forming condensation. I left it alone until I could plug it in and check it out this evening. The last thing I need to do is destroy a good TV by plugging it in while it's soaking up moisture from the air in my apartment.
When I get home, I see that it looks to be in pretty good shape. Nice! I plugged it in, and it powered on with the power button. So far so good! When I went to plug the coaxial cable into it, though...
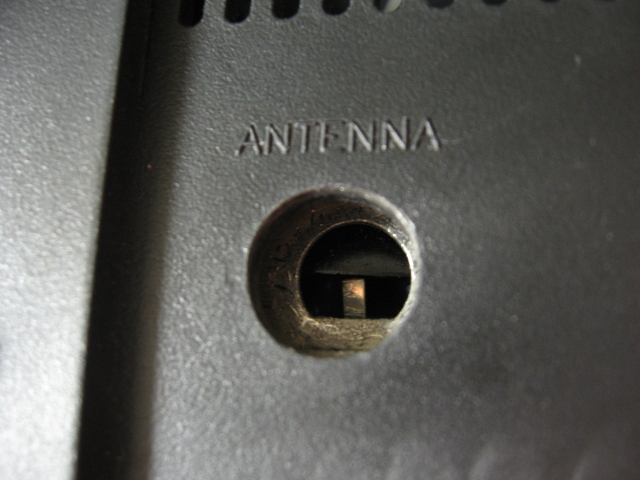
Great. So that's why this thing is in the dumpster! I went ahead and grabbed the coax cable anyways, and touched the center pin of the coax to the metal tab inside the hole, and to my surprise, I got a signal and a pretty good picture.
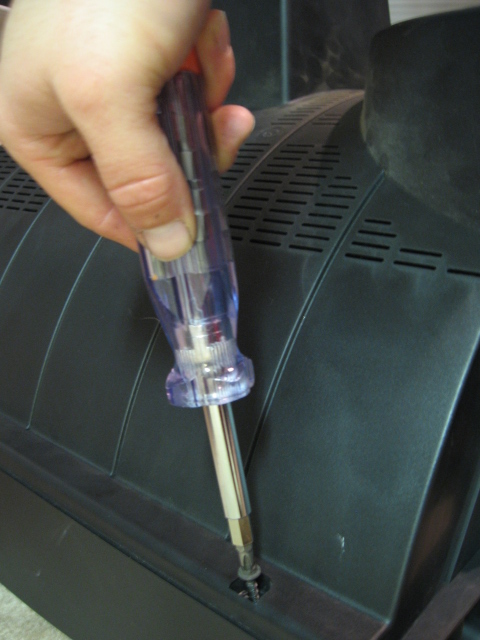
A quick trip to RadioShack should fix this pretty easily.

I plug in the Soldering iron so it's ready to go. Did you know I also found this soldering iron in a dumpster? That was about 5 years ago, but it's still going strong!

Then, I start hacking away...
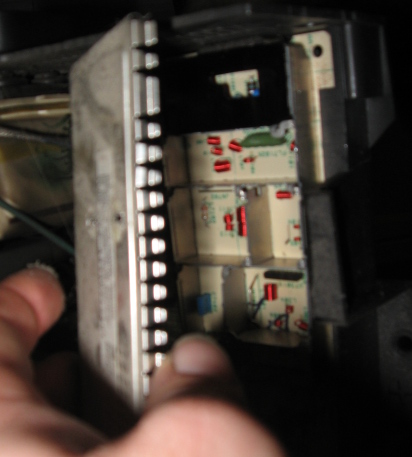
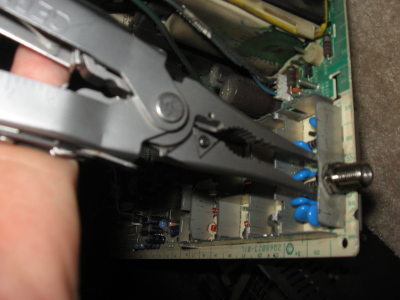
Once the case is open, I see that the F-Connector's location is obscured within the tuner module, so then it's a fun game of "disassemble the tuner"
The back side of these F-connectors are too deep. To offset this problem, I put one more nut on the F-connector, then put the connector onto the tuner, hand-tightened. I leaned the old broken center pin against the new center pin tab.
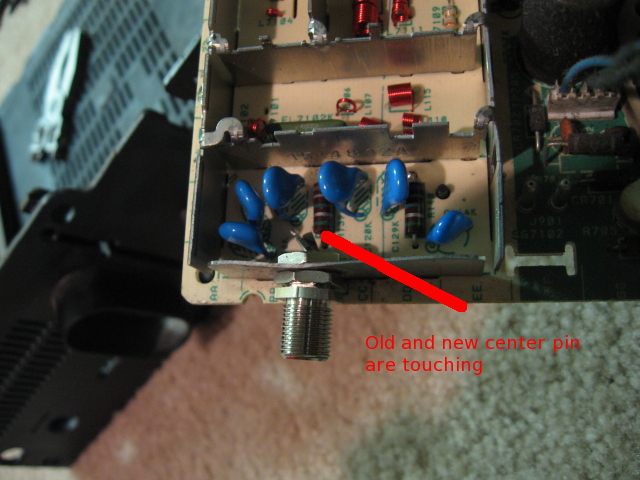
I threw the trusty needlenose attachments onto my Gerber Evolution, and went to work actually tightening the F-connector to the tuner housing.
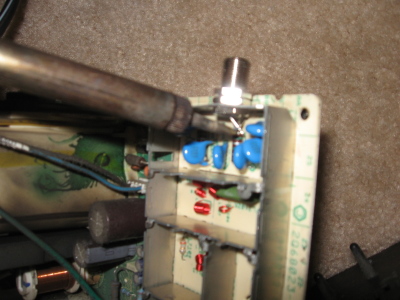
I then applied a little bit of solder, making sure that the solder "flows" well, so we don't get a cold solder joint...
Final re-assembly begins with putting the tuner back together again. See the nice, new, shiny F-connector?
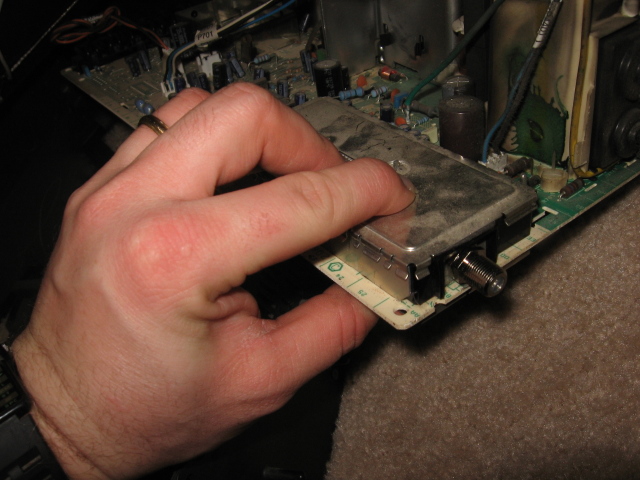
By the way, it worked perfectly once I put it all back together. :)
Subscribe to:
Posts (Atom)


