
I ran across a bizarre Windows issue today on a friend's laptop. It appears to be relatively common, but the answers seem to be elusive, or all over the map. Not only was there an "NTLDR Missing" error, but in trying to access the Recovery Console, the Windows XP Install CD was halting as a blank screen right after "Setup is inspecting your computer's hardware..."
The short answer:
The partition table or boot sector is corrupt and it's messing with Setup when it scans your hard drive and causing the lock up before the installer starts. You are going to have to delete the partition and re-install Windows from scratch. I hope you have backups! Of course, if you prefer, now's a good time to try some other Operating Systems. ;)
The long answer:
Normally, "NTLDR Missing" errors are easy to fix with the recovery console of the Windows install CD or with 3rd party tools like FixNTLDR, UBCD or BartPE (builds a live-CD from your Windows install CD)
The first things to try are replacing the core boot files from the pristine versions on the XP CD (as per the Microsoft KB article) -- ntdetect.com, ntldr, and verify that the syntax of boot.ini is valid. Also, running fdisk /mbr can fix certain boot problems. These should be non-damaging to the data on your drive. You should try to fix it before you go blowing away the partition table.
In my case, none of the third party tools were working, and all the Windows XP CDs I have failed to boot past the "Setup is inspecting..." screen on this machine. The screen went dark and the CD stopped spinning, the system hung and refused to boot. No boot means no recovery console. I tried using the Windows 7 CD, too. It would boot but couldn't find a valid windows partition to repair.
My next step was to boot into Backtrack 4 Final from USB, and try to replace the files as one would from the Windows Recovery Console. I was able to write to the hard drive, and get the files off the OEM Restore CD just fine. Boot.ini was also intact. Still, the system wouldn't boot from the hard drive or the XP install CD.
As mentioned above, it was time to blow away the partition table and start over. Fortunately, my friend had good backups on an external hard drive. I opted to use BackTrack 4 Final to perform the partition-ectomy. Several boot CDs can do this, too. YMMV.
Deleting the partition with BackTrack is simple. Once you have booted backtrack, execute "cfdisk /dev/hda" - This assumes you have only one hard drive in the machine, and that there's only Windows XP installed.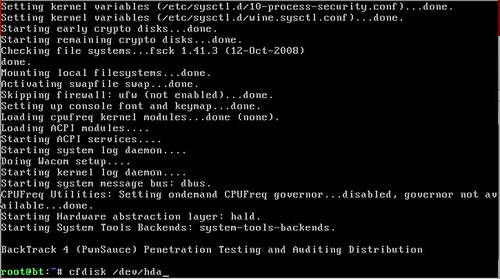
Select the partition using the up/down arrow keys and navigate with the left/right arrow keys to the "Delete" menu option. You may be wondering what I'm doing with a scant 2GB hard drive. This is actually a Windows XP Virtual machine, used for lab testing.
Then, use the arrow keys to navigate to the "Write" option.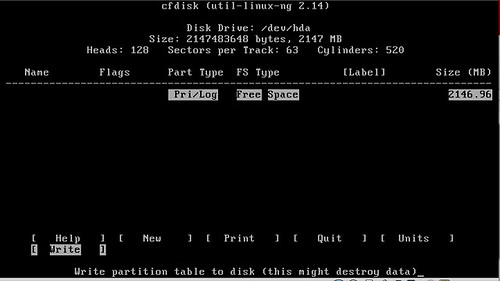
Quit cfdisk, then reboot with your Windows CD to start the installation process.
2010-01-24
Fixing Windows: NTLDR missing, install CD won't boot

2009-08-13
Cratered your Linux Box? Here are some helpful tips.
A friend of mine encountered a problem where all the storage vanished from the system while he still had a root shell. He needed to reboot, but could not do it any traditional way, because "reboot" "init" and most other commands were all on the no-longer-mounted filesystem.
I have a bunch of little shell gems written down in my notebook. Some of them are "things you can do with only shell built-in commands". Built-in commands also come in handy when your system is completely cratered, for example, by a fork bomb. Ever see this? It's usually the harbinger of bad news.
axon@silence:~$ ps
-bash: fork: Resource temporarily unavailable
Some of the following may work in other operating systems with modification.
The basics
ls:
One of the first things you'll probably want to be able to do is list files. Since "cd" is a built-in as well, you can navigate. You can use the old standby "echo *" - it will barf out a list of files in the current directory. You can even alias it.
alias ls="echo *"
cat:
You'll need to create a shell function, but if you use built-ins wisely, you can create a "cat" clone that will dump files out by reading and echoing one line at a time until the end-of-file. I have this written down, but I apparently found it on some web discussion board years ago. You can name the function "cat" so that it doesn't even try to use /bin/cat anymore.
cat() { while IFS="" read l ; do echo "$l" ; done < $1 ; }
Use /proc!
Once we have a "cat" and "ls" replacement, we can poke around in /proc to our heart's content to get information about what is wrong. Don't ignore informative treasures such as /proc/meminfo and files in /proc/sys for example. Everything you find in /proc has the potential to help you investigate what went south. Here are some of my favorite tricks for using /proc:
uptime:
cat /proc/uptime (shows uptime in seconds)
cat /proc/loadavg (shows load averages you'd expect with the "uptime" shell command)
ps:
This is REALLY UGLY and just plain ghetto. But it will tell you what pid belongs to what. Note, you'll have to have the "cat" function above defined. If you want to decode all the info, look at the /proc/[number]/stat section of the proc(5) man page.
ps() { for line in /proc/*/stat; do cat $line; done }
kill:
This is a builtin of most shells including bash... No special tricks needed. You can TRY to kill things now that you have a ghetto "ps" replacement. If you have a fork-bomb, you'll have to fight pretty hard to get anywhere.
kill -[signal] [pid]
Last ditch efforts
reboot:
One can force a reboot using the "echo" builtin and sysrq kernel calls, but SysRq has to be compiled into the kernel, it is with Ubuntu. This was the eventual solution to my friend's almost-unusable system at the beginning of this post, since all other hope was lost.
The following will enable SysRq, then send the "boot" command (equivalent to pressing alt-prtscr-b on the console)
echo 1 > /proc/sys/kernel/sysrq; echo b > /proc/sysrq-trigger
exec:
Exec [command] will almost always work, but you only get one shot at it, since it replaces the shell with whatever you call. If you waste it on something that doesn't recover the system, you'll lose your shell at the same time. Best to use this on "reboot" or similar.
exec /sbin/reboot
Have any other must-know commands to weasel your way out of a nearly-deadlocked system? Let us know in the comments! I am always looking for nifty shell recipes like this to jot down for a rainy day.
2009-07-05
Sysadmin Sunday: Guard against file corruption with PAR
Introduction:
Bit rot, File corruption, partial file transfer, call it what you will, digital transmission mediums some times fail and you are left with a corrupted fragment of data if any at all. In the case of large files in which re-transmission would take hours or days, this is a tough situation.
PAR uses a RAID like technique to salvage corrupted files in most cases only needing to obtain files containing restore information that are a fraction of the size of the original file.
This article is intended for people with basic to intermediate understanding of a un*x style operating system.
-=-=-=-=-=-=-=-=-=-=-=-=-=-
Table of contents:
1. PAR and the Reed-Solomon error correction algorithm
2. Available applications based off of PAR
3. Examples
4. Informative resources
-=-=-=-=-=-=-=-=-=-=-=-=-=-
1. PAR and the Reed-Solomon error correction algorithm
The Reed-Solomon algorithm was developed in 1960 by Irving S. Reed and Gustave Solomon. It is used in many technologies such as CD's, BlueRay, DSL Modems, RAID6 and more. This method of error correction is used to protect against certain forms of media defects or data transmition errors.
The PAR utility was developed by Tobias Rieper and Stefan Wehlus for the purpose of recovering corrupted files and file fragments from Usenet posts with out needing to download the file all over again. Later, to compensate for some limitations of PAR, the PAR2 specification was developed by Michael Nahas and Peter Clements. Clements then wrote some of the first PAR2 applications.
A simple way of explaining what PAR does is that it takes the original source files then applies the mathematical algorithm to it which contains a sort of processed description of what that file looks like. Then lets say you send someone a file but for some reason the transmission fails mid way through the file transmission. All that needs to be done is to download the results of the mathematical operation (which are significantly smaller than the original file) and run the par utility to apply the math to the file fragment. Par can fill in the blanks using the algorithm and restore the the file.
2. Available applications based off of PAR
There is of course the fore-mentioned open source application written by Peter Clements et all. There are a slew of other PAR clients for Mac, OS 9 and 10, Windows, Linux, BSD and more. Though the PAR1 specifications are incompatible with the PAR2 specification most clients support both formats side by side. For a detailed list of PAR compliant projects check out the Parchive sourceforge website. If you are using Linux, you can either download a Linux rpm or source tarball from the sourceforge site . Or use a package system such as apt-get to download it from your distributions package archives.
3. Examples
In this example I am using Ubuntu Linux.
- This will require the Ubuntu Universe repository. You can uncomment this in "/etc/apt/sources.list" using "sudo vi /etc/apt/sources.list".
- Then update your sources using "sudo apt-get update".
- Finally get the par2 package using "sudo apt-get install par2" .
- Using dd create a 10MB test data file from /dev/zero "dd if=/dev/zero of=/tmp/testdata.bin bs=1024 count=10240"
- Then create our par2 file and recovery blocks: "par2 create testdata.par2 testdata.bin"
- Now im going to copy the original data to a different name then make some changes to it.
- Then I run "par2 verify testdata.par2 testdata.bin"
- par2 tells me that I need one recovery block to repair the file. (* during the create process par2 created several repair blocks. Since par2 over-samples, I can use the either the largest repair file or a combination of the smaller files for the same effect.) In this case I just need to have the repair block file called testdata.vol000+01.par2 in the same directory.
- I then type in "par2 repair testdata.par2 testdata.bin" where it then reports that the file has been repaired.
Clements,Peter Gallagher,Ryan Nahas,Mike et. all. "Parity Archive Volume Set: File
Specification, Clients, and Related Resources" (Accessed July 2009)
http://parchive.sourceforge.net/
Wikipedia.org "Reed-Solomon Error Correction" (Accessed July 2009).
http://en.wikipedia.org/wiki/Reed%E2%80%93Solomon_error_correction
Wikipedia.org "Parchive" (Accessed July 2009).
http://en.wikipedia.org/wiki/Parchive
2008-09-09
Recover text from damaged MS Word documents
 Sorry for posting so much of other peoples' news today, but I found this via LifeHacker and it's going to come in very handy for my own Mother (a college English professor) and several of my old co-workers at that same college. For a long time, I was the go-to-guy for student data recovery, and students seemed to have a knack for really borking their Word Documents, not having any backups, or bringing in files that were created by some un-known word processing suite whose native format couldn't be opened up by any software in the computer labs.
Of course, my best friends for this kind of thing were usually dd and strings... not exactly user-friendly enterprise applications. I'm going to e-mail this to my mother and some old co-workers now. I can just imagine the green marks all over this article's epic run-on sentence in the last paragraph. Yes, my mother grades her papers with green ink. Less intimidating than red, she claims. Hi, mom! Love ya lots.
Download Repair My Word for free! Sorry, Windows Only.

 Posts


