I recently had to do an audit and see who was logged in when some performance issues were being reported on one of our Solaris boxes. The problem? The performance issues had been talked about in an email thread for a long time before it fell onto my plate. The only way to find out who was logged in during that time frame was to pull data out of old backups of the wtmpx file.
On Solaris, wtmpx contains data such as what IP address a user connects from, when they logged in, and how long they stayed on. It's a binary, non-human-readable format. I did some research to figure out how to get usable data from it. The fwtmp command converts the wtmpx records to ascii, making it easy to parse them, for instance, with Awk. Unfortunately, this utility isn't in the path, and I don't know why. No matter, though. I'll tell you where it's at. It's a stream converter, so it takes the raw wtmpx file as input, and bars out plain text. This is how I usually run it:
$ /usr/lib/acct/fwtmp < /var/adm/wtmpx > wtmpx-`date +%Y-%m-%d`.txt
This creates an ascii wtmpx file with the current date as part of its filename.
See the man page for fwtmp for more information. It can also be used for importing records into wtmp. With some scripting, a nice log-rotation mechanism can be implemented.
2008-01-24
UNIX Tip: Getting data out of wtmpx on Solaris
2008-01-22
Perl: Convert epoch seconds to readable time
To make some kind of sense out of that stamp, you can use perl's localtime() function right from the UNIX command-line.
$ perl -e 'print scalar localtime('1201017672'); print "\n";'
Tue Jan 22 10:01:12 2008
2008-01-19
Sysadmin Sunday: OpenBSD 4.2, Apache, MySQL, PHP (OAMP?)
It used to be that some stuff had to be compiled by hand to make everything work just right, but the package/port guys finally nailed it. With the help of obsd_pkgscripts, OAMP is a breeze. The benefits of running your AMP-driven website atop OpenBSD are many, not the least of which are the facts that it's a minimalistic, secure, and high-performance platform out of the box.
OpenBSD already ships with Apache. It's a patched and tweaked version of Apache, but it's Apache all the same. You're already halfway to OAMP land with OpenBSD and Apache installed out of the box.
First, install the MySQL Server. I obviously chose to use my pkg_get.sh tool for this, but it's not needed.
$ pkg_get.sh mysql-server
Attempting to fetch/install package...
mysql-client-5.0.45: complete
p5-DBD-mysql-3.0008:p5-Net-Daemon-0.39: complete
p5-DBD-mysql-3.0008:p5-PlRPC-0.2018p0: complete
p5-DBD-mysql-3.0008:p5-DBI-1.53: complete
p5-DBD-mysql-3.0008: complete
mysql-server-5.0.45: complete
--- mysql-server-5.0.45 -------------------
You can find detailed instructions on how to install a database
in /usr/local/share/doc/mysql/README.OpenBSD.
Next, that README contains some useful information for more advanced installations and performance, but summarized, follow these instructions. I use sudo, and rarely use the root account. I recommend doing the same.
Create the DB:
-bash-3.2$ sudo /usr/local/bin/mysql_install_dbStart MySQL:
-bash-3.2$ sudo /usr/local/share/mysql/mysql.server startTo make MySQL Start up at boot, add the above mysql startup line to /etc/rc.local without the "sudo" at the beginning (optional but highly recommended). There is a "theoretically correct" start-up snippit on the documentation, but I've found this works just as well.
Set a password for mysql's root user (choose a better one than this):
-bash-3.2$ sudo /usr/local/bin/mysqladmin -u root password 'new-password'That's pretty much it as far as getting MySQL up and running is concerned. Now we just need to get PHP installed with the MySQL client library...
-bash-3.2$ sudo pkgscripts/pkg_get.sh php5-mysqlThen you have to follow the post-install instructions:
Attempting to fetch/install package...
php5-core-5.2.3: complete
php5-mysql-5.2.3: complete
--- php5-core-5.2.3 -------------------
To finish the install, enable the php5 module with:
/usr/local/sbin/phpxs -s
To enable parsing of PHP scripts, add the following to
/var/www/conf/httpd.conf:
AddType application/x-httpd-php .php
Copy the config file below into /var/www/conf/php.ini
/usr/local/share/examples/php5/php.ini-recommended
Don't forget that the default OpenBSD httpd is chrooted
into /var/www by default, so you may need to create support
directories such as /var/www/tmp for PHP to work correctly.
--- php5-mysql-5.2.3 -------------------
Enable this module in php.ini using the following command:
/usr/local/sbin/phpxs -a mysql
-bash-3.2$ sudo /usr/local/sbin/phpxs -sEdit /var/www/conf/httpd.conf and add the below line with the other AddTypes:
-bash-3.2$ sudo /usr/local/sbin/phpxs -a mysql
AddType application/x-httpd-php .php
I also recommend since we're going to be running PHP, adding index.php to the DirectoryIndex line:
DirectoryIndex index.html index.php
Save the httpd.conf file.
Now, copy the php.ini file over from the examples:
-bash-3.2-$ sudo cp \Now, make sure apache is set to start.
/usr/local/share/examples/php5/php.ini-recommended \
/var/www/conf/php.ini
If you plan on keeping all your web-related content content in /var/www, find the httpd_flags line in /etc/rc.conf and change it to httpd_flags=""
If you intend on giving users traditional ~username (public_html) directories, start apache without being chrooted. Chroot is more secure, but it's a royal pain if you want user home-directories on a vanilla OAMP box, and beyond the "quick and dirty OAMP" scope of this article. Find the httpd_flags line in /etc/rc.conf and change it to httpd_flags="-u" to disable chroot if you must.
The above change to httpd_flags will make apache auto-start upon reboot. You can manually start it with apachectl, though:
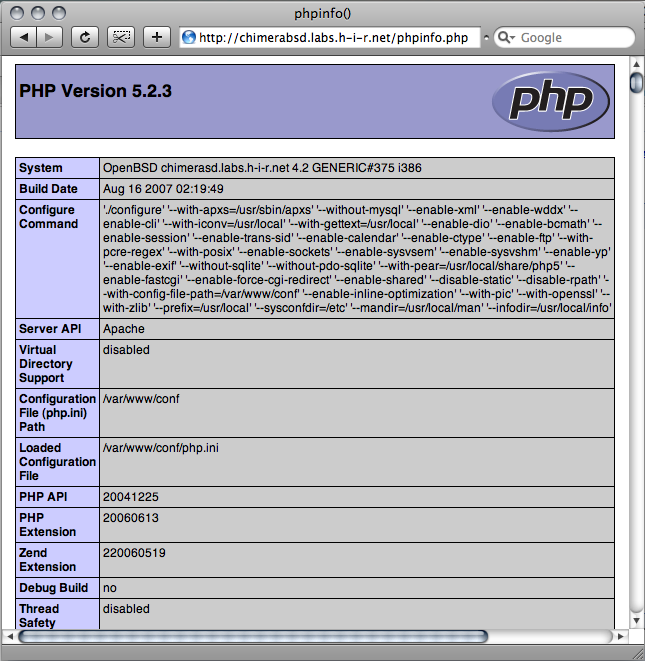
-bash-3.2$ sudo apachectl startMake a phpinfo example php file and move it into the web root.
/usr/sbin/apachectl start: httpd started
-bash-3.2$ echo "<?phpinfo();?>" > phpinfo.php
-bash-3.2$ sudo mv phpinfo.php /var/www/htdocs/Then test it out by pointing a browser to your new phpinfo.php file (example: http://10.23.45.67/phpinfo.php ) and you should see output from PHP. If you see a blank screen or just the phpinfo line, something went wrong. Re-check your steps.
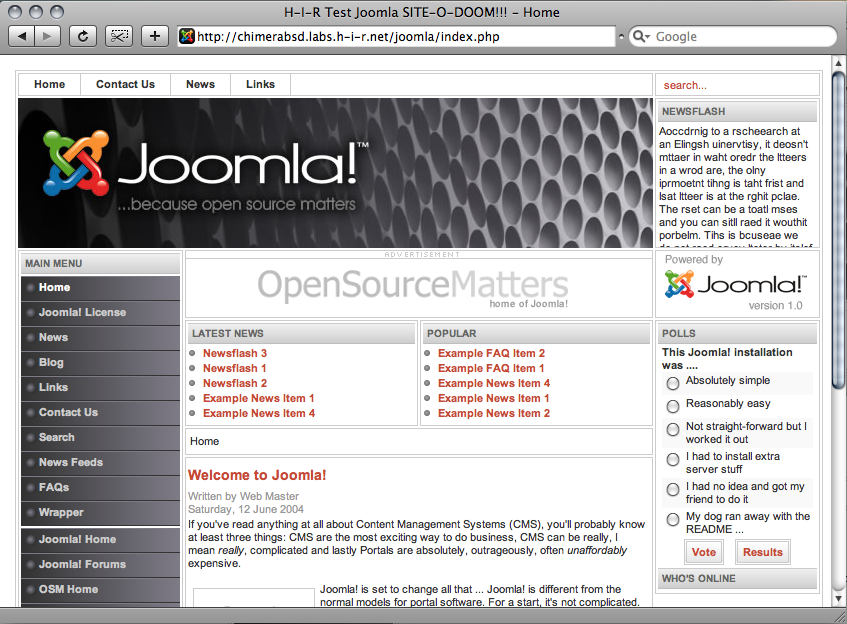
There you have it! As a test, I installed Joomla on this system (screen shot below). Joomla is a popular open-source CMS. I unpacked it into /var/www/htdocs/joomla and pointed my browser to it, following all of its instructions. This includes making a database, changing permissions on some of the Joomla files, and modifying some values in php.ini. The installation went off without any problems just like it would on any LAMP box. I'd imagine you'll see similar results with other *AMP packages such as phpMyAdmin, Xoops, and others.
UNIX Tip of the day: Freeware for Enterprise UNIX
Let's face it, Solaris and AIX are nice in their own right, but they don't have a whole lot of software out of the box. Add to that how cumbersome the compilers are and how it can be a pain to get source code to compile no thanks to oddball libraries, and you have a real dilemma. Sometimes, it would just be easier if you could install binary packages and be done with it.
- The old AIX Public Domain Software Library at UCLA is now gone, but I found a mirror of it here. This is as easy as it gets. The site is laid out in a logical hierarchy. Find the package you want, drill down and get the tar file for your architecture and AIX Version. All you have to do to get the binaries is extract the file with zcat filename.tar.Z | tar xvf -
- Bull freeware offers packages that you can (and should) install through AIX's own package manager. They outline the installation process nicely on their site.
- IBM Has their own, as well. The AIX Toolbox for Linux, which essentially gives you RedHat's RPM package manager for which to install a plethora of IBM-packaged freeware.
- Sun Freeware, much like Bull, provides actual Solaris packages, not just binary executables. You have to install stuff that you download from them, but they document it well.
- Sun Microsystems offers a lot of Freeware with Solaris, but you have to install it from the companion CD. This is available for download as well. Alternatively, you can just download the individual packages you want. Note, you need an account to download stuff from Sun. Creating an account is free. So is borrowing an existing account. ;)
2008-01-17
Tracing processes with a laugh
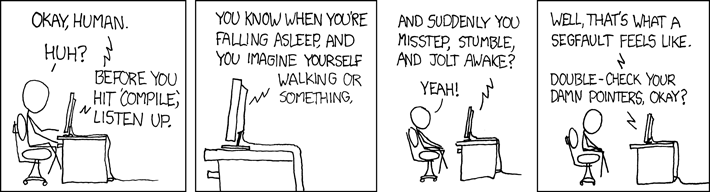
In these examples, I'll just trace a quick ls command. In our case, ls doesn't have any problems, but the trace will contain all of the system calls that were executed. If you can replicate problems or crashes while tracing, you can spot where they're happening to report the problem to the developer or vendor of the application. Or, you can go back and double-check your damn pointers, human -- lest the computer eat your comp-sci homework.
Solaris
Truss is a command on Solaris that dumps all of the syscalls for a process. In its most basic form, you launch truss around the program you're going to troubleshoot. The below command-line takes truss' output and puts it in ls.truss.out before running ls normally, listing the files.
$ truss -o ls.truss.out lschuser.sh find.truss.out ls.truss.out megascan.sh test.pl
# truss -o sshd.truss.out -p 3088You can view ls.truss.out to see what it found.
BSD
A little more complicated, you can use ktrace to do something similar. By default, ktrace creates a (non-human-readable) file called ktrace.out. You can specify the output file with -f.
$ ktrace -f ls.ktrace.out lsSimilarly, with the -p option, ktrace accepts a pid:
ls.ktrace.out pkgscripts obsd_pkgscripts-1.00.tar.gz static.key
# ktrace -f sshd.ktrace.out -p 3088
Then, the fun begins. You have to use kdump to read the syscalls from the file.
$ kdump -f ls.ktrace.out > ls.ktrace.txtHave a look at the results, if you wish.
2008-01-16
UNIX tip of the day: preserve attributes by copying with tar
This quick-n-dirty command-line, if run as root, will retain all file permissions, timestamps, and ownership data while doing a recursive copy of a directory. Linux (specifically, the GNU version of cp) has cp -a which does about the same thing as this. Under most BSD Flavors, cp -Rp does the same thing as well. That said, AIX, HP/UX and Solaris need love too. This works on any POSIX platform and comes in very handy in a pinch.
# cd source-dir ; tar cf - . | (cd destination-dir && tar xBf - )
Adjustments: You should be able make the last tar command "tar xvBf -" if you wish to see the filenames as they're being copied, without any problems.
2008-01-15
Unofficial DUN Tethering guide: LG Chocolate (vx8550) Hack
Adventures of a new mobile phone Pt. 3...
Editor's note: this particular article involves downloading and installing software from un-trusted web site. That's dangerous. It also involves running Windows. That's also dangerous. To top it all off, it also involves software that interacts with your mobile phone at a very low level. That, too, is dangerous. In short, HiR isn't responsible if you get in trouble with the law or your service provider, get a virus from a russian s3ri4lz site, get somehow addicted to running Windows, or brick your shiny new gadget.
Now for the fun stuff. One of the things I kind of relied on my Motorola e815 for was dial-up networking (DUN) via bluetooth. I didn't necessarily use it a lot, but as a sysadmin that's always been a bit of a road warrior, I often find myself places where there simply is no Internet. Inevitably, the pager-of-doom goes off and I'm out at the lake camping or at a location where there's no obvious Internet connection available. Other times, I'll be on a commuter bus and have the burning desire to check the news, or do some research on something really quick.
Whatever the reason, I enjoyed this functionality. On the e815, this was simple to enable. A quick punch-of-numbers on the keypad and voila. My MacBook could see it as a bluetooth modem with surprisingly quick download speed nonetheless -- at times upwards of 1mbit/sec.
The LG Chocolate? Different story. My MacBook saw it, but I wasn't getting anywhere. The connection would be refused with an invalid login and password, even though my login and password were fine when using my e815. This had me concerned.
I did a quick bit of research, and found that the phone has some internal IDs that differ when used for DUN. There's no quick handset-hack for this. Two things were required: A Data Cable, and the proprietary software from Qualcomm (called QPST) for changing the phone's settings. Even BitPIM wouldn't help me here.
All of the Windows operations were done within Parallels Desktop on a small Windows 2000 partition with all the latest patches. This isn't saying much, I don't know when the last patch was released for Windows 2000 but it's a lightweight operating system that can run the few Windows apps that I am ever tempted to launch.
The first order of business was to find the software. Unfortunately, the location where I got it seems to be offline, but you'll have to search for it. The specific file I found was a compressed installer for QPST 2.7 Build 231. Other builds might work fine. I'll caution you that a lot of sites that I found contained massive amounts of shady stuff, so do this at your own risk. I scanned the downloaded file for viruses before transferring it to my Win2K virtual machine. This is only available for Windows. Once downloaded, install it. It's a pretty straight-forward next-next-next installation.
Next, of course, was finding the data cable. I went ahead and purchased the Verizon Chocolate music accessory kit. It was a relative bargain at only $45. Along with the USB Data cable, I also got a special stereo 1/16" headset, a 2GB TransFlash card and adapters. The package also came with drivers for the USB connection as well as software for managing music on the phone. I obviously had no intention of using their Windows software just to copy files to my phone, but the driver was also Windows-only. I installed the USB driver, inserted the 2GB card into my phone, and went on my way with the rest of this hack.
Once the drivers are installed, the phone shows up on a high COM Port. Make sure the phone is plugged in and if running Parallels (versus doing this on a dedicated Windows machine) make sure that the USB Device is enabled for Parallels (Devices > USB menu) then open QPST Configuration and hit "Add Port". If all's well, you should see your phone in the dialog. Select and add it accordingly.
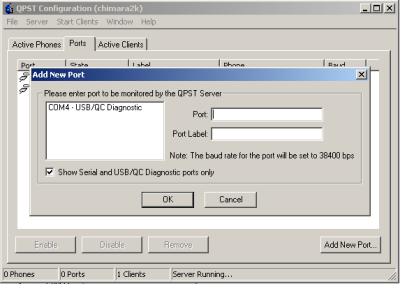
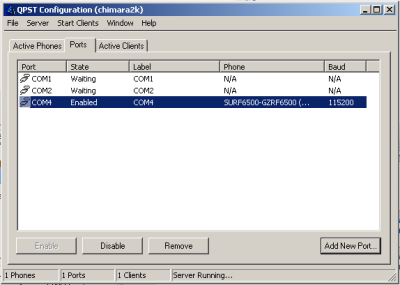
Once the port has been added, close QPST Configuration.
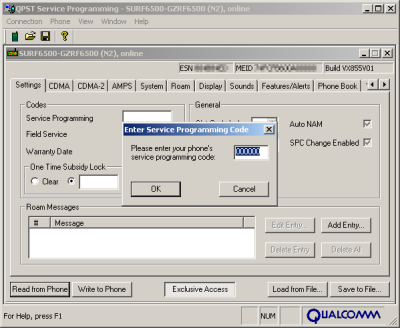
Next, open QPST's Service Programming tool. It should immediately prompt you to select your phone. Select it and continue. BEFORE YOU DO ANYTHING AT ALL, hit "Read from Phone", enter the SP code (usually 000000) and then save the data to a file. This will back-up your phone's configuration.
Now that that's out of the way, on the row of tabs across the top, scroll over until you find the M.IP tab. Expand the "NAI" and "Tethered NAI" columns so you can read them both clearly. You can see that Tethered NAI is not the same as NAI.
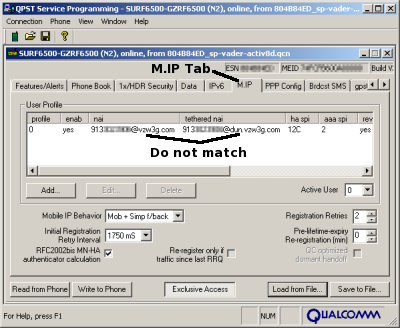
Edit Tethered NAI so that it matches.
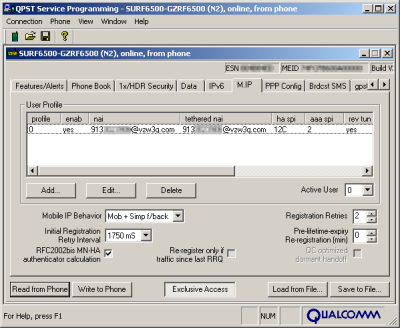
Then, save this configuration to a different backup file. Don't over-write your pristine backup, please. Finally, get your phreak on and click the "Write to Phone" button and cross your fingers.
Quit the QPST Service Programming tool. Your phone should reboot and be completely intact.
From there, you set up your dial-up networking as usual. This is straight-forward in both Windows and Mac OS X.
Phone Number: #777
User Name: the tethered NAI you used above, ex: 1234567890@vzw3g.com
Password: vzw (but anything should work)
Now that you have the cable with a driver for Windows, you can do USB Serial or bluetooth on Windows.
Without a USB Driver on OS X you can still do Bluetooth DUN. If you configured your phone's Bluetooth connection with the "Access the internet with this phone's data connection" option checked, it should simply ask for a username and password.


