Editor's note: I know, I know. This is SATURDAY! But I'm putting this out there for a good reason. Today is also KC PHP User's Group's first meeting of 2008, and what better way to kick off the KCPUG new year than with some fresh AMP-Stack Content. So, here we go.
It used to be that some stuff had to be compiled by hand to make everything work just right, but the package/port guys finally nailed it. With the help of obsd_pkgscripts, OAMP is a breeze. The benefits of running your AMP-driven website atop OpenBSD are many, not the least of which are the facts that it's a minimalistic, secure, and high-performance platform out of the box.
OpenBSD already ships with Apache. It's a patched and tweaked version of Apache, but it's Apache all the same. You're already halfway to OAMP land with OpenBSD and Apache installed out of the box.
First, install the MySQL Server. I obviously chose to use my pkg_get.sh tool for this, but it's not needed.
$ pkg_get.sh mysql-server
Attempting to fetch/install package...
mysql-client-5.0.45: complete
p5-DBD-mysql-3.0008:p5-Net-Daemon-0.39: complete
p5-DBD-mysql-3.0008:p5-PlRPC-0.2018p0: complete
p5-DBD-mysql-3.0008:p5-DBI-1.53: complete
p5-DBD-mysql-3.0008: complete
mysql-server-5.0.45: complete
--- mysql-server-5.0.45 -------------------
You can find detailed instructions on how to install a database
in /usr/local/share/doc/mysql/README.OpenBSD.
Next, that README contains some useful information for more advanced installations and performance, but summarized, follow these instructions. I use sudo, and rarely use the root account. I recommend doing the same.
Create the DB:
-bash-3.2$ sudo /usr/local/bin/mysql_install_dbStart MySQL:
-bash-3.2$ sudo /usr/local/share/mysql/mysql.server startTo make MySQL Start up at boot, add the above mysql startup line to /etc/rc.local without the "sudo" at the beginning (optional but highly recommended). There is a "theoretically correct" start-up snippit on the documentation, but I've found this works just as well.
Set a password for mysql's root user (choose a better one than this):
-bash-3.2$ sudo /usr/local/bin/mysqladmin -u root password 'new-password'That's pretty much it as far as getting MySQL up and running is concerned. Now we just need to get PHP installed with the MySQL client library...
-bash-3.2$ sudo pkgscripts/pkg_get.sh php5-mysqlThen you have to follow the post-install instructions:
Attempting to fetch/install package...
php5-core-5.2.3: complete
php5-mysql-5.2.3: complete
--- php5-core-5.2.3 -------------------
To finish the install, enable the php5 module with:
/usr/local/sbin/phpxs -s
To enable parsing of PHP scripts, add the following to
/var/www/conf/httpd.conf:
AddType application/x-httpd-php .php
Copy the config file below into /var/www/conf/php.ini
/usr/local/share/examples/php5/php.ini-recommended
Don't forget that the default OpenBSD httpd is chrooted
into /var/www by default, so you may need to create support
directories such as /var/www/tmp for PHP to work correctly.
--- php5-mysql-5.2.3 -------------------
Enable this module in php.ini using the following command:
/usr/local/sbin/phpxs -a mysql
-bash-3.2$ sudo /usr/local/sbin/phpxs -sEdit /var/www/conf/httpd.conf and add the below line with the other AddTypes:
-bash-3.2$ sudo /usr/local/sbin/phpxs -a mysql
AddType application/x-httpd-php .php
I also recommend since we're going to be running PHP, adding index.php to the DirectoryIndex line:
DirectoryIndex index.html index.php
Save the httpd.conf file.
Now, copy the php.ini file over from the examples:
-bash-3.2-$ sudo cp \Now, make sure apache is set to start.
/usr/local/share/examples/php5/php.ini-recommended \
/var/www/conf/php.ini
If you plan on keeping all your web-related content content in /var/www, find the httpd_flags line in /etc/rc.conf and change it to httpd_flags=""
If you intend on giving users traditional ~username (public_html) directories, start apache without being chrooted. Chroot is more secure, but it's a royal pain if you want user home-directories on a vanilla OAMP box, and beyond the "quick and dirty OAMP" scope of this article. Find the httpd_flags line in /etc/rc.conf and change it to httpd_flags="-u" to disable chroot if you must.
The above change to httpd_flags will make apache auto-start upon reboot. You can manually start it with apachectl, though:
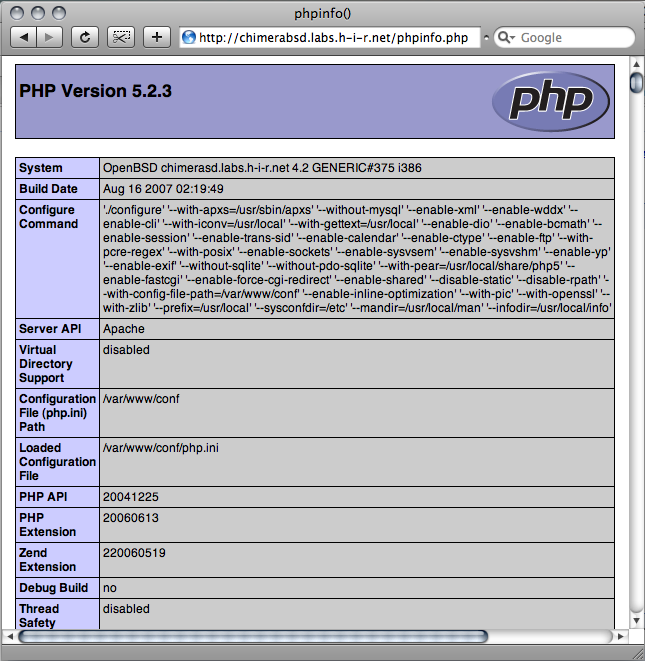
-bash-3.2$ sudo apachectl startMake a phpinfo example php file and move it into the web root.
/usr/sbin/apachectl start: httpd started
-bash-3.2$ echo "<?phpinfo();?>" > phpinfo.php
-bash-3.2$ sudo mv phpinfo.php /var/www/htdocs/Then test it out by pointing a browser to your new phpinfo.php file (example: http://10.23.45.67/phpinfo.php ) and you should see output from PHP. If you see a blank screen or just the phpinfo line, something went wrong. Re-check your steps.
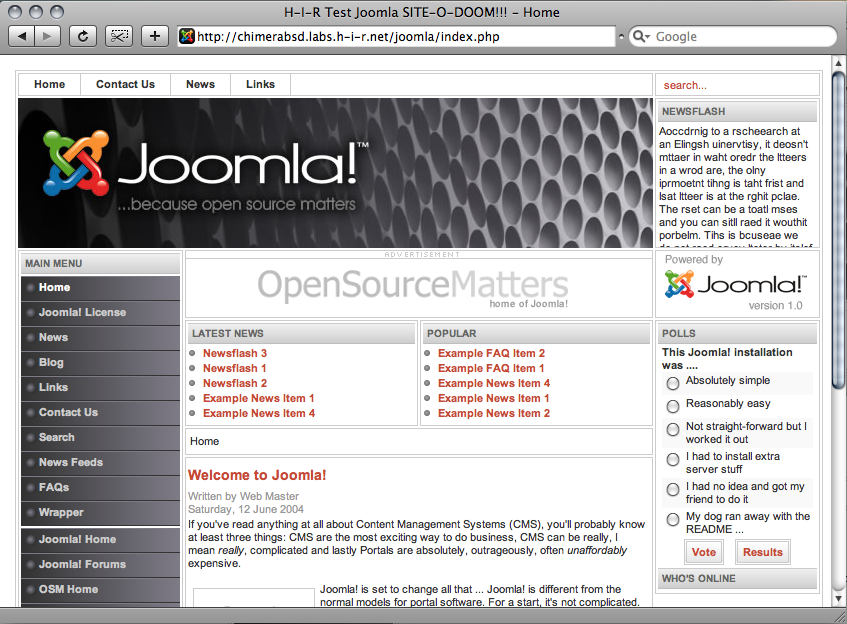
There you have it! As a test, I installed Joomla on this system (screen shot below). Joomla is a popular open-source CMS. I unpacked it into /var/www/htdocs/joomla and pointed my browser to it, following all of its instructions. This includes making a database, changing permissions on some of the Joomla files, and modifying some values in php.ini. The installation went off without any problems just like it would on any LAMP box. I'd imagine you'll see similar results with other *AMP packages such as phpMyAdmin, Xoops, and others.