
Michael Santarcangelo is Catalyst On Tour! Next week, his travels will bring this nomadic security expert right here to Kansas City. For those who don't know, he wrote the recently-released book Into The Breach. I've invited him to talk to the Cowtown Computer Congress , so he'll be at the meeting on October 23rd (7pm, Javanaut at 39th and Wyoming). We'll likely partake in food and drink afterwards, and continue the conversation. Trust me, this is someone you want to meet.

2008-10-12
BT3 / Karmetasploit / Alfa update
 People have been asking me about how my adventures with Karmetasploit have been going. Well, I have some good news on getting Karmetasploit working on BackTrack 3 with the Alfa AWUS036H USB WiFi Adapter, but it's still not working 100%. This is an update to the quandary I posted a little more than a month ago. It's after 1:00 am and I need to be up bright and early so I have to call it a night. I hope to have more info in the coming week as I get some lab time to put into this project.
What I've got is pretty raw, but this is just as much for our readers as it is for me to document for myself what's worked so far. Out of literally dozens of tries, this is the closest I've come to getting this to work the way I want it.
First and foremost, the version of aircrack-ng that ships with BT3 is old and lacking some functionality that's needed for what I'm trying to do. Among other things, airbase-ng doesn't have the -P option that lets it reply to all probes. This is stuff that's normally handled by the MadWifi drivers when you've got an Atheros adapter. Since the Alfa's using the RTL8187 chipset, we need to rely on airbase-ng. Updating airbase-ng is easy, but if you're running BT3 from CD and without saving changes, you'll have to do it every time. Just snag the latest aircrack-ng source via Subversion and compile it right there in the BT3 environment with the following commands.
svn co http://trac.aircrack-ng.org/svn/trunk/ aircrack-ng
cd aircrack-ng
make
make install
Then, airbase-ng will be updated with the functionality needed for karma. Keep in mind that Karma's just the "greedy access point" part that uses probe requests to rope in wireless clients.
Use airmon-ng to enable monitor mode on your Alfa:
airmon-ng start wlan0
I run airbase-ng in its own terminal window and in verbose mode so I can watch as crap scrolls by. If it gives you an error about not being able to create a tap interface, run "modprobe tun" to load the module it's complaining about.
airbase-ng -P -C 30 -e "HiR WiFi Lab" -v wlan0
You should see all probe requests and get messages whenever anyone associates.
In another window, I bring up the at0 interface. I know using a /24 netmask on 10.x.x.x is a sin, but that's how the dhcp configuration comes on BackTrack:
ifconfig at0 up 10.0.0.1 netmask 255.255.255.0
Then we clear the dhcp leases and start the dhcp server:
echo > /var/state/dhcp/dhcpd.leases
dhcpd -cf /etc/dhcpd.conf at0
At this point, I have a computer that's running BackTrack 3, broadcasting as an access point named "HiR WiFi Lab" but will snag any wireless client in range trying to associate to a network, regardless of their SSID. It will issue a DHCP lease and the DNS specified by dhcp will point to the BackTrack 3 box.
Now, to start the "metasploit" part, which should start a fake DNS Server (which makes all services point to the BackTrack 3 box as well) and a bunch of fake services for password grabbing, etc:
/msf3/msfconsole -r /msf3/karma.rc
All the services appear to come up just fine in Metasploit Console, but the fake DNS isn't working. In fact, lots of the fake services aren't working as they should. The fake FTP server, for example, just opens a session and sits idle without prompting for a login. If I point my browser to 10.0.0.1, however, it loads the "evil" cookie-grabbing web page (which consists of a bunch of invisible iframes to grab cookies from several popular domains), but since DNS doesn't work, the pages within the iframes never resolve.
So, I'm a lot closer to having Karmetasploit working with the Alfa on BackTrack, but it seems like there's still a lot of troubleshooting to do. Also, with having to download and re-compile aircrack-ng every time I boot BackTrack on my lab box, I'm thinking I might install BT3 to an old hard drive to make things a little easier.
2008-10-10
La Fonera lab: Fon un-bricking howto
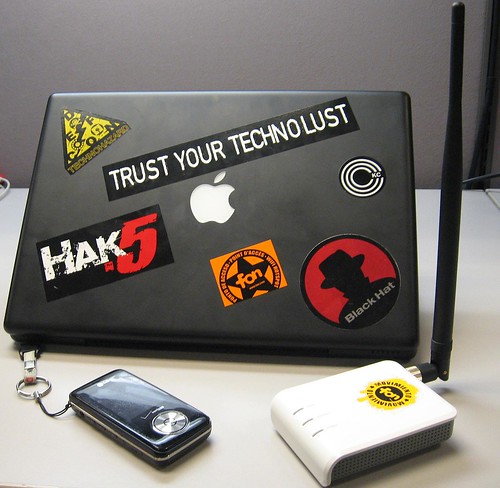
I've bricked my Fon twice now. That's pretty much the name of the game when you tinker. Fortunately, the Fon has redboot, and if you enabled telnet access to it (you know, BEFORE you brick it!?) you can un-brick it over the network.
Here's a log of my un-bricking session. The bold, bright green is stuff I typed in the console. Dark-green is terminal output and normal text is my commentary as I go along.
As I mentioned, I'm running a tftp server on my MacBook, with the kernel and rootfs files (you can get them here) in /private/tftpboot (the default shared folder for tftpd). For reference, I'm relying on the MacBook's MDI/MDIX auto-crossover functionality (a staple in several ethernet adapters) and using the Fon's ethernet cable connected directly to my MacBook. You may need to use a crossover cable. My MacBook's IP is 192.168.1.2 for this lab.
Power on the FON, and as soon as the "Internet" light comes on, telnet to port 9000 of 192.168.1.254. This is RedBoot's IP address.
$ telnet 192.168.1.254 9000
Trying 192.168.1.254...
I held the return key down for quite a while (5, 10 seconds or so?) until the RedBoot prompt came up. Control C does NOT WORK! Okay, it didn't work for me. Your mileage may vary. I had a whole screen of blank lines for a while and a matching whole screen of "Executing boot script" messages to match them. I spared you from that and only showed three below..
UPDATE: A reader showed us the awesome redboot.pl script. See the comments of this post for a little more info.
Connected to 192.168.1.254.
Escape character is '^]'.
== Executing boot script in 9.990 seconds - enter ^C to abort
== Executing boot script in 9.990 seconds - enter ^C to abort
== Executing boot script in 9.990 seconds - enter ^C to abort
RedBoot>
Once in redboot, we set the ip address of the Fon's local ethernet port (192.168.1.254 is just fine, so we'll enter that) and the tftp host for the firmware images. Again, I'm using 192.168.1.2.
These steps download the kernel, initialize the flash and write the kernel to the Fon.
RedBoot> ip_address -l 192.168.1.254 -h 192.168.1.2
IP: 192.168.1.254/255.255.255.0, Gateway: 0.0.0.0
Default server: 192.168.1.2
This shows the block of free space left, we'll need these numbers to properly create the root filesystem
RedBoot> load -r -b %{FREEMEMLO} openwrt-atheros-2.6-vmlinux.lzma
Using default protocol (TFTP)
Raw file loaded 0x80040800-0x801007ff, assumed entry at 0x80040800
RedBoot> fis init
About to initialize [format] FLASH image system - continue (y/n)? yes
*** Initialize FLASH Image System
... Erase from 0xa87e0000-0xa87f0000: .
... Program from 0x80ff0000-0x81000000 at 0xa87e0000: .
RedBoot> fis create -e 0x80041000 -r 0x80041000 vmlinux.bin.l7
... Erase from 0xa8030000-0xa80f0000: ............
... Program from 0x80040800-0x80100800 at 0xa8030000: ............
... Erase from 0xa87e0000-0xa87f0000: .
... Program from 0x80ff0000-0x81000000 at 0xa87e0000: .
Now we need some bc-foo or at least some hex math skills. We'll need the hex difference between the first and last free block. You need to do this in another window. obase=16 and ibase=16 set bc in hexadecimal mode.
RedBoot> fis free
0xA80F0000 .. 0xA87E0000
(Control-D exits bc)
$ bc
bc 1.06
Copyright 1991-1994, 1997, 1998, 2000 Free Software Foundation, Inc.
This is free software with ABSOLUTELY NO WARRANTY.
For details type `warranty'.
obase=16
ibase=16
A87E0000 - A80F0000
6F0000
For me, the length of the free space is 0x006F0000. Jot yours down and make sure it's prefixed with 0x and it's 8 hex digits long (padded with zeros if need be). You'll need it in a bit to determine where to write the OpenWrt root filesystem. Now, back to the RedBoot session on the Fon:
Wait a few minutes for the fon to boot, then you can access the actual OS with telnet. I used -lroot so that the telnet client hands the username "root" to the telnet server. By default, BSD's telnet client hands off your current username to the remote server. You may or may not need to use -lroot.
RedBoot> load -r -b %{FREEMEMLO} openwrt-atheros-2.6-root.squashfs
Using default protocol (TFTP)
Raw file loaded 0x80040800-0x801607ff, assumed entry at 0x80040800

(use the length of the free-space IN PLACE OF
0x006F0000 below if yours differs.)

RedBoot> fis create -l 0x006F0000 rootfs
... Erase from 0xa80f0000-0xa87e0000: ...............................................................................................................
... Program from 0x80040800-0x80160800 at 0xa80f0000: ..................
... Erase from 0xa87e0000-0xa87f0000: .
... Program from 0x80ff0000-0x81000000 at 0xa87e0000: .
RedBoot> reset
^] (control close-bracket escapes the telnet session)
telnet> close
Connection closed.
Of course, you should set a root password (using the passwd command) ASAP, and probably enable wireless as below:
$ telnet -lroot 192.168.1.1
Trying 192.168.1.1...
Connected to 192.168.1.1.
Escape character is '^]'.
=== IMPORTANT ============================
Use 'passwd' to set your login password
this will disable telnet and enable SSH
------------------------------------------


BusyBox v1.4.2 (2007-09-29 07:21:40 CEST) Built-in shell (ash)
Enter 'help' for a list of built-in commands.

_______                     ________        __
|       |.-----.-----.-----.|  |  |  |.----.|  |_
|   -   ||  _  |  -__|     ||  |  |  ||   _||   _|
|_______||   __|_____|__|__||________||__|  |____|
         |__| W I R E L E S S   F R E E D O M
KAMIKAZE (7.09) -----------------------------------
* 10 oz Vodka       Shake well with ice and strain
* 10 oz Triple sec  mixture into 10 shot glasses.
* 10 oz lime juice  Salute!
---------------------------------------------------
root@OpenWrt:/#
root@OpenWrt:/# uci set wireless.wifi0.disabled=0
root@OpenWrt:/# uci commit wireless && wifi
So now all the fun stuff I've done to my Fon (I'm calling it The Patriot for its ability to wreak Surface-To-Air Carnage) are un-done. Fortunately I have most of it backed up.
2008-10-09
Jasager Lives! Muahahaha!
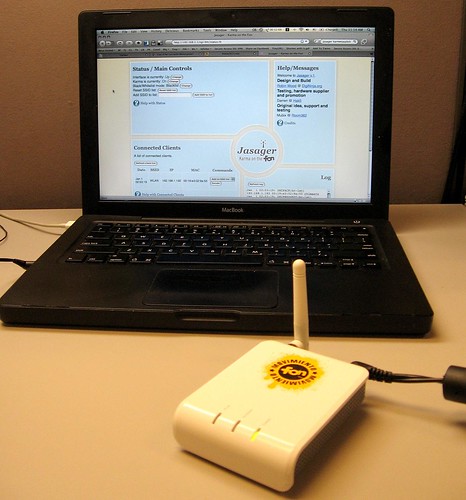
Meet Jasager, a mash-up of OpenWrt and Karma running on a La Fonera router. After seeing the Jasager walk-through on Darren Kitchen's website and then seeing Hak5 Season 4 Episode 5 (about 11 minutes into the episode), I had to give it a shot. If you can't tell, I've been lusting after Karmetasploit for quite a while.
Jasager doesn't provide the "evil" that metasploit offers (that is, the password-grabbing fake services, cookie-snarfing and browser exploiting parts), but Jasager DOES gleefully do the "Karma" part. No matter what SSID you try to connect to, Jasager will take your probe request and play the SSID back as a beacon. If the real access point is out of range or has a weaker signal than Jasager, it WILL rope you in. Mubix put together a post today with a lot of background to Jasager and where it's going. His ideas as well as Robin Wood's skills and Darren Kitchen's passion were a driving force in my interest in Karmetasploit from the get-go. This has been in the works for quite some time, as Darren couldn't stop gushing about it when I hung with him in Springfield. (Note to self: Fix the damn photos on that old post.)
The latest version of Metasploit Framework contains dozens of megabytes of code (mostly written in Ruby) and the La Fonera only has a few megabytes of flash for storing files, so setting up a full Karmetasploit ownage rig using a Fon isn't going to happen. That's not to say there isn't plenty of fun to be had. If you set this up on a public network, you can man-in-the-middle stuff with the Fon. Darren suggested using upside-down-ternet. You can do some hacking to make Jasager work with another full-fledged computer that can run Metasploit. The options are as limitless as your imagination even with a standalone Fon running Jasager. Be creative!
Now, on for some errata to Darren's howto:
I used OS X and command-line scp and ssh to do all the stuff Darren did with the windows equivalents. This is pretty straight-forward for command-line users.
In Step 8, you transfer 2 files into /tmp, but out.hex gets erased after the reboot in step 9 and before you're told to use it in step 10. So just SCP it over after the reboot in step 9.
I actually bricked my Fon at step 11 (where you use some goofy Windows GUI to flash the Fon). Fortunately, the walk-through enables RedBoot over Telnet early on. If you're not running Windows, then set up a tftp server on a workstation on an internet-separated network. I just used an ethernet cable to my MacBook. You can flash the firmware to the Fon via RedBoot with these instructions I got from the Fonera section of the OpenWrt Wiki.
Preparation for flashing:
La Fonera will use 192.168.1.1 and 192.168.1.254, so set your Ethernet interface to something in the 192.168.1.2-253 range on the system that you will use to tweak the Fon. Make sure it's got a tftp server on that system as well. Make sure you have the openwrt-atheros-2.6-vmlinux.lzma and openwrt-atheros-2.6-root.squashfs files. Make sure the network is segregated from the Internet, and make sure no DHCP servers are on the network.
I was using Mac OS X, and used this TFTP configuration front-end to control OS X's built-in tftpd. Note: TFTP is NOT FTP and an FTP server won't work in place of tftpd.
Once I got the Fon un-bricked and OpenWRT installed via TFTP and RedBoot. all the steps from 12 on worked fine. Hopefully using the above help, you won't need Windows nor will you brick your Fon.
Asmodian X has at least one Fon to play with as well. We'll cover our various experiments with them and label the posts with fon.
2008-10-03
Do you think this guy's a gamer?
I saw this in my parking garage at work a few days ago. These stickers were adorning some cargo boxes bolted to a nice-looking BMW Motorcycle. Taking a guess, I'd say this guy takes his games pretty seriously. 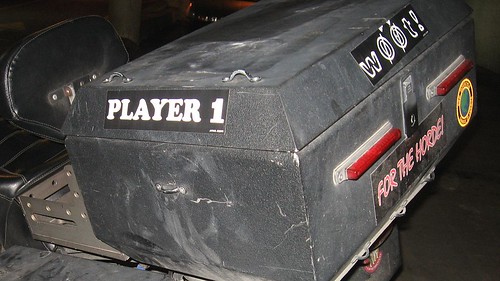
My wife tells me "For the Horde!" is a World Of Warcraft reference. She plays it, I do not. Yet.
I particularly got a kick out of this one. 
2008-10-02
Open Source... Bicycle Parts?!
Okay, I'll admit that my inner cyclist is a little giddy about this. While it certainly isn't programming or security related, it squarely falls into "other interesting topics" and the Xtracycle guys undoubtedly operate with a "hacker" and "maker" kind of attitude, all the while embracing sustainability and empowering others to use human powered machines for tasks that would previously require a car. The initial premise, realized almost a decade ago, was to build an extension frame that would bolt up to a plain old bicycle and move the rear wheel back quite a ways while adding structure and attachment points to support weight-bearing bags and platforms.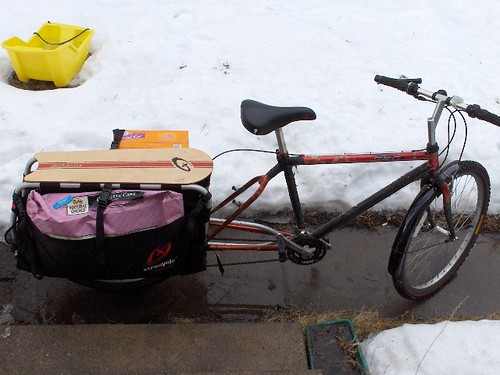
(Creative Commons photo by arifm)
Now, many manufacturers are running with the idea, and the guys at Xtracycle have decided to open-source their design in order to engage the community in collaboration and to allow anyone with the equipment and skill to make their own and build onto an already tried-and-true design. (Click for higher res)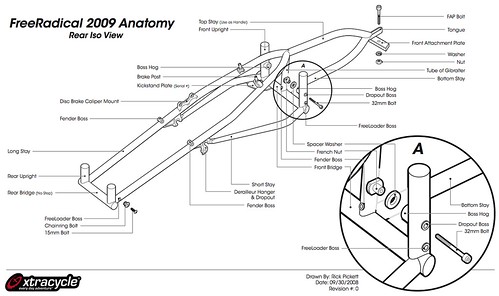
They're using a Wiki to collaborate right now (and I should note that it's not working all the way yet). I'm not sure I'm ready to sell my car and break out the torch to weld one of these up myself yet, but it's a fascinating project, and it's the first time I've seen this kind of detail in their design.
2008-10-01
A Peek Inside A Simple ATM Machine
This article is a derivative of an article I wrote a while back ago, which was published in 2600: The Hacker Quarterly 22:3 (Autumn 2005). If it looks familiar, that's why.
In [2600 Magazine] issue21:4, I discussed the workings and "unofficial" reset method for
LaGard ComboGard vault locks. [Also archived on HiR] This time, I've got a whole ATM to work with.
The ATM I scored is a Diebold CashSource+ 100. This is one of those smaller
indoor ATMs that you would find inside a convenience store. It features a
monochrome LCD, eight option keys beside the screen, a number pad with four
function keys (Shift, Cancel, Clear, and Enter) receipt printer, slots for
one cash box and one "reject" box. The card slot is a horizontal swipe-through
under the screen. There's a single five-tumbler lock on the front door. Once
opened, you're given access to 3 things: The combination dial, the vault door
bolt control, and a pair of buttons that let you swing the top compartment
upwards.
Once you squeeze the buttons together and swing the top compartment open,
you're given access to the printer, the main power switch, the modem, and some
Macintosh-style serial cables plugged into the backside of the LCD/Keypad.
The printer uses standard thermal receipt paper, and there's only one printer,
so there's no "live" paper audit trail. I'd imagine it's stored in memory, but
it may not keep an audit trail at all. The modem in my ATM is a generic 33.6k
serial modem. When I power the unit on, it attempts to dial the mother ship,
but I am not curious enough to hook it up to a phone line to see what happens.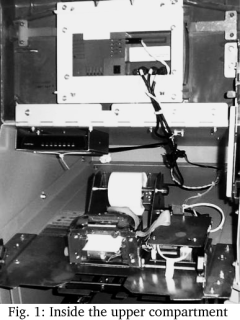
Of course, all the interesting stuff is held within the vault. On my CSP-100,
the vault lock was a LaGard 3332-3, which is a 3-number (0-100) mechanical
combination lock with wires that can be used for sensing bolt position and
a "duress" combination. These wires on my ATM were simply wire tied and un-
used. A duress combination is the combination you dial in when you're being
forced against your will to open the vault. To activate duress mode, you dial
in the combination normally, except the last digit, you dial to the "change"
index, which is another mark about 20 degrees to the left of the "open" index.
This causes a plastic arm inside the lock to trigger the duress switch.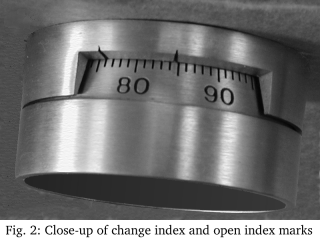
The duress wiring (white and blue wires) can be used in combination with a
silent alarm or telephone dialer to notify the police or an alarm monitoring
company. The bolt position switch that I mentioned (red and black wires)
operates in the same way, but is triggered whenever the lock is opened
regardless of duress mode. This can also be used with an alarm system or
with a buzzer so that an audible alert is heard when the vault is opened.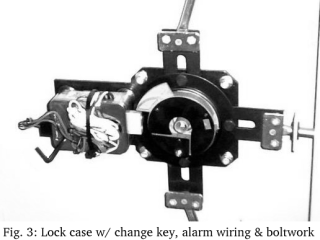
This lock can be easily replaced with one of many combination locks on the
market, including electronic combination locks such as the LaGard ComboGard
I wrote about in 21:4, Kaba Mas (or Mas Hamilton) Cencon S2000 or Auditcon.
The combination on the existing mechanical lock can also be changed, provided
you have a change key, which my ATM came with, taped to the vault door.
Detailed combination changing instructions are available from LaGard, I found
them by Googling for: change combination instructions group 2m
Once the correct combination (or the duress combination) has been entered,
the other knob will turn, which retracts the locking bolts that hold the door
shut. Once that knob is turned, the door opens, and you've got full access to
the cash boxes, reject box, the main power supply, control board, combination
lock housing (for changing the combination using a change key) and the
conveyor belt that moves the money around. The reject bin is where money goes
that comes out of the cash box "out of spec", that is, multiple bills stuck
together, comes out at an angle, folded, or damaged. There are several kinds
of cash boxes. The one that came with my CSP-100 was a locking cash box that
had a red/green tamper indicator on it. The locks on my reject box and cash
box were both operated by the same 7-pin cylinder key. The tamper indicators
will trigger at almost any sign of forced entry including simply removing them
from the ATM. The boxes can not be re-inserted when the indicator is red, and
the key is needed in order to clear the indicator.
The ATM knows what kind of cash boxes are inserted by means of an array of
buttons inside the ATM that are operated by plastic nubs on the back of the
cash box. I do not know what the coding is, but the reject box had its
plastic nubs in a different pattern than the $20 cash box that my ATM came
with. Most cash boxes can hold upwards of 2,000 bills (2,500 if they're
fresh, crisp, new bills), so a fully loaded cassette of $20 bills could store
up to $50,000. It's doubtful that you would see an ATM of this puny stature
loaded with more than a few thousand dollars at any given time, though.
Pressing the small blue button on the lower front of the inside frame of
the ATM allows allow you to firmly yank the innards out on a rolling rail
system. This gives you better access to the money conveyor belt system,
the main system board, the sides of the cash box area, and the main power
supply.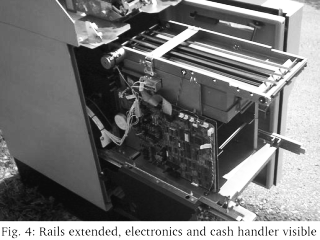
The vault is made of heavy guage steel, which probably is the main reason that
this thing is so heavy. I certainly see why not very many ATM's get stolen.
They might look small and easy to manage, but you would need 2 or 3 men and
a pickup truck to make a successful and timely getaway with this small ATM,
and good luck getting the vault opened up. It would certainly be more
trouble than it's worth.
I have not even tried to get into the ATM's diagnostics or settings yet. There
are no power outlets in the storage unit I'm keeping the ATM in, so I'll have
to move it somewhere else to continue tinkering beyond the mechanical realm.
Given the severe lack of external controls (and a user or installer manual),
I am thinking that the setup/maintenace process needs to happen either over
the on-board modem, or with an external device such as the ATM programmers
I've found in the dumpster before. I can't see where I'd hook such a device
up, though.
That's the mechanical breakdown of a simple ATM. As I experiment some more,
look for another article on programming, setup, auditing, and diagnostics.
Subscribe to:
Posts (Atom)

 Posts


