Showing posts with label chroot. Show all posts

2009-12-29

From the comments: Apache + UserDir + Chroot on OpenBSD

In the comments on the OpenBSD 4.6 OAMP article, azhax and I hashed out how to get UserDir functioning in a chroot. I don't usually need UserDir, but it's a common configuration for multi-user systems such as those found at universities and ISPs. It's definitely worth covering.


UserDir is the configuration directive in Apache that lets you use tilde shortcuts for users' web directories. ex. http://some.server.edu/~axon/

The first thing you need to do is realize that when Apache is running in a chroot in the default OpenBSD install, Apache can't access anything outside of /var/www. The default OpenBSD apache install comes with a directory created for this: /var/www/users

First, edit /var/www/conf/httpd.conf and uncomment the "UserDir /var/www/users" line, and delete or comment out the "UserDir disabled" line. Use whatever editor you're happy with, but you may need to chmod it first, or use :w! in vi, since the file is read-only.

Then, I created a directory for my user account, gave myself ownership of the directory and created a public_html symlink to my home-directory. Keep in mind some ftp servers do not like to follow symlinks in the name of security, but SCP or SFTP might do just fine with this.

$ sudo mkdir /var/www/users/axon
$ sudo chown axon /var/www/users/axon
$ sudo ln -s /var/www/users/axon ~axon/public_html

And finally, I restarted apache. "apachectl restart" doesn't always work properly, so start it manually after stopping it with apachectl.
$ sudo apachectl stop
$ sudo /usr/sbin/httpd

Thanks go to azhax for asking how this one is done. It's definitely more involved than your average Ubuntu Server install, where only a public_html directory is needed in users' home directories and little else. If you find that most of your users will need web directories, you may want to create a script to put in /usr/local/sbin that you can run with sudo after running adduser just to make it a little easier.
#!/bin/sh
#addwebdir.sh
#syntax: addwebdir.sh [username]
mkdir /var/www/users/$1
chown $1 /var/www/users/$1
ln -s /var/www/users/$1 ~$1/public_html

2009-10-28

OAMP: OpenBSD 4.6 + Chroot Apache + MySQL + PHP

Introduction
I'm combining the OAMP howto with chroot from the start this time because it's really the proper and secure thing to do. You can read more about how chroot works in my last article about it, but the premise is that chrooting Apache limits the amount of damage that can be caused by vulnerabilities in web applications. Keep in mind that we'll be accessing MySQL from within the chroot in this article, so all content within MySQL is potentially at risk if you're serving up SQLi-vulnerable content. The best things the average sysadmin can do to protect the server is to keep webapps and system patches up-to-date, and to perform periodic database dumps and system-wide backups.

I will walk through the commands here without showing the output they generate. You can reference my OAMP walk-through from OpenBSD 4.4 if you want to see example output, which should look similar for OpenBSD 4.6. The output shouldn't matter much, because I'll walk you through everything here.

Preparation
To start off, I make sure that a user-level admin account has access to run anything as root from sudo. Note: all the administrative commands in this post begin with "sudo" for a reason. To do this, I add my admin account to the wheel group. You can do this during the adduser process or with usermod, but if you created a non-root admin user during the OpenBSD 4.6 installation process, that user will be in the wheel group by default. All you need to do is add a sudo rule for the wheel group. It's commented out in /etc/sudoers.

$ su -
Password:
# visudo
... or use whatever editor you want on /etc/sudoers. Not recommended.

Find the line that grants access to the wheel group, and uncomment it. It's about 35-40 lines down in the default configuration. Optionally, there's a NOPASSWD version of the same, a few lines down. I don't recommend using this option on a production server, but it may make system management more friendly on your development servers and workstations.

%wheel ALL=(ALL) SETENV: ALL
-- or --
%wheel ALL=(ALL) NOPASSWD: SETENV: ALL

I also set up the path for pkg_add by adding these lines to my user-level account's .profile, then logging out and back in to reload the profile. I usually use an OpenBSD mirror, like ftp5.usa.openbsd.org instead of the main FTP site. You can also use any of the http mirrors in this path.
vi .profile

PKG_PATH=ftp://ftp5.usa.openbsd.org/pub/OpenBSD/4.6/packages/i386/
export PKG_PATH
Installing Packages
Installing php5-mysql and mysql-server will fetch all of the dependencies for OAMP. This particular version of PHP comes pre-compiled with the suhosin hardened PHP patches in place, which is a nice touch! This process may take a while depending on your connection speed. There are eight or nine packages in total, including php5-core and some perl modules that MySQL depends on for its management tools.
sudo pkg_add php5-mysql mysql-server
Next, copy the PHP + MySQL sample files into place
sudo cp /var/www/conf/modules.sample/php5.conf \
/var/www/conf/modules/

sudo cp /var/www/conf/php5.sample/mysql.ini \
/var/www/conf/php5/
Run the script to get the default MySQL database installed, start MySQL and set a MySQL root password.
sudo /usr/local/bin/mysql_install_db

sudo /usr/local/share/mysql/mysql.server start

sudo /usr/local/bin/mysqladmin \
-u root password 'your-password'
At this point, both MySQL and PHP are installed and set up with a default configuration that will probably work fine for most applications.

Chroot Setup
Most AMP packages only need somewhere to store Session information and a way to get to the MySQL socket. Since the real /tmp contains information that is not needed for Apache, we'll just create a new tmp directory specifically for Apache within /var/www and make it world-writable with the "sticky bit" set (exactly like the real /tmp)
sudo mkdir /var/www/tmp
sudo chmod 1777 /var/www/tmp
Next, reproduce the directory structure for the MySQL socket under /var/www.
sudo mkdir -p /var/www/var/run/mysql  # -p creates subdirs as needed
Start Apache and MySQL at boot
Set apache to start on boot by editing /etc/rc.conf. Find the httpd_flags line in the file, change NO to "" -- literally, two double quotes as shown below.
sudo vi /etc/rc.conf
# use -u to disable chroot, see httpd(8)
httpd_flags=""
-or-
httpd_flags="-u" #disables chroot. You can if you want.
Then, make sure that MySQL starts at boot and that the real mysql.sock file gets hard linked into the new directory by editing /etc/rc.local. I also added a line to remove the old hard link before starting MySQL. The end of my /etc/rc.local looks like this:

rm /var/www/var/run/mysql/mysql.sock
/usr/local/share/mysql/mysql.server start
ln /var/run/mysql/mysql.sock /var/www/var/run/mysql/mysql.sock

After getting all of the services set up to start automatically, I usually reboot to make sure everything starts up as expected.

sudo reboot

Testing
Once the system comes back online, the most basic test of Apache and PHP is to create a phpinfo script. This can be done with one line of shell-fu, which will launch "tee" with root permissions to write the phpinfo.php file.

echo "<?php phpinfo(); ?>" | sudo tee /var/www/htdocs/phpinfo.php

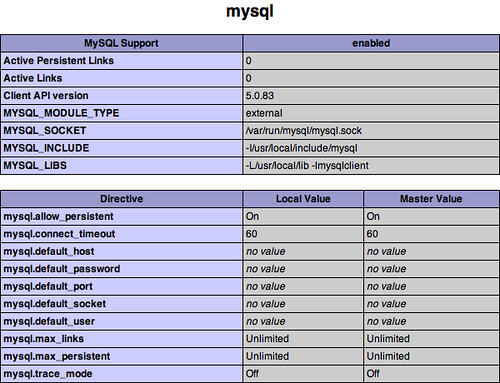
Then, navigate to http://your.openbsd.ip.address/phpinfo.php in your web browser. It should load a nice-looking document containing details about PHP's configuration. In particular, check for MySQL.

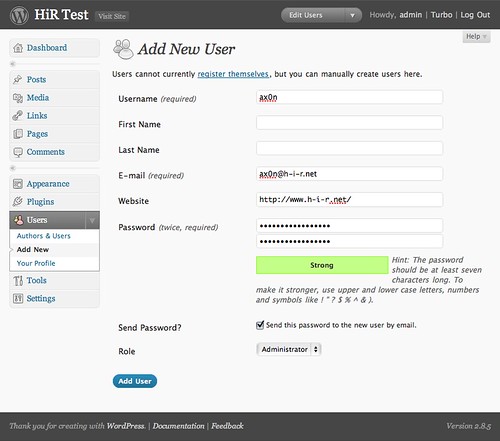
To really put our fresh chrooted OAMP installation through its paces, I downloaded the latest version of Wordpress, then followed the instructions using "the famous 5-minute install", which is way beyond the scope of this article. It's as simple as creating a database, setting up a privileged user for that database, editing a configuration file and copying wordpress into /var/www/htdocs (or a subdirectory) before accessing the control panel to finish up.

The wordpress install worked without changing anything from the instructions, and it's all running under chroot without any problems!

If you find that things are not working well with a particular AMP application, check file permissions, and copy or create hard links to files or directories that are needed. Example: sometimes you need a fake /etc/password file, some tools from /usr/bin or a /dev structure to be replicated within the chroot environment. Add these only as needed.

2009-05-10

Sysadmin Sunday: Dealing with OpenBSD's chroot Apache server

Prerequisites
I'm assuming that you have a working OpenBSD/Apache/MySQL/PHP environment working prior to this, or at least have all the packages installed. We will be slightly modifying the MySQL startup process, and changing some stuff on the filesystem to allow the chroot to function properly.

Introduction to chroot
Chroot means "change root", and it's a way to spawn a process so that it has a different apparent root directory. Try as it might, this process cannot get to the "real" root. This has many advantages, especially with web servers.

While an operating system itself might be locked down like Fork Knox, the system's overall security is only as good as the applications that get installed on it. Just take a look at Milw0rm and you'll see that web application vulnerabilities are a dime a dozen. Local file inclusion and other vulnerabilities can sometimes allow an attacker to get to the very heart of the host operating system. With chroot, the attacker is unable to see the real operating system's environment -- in this case, only things within /var/www are visible to Apache and its sub-processes.

Path names that do not have a leading / will automatically use the "ServerRoot" directive (/var/www in OpenBSD) This is why you see lines such as "ErrorLog logs/error_log" in the configuration.

Basically, chroot is awesome. It's also a pain in the ass if you aren't used to dealing with it. Don't worry; I'm here to help.

Why isn't Apache always chrooted then?
There are things in the real operating system environment that the web server relies on. For AMP web applications, PHP needs access to the MySQL Socket (in /var/run/mysql). If you have Sessions enabled and using the filesystem, then /tmp needs to be accessible. Anything else in the "real root" that needs to be accessed must be re-created or hard-linked within /var/www as if it's the root directory.

Anything else in Apache's configuration that calls for path names with a leading / (VirtualHost, UserDir, etc) will be forced to use /var/www as its root as well. I do not recommend creating hard links from inside ServerRoot to external directories for web content. Instead, create subdirectories under /var/www for content (ex: /var/www/virtuals/HiRtest/ ) and grant write permissions for users who need it.

Fixing the broken stuff!
Most AMP packages only need somewhere to store Session information and a way to get to the MySQL socket. Since the real /tmp contains information that is not needed for Apache, we'll just create a new tmp directory specifically for Apache within /var/www and make it world-writable with the "sticky bit" set (exactly like the real /tmp)

sudo mkdir /var/www/tmp
sudo chmod 1777 /var/www/tmp

Next up is the MySQL socket. First, reproduce the directory structure for the MySQL socket under /var/www.
sudo mkdir -p /var/www/var/run/mysql  # -p creates subdirs as needed

Then, make sure the real mysql.sock file gets hard linked into the new directory. If you added the "mysql.server start" line to the end of /etc/rc.local, you can accomplish this pretty easily by adding a hard link command after the mysql server starts. I also added a line to remove the old hard link before starting MySQL. The end of my /etc/rc.local looks like this:
rm /var/www/var/run/mysql/mysql.sock
/usr/local/share/mysql/mysql.server start
ln /var/run/mysql/mysql.sock /var/www/var/run/mysql/mysql.sock

Finally, make sure that you set the httpd line in /etc/rc.conf to look like the line below, unless you really need more options. Just make sure "-u" isn't one of them!
httpd_flags=""  # for normal use: "" (or "-DSSL" after reading ssl(8))

At this point, I would advise rebooting the system. While you can start and stop Apache and MySQL, it's best to make sure that everything will come back up and that the chroot hard link to the MySQL socket will be re-created properly upon reboot. Otherwise, you might find yourself with a problem later on.

After rebooting, Apache web server should have all its components working properly again within its chroot environment. In my case, I installed WordPress 2.7.1 before setting Apache to chroot mode. After simply restarting Apache in chroot mode, WordPress gave only an error message about being unable to connect to the database. After making the other changes above and rebooting, WordPress is back to life. The same should hold true for most other packages.