2017-04-29

OpenBSD vmm Hypervisor Part 2: Installation and Networking

* Updated November 1, 2018, Thanks to some commenters below! 
This is going to be a (likely long-running, infrequently-appended) series of posts as I poke around in vmm.  A few months ago, I demonstrated some basic use of the vmm hypervisor as it existed in OpenBSD 6.0-CURRENT around late October, 2016. We'll call that video Part 1.

As good as the OpenBSD documentation is (and vmm/vmd/vmctl are no exception) I had to do a lot of fumbling around, and asking on the misc@ mailing list to really get to the point where I understand this stuff as well as I do. These are my notes so far.

Quite a bit of development was done on vmm before 6.1-RELEASE, and it's worth noting that some new features made their way in. Work continues, of course, and I can only imagine the hypervisor technology will mature plenty for the next release. As it stands, this is the first release of OpenBSD with a native hypervisor shipped in the base install, and that's exciting news in and of itself. In this article, we assume a few things:

  1. You are using OpenBSD 6.4-RELEASE or -STABLE  (or newer)
  2. You're running the amd64 architecture version of OpenBSD
  3. The system has an Intel CPU with a microarchitecture from the Nehalem family, or newer. (e.g. Westmere, Sandy Bridge, Ivy Bridge). Basically, if you've got an i5 or i7, you should be good to go.
  4. Your user-level account can perform actions as root via doas. See the man page for doas.conf(5) for details.
 Notes on formatting:
  1. Lines in blue are text inside configuration files.
  2. Lines in green are shell commands to be executed on the command line.

Basic network setup

To get our virtual machines onto the network, we have to spend some time setting up a virtual ethernet interface. We'll run a DHCP server on that, and it'll be the default route for our virtual machines. We'll keep all the VMs on a private network segment (via a bridge interface), and use NAT to allow them to get to the network. There is a way to directly bridge VMs to the network in some situations, but I won't be covering that today. (Hint: If you bridge to an interface with dhclient running in the host OS, no DHCP packets will reach the VMs, so it's best to static-assign your VM host's LAN port. or use a different interface entirely.)

Enable IP forwarding in sysctl. Add the following to /etc/sysctl.conf:

net.inet.ip.forwarding=1
net.inet6.ip6.forwarding=1

You can reboot to enable these, or run these commands manually:

doas sysctl net.inet.ip.forwarding=1
doas sysctl net.inet6.ip6.forwarding=1


We're going to be using "vether0" as the VM interface, and in my current configuration, "athn0" as the external interface. The below block of pf configuration was taken partially from /etc/example/pf.conf and some of the PF NAT example from the OpenBSD FAQ. Change your ext_if as needed, and save this as /etc/pf.conf:

ext_if="athn0"
vmd_if="vether0"

set skip on lo

block return
pass           
 

match out on $ext_if inet from $vmd_if:network to any nat-to ($ext_if)

Next, you'll need to specify an IP and subnet for vether0. I am going with 10.13.37.1 (and a 255.255.255.0 netmask for a /24 network) in my example. Place something like this in /etc/hostname.vether0:

inet 10.13.37.1 255.255.255.0

We need to create a bridge interface for the guest VMs to attach to, and bridge vether0 to it. Place the following in /etc/hostname.bridge0:

add vether0

Bring vether0 and bridge0 online by running the following commands:

doas sh /etc/netstart vether0
doas sh /etc/netstart bridge0

Reload the pf configuration (h/t to voutilad for the heads up in the comments about moving this step down a few spots):

doas pfctl -f /etc/pf.conf

Create a basic DHCP server configuration file that matches the vether0 configuration. I've specified 10.13.37.32-127 as the default DHCP pool range, and set 10.13.37.1 as the default route. Save this in /etc/dhcpd.conf:

option  domain-name "vmm.openbsd.local";
option  domain-name-servers 8.8.8.8, 8.8.4.4;

subnet 10.13.37.0 netmask 255.255.255.0 {
        option routers 10.13.37.1;

        range 10.13.37.32 10.13.37.127;

}

Configure a switch for vmm, so the VMs have connectivity. Put the following in /etc/vm.conf:

switch "local" {
        interface bridge0
}


Enable and start the DHCP server. We also need to set the flags on dhcpd so that it only listens on vether0. Otherwise, you'll end up with a rogue DHCP server on your primary network. Your network administrators and other users on your network will not appreciate this because it could potentially keep others from getting on the network properly.

doas rcctl enable dhcpd
doas rcctl set dhcpd flags vether0
doas rcctl start dhcpd

Enable vmd, then start it as well. For good measure, re-run fw_update to make sure you have the proper vmm-bios package.

doas rcctl enable vmd
doas rcctl start vmd
doas fw_update

You should notice a new interface, likely named "bridge0" in ifconfig now.

VM Creation and installation

Create an empty disk image for your new VM. I'd recommend 1.5GB to play with at first. You can do this without doas or root if you want your user account to be able to start the VM later. I made a "vmm" directory inside my home directory to store VM disk images in. You might have a different partition you wish to store these large files in. Adjust as needed.

mkdir ~/vmm
vmctl create ~/vmm/test.img -s 1500M

Boot up a brand new vm instance. You'll have to do this as root or with doas. You can download a -CURRENT install kernel/ramdisk (bsd.rd) from an OpenBSD mirror, or you can simply use the one that's on your existing system (/bsd.rd) like I'll do here.

The below command will start a VM named "test.vm", display the console at startup, use /bsd.rd (from our host environment) as the boot image, allocate 256MB of memory, attach the first network interface to the switch called "local" we defined earlier in /etc/vm.conf, and use the test image we just created as the first disk drive. 

doas vmctl start "test.vm" -c -b /bsd.rd -m 512M -n "local" -d ~/vmm/test.img

You should see the boot message log followed by the OpenBSD installer. Enter "I" at the prompt to install OpenBSD. I won't walk through how to install OpenBSD. If you've gotten this far, you've done this at least once before. I can say that the vm console works by emulating a serial port, so you should leave these values at their defaults (just press enter):
Change the default console to com0? [yes]
Available speeds are: 9600 19200 38400 57600 115200.
Which speed should com0 use? (or 'done') [9600]
You will also likely need to install packages without a prefetch area. Answer yes to this.
Cannot determine prefetch area. Continue without verification? [no] yes
After installation and before rebooting, I'd recommend taking note of the vio0 interface's generated MAC address (lladdr) so you can specify a static lease in dhcpd later. If you don't specify one, it seems to randomize the last few bytes of the address.
CONGRATULATIONS! Your OpenBSD install has been successfully completed!
To boot the new system, enter 'reboot' at the command prompt.
When you login to your new system the first time, please read your mail
using the 'mail' command.

# ifconfig vio0                                                               
vio0: flags=8b43 mtu 1500
        lladdr fe:e1:bb:d1:23:c4
        llprio 3
        groups: dhcp egress
        media: Ethernet autoselect
        status: active
        inet 10.13.37.39 netmask 0xffffff00 broadcast 10.13.37.255
Shut down the vm with "halt -p" and then press enter a few extra times. Enter the characters "~." (tilde period) to exit the VM console. Show the VM status, and stop the VM. I've been starting and stopping VMs all morning, so your VM ID will probably be 1 instead of 13.
# halt -p

(I hit ~. here...)
[EOT]
$ vmctl status
   ID   PID VCPUS  MAXMEM  CURMEM     TTY        OWNER NAME
   13 96542     1    256M   52.6M   ttyp3         root test.vm
$ doas vmctl stop 13
vmctl: terminated vm 13 successfully

VM Configuration

Now that the VM disk image file has a full installation of OpenBSD on it, build a VM configuration around it by adding the below block of configuration (with modifications as needed for owner, path and lladdr) to /etc/vm.conf.

# H-i-R.net Test VM
vm "test.vm" {
        disable
        owner axon
        memory 512M
        disk "/home/axon/vmm/test.img"
        interface {
                switch "local"
                lladdr fe:e1:bb:d1:23:c4
        }
}


I've noticed that VMs with much less than 256MB of RAM allocated tend to be a little unstable for me. You'll also note that in the "interface" clause, I hard-coded the lladdr that was generated for it earlier. By specifying "disable" in vm.conf, the VM will show up in a stopped state that the owner of the VM (that's you!) can manually start without root access.

Go ahead and reload the VM configuration with "doas vmctl reload", then look at the status again.
$ doas vmctl reload
$ vmctl status
   ID   PID VCPUS  MAXMEM  CURMEM     TTY        OWNER NAME

    -     -     1    512M       -       -         axon test.vm

DHCP Reservation (Optional)

I opted to set up a DHCP reservation for my VM so that I had a single IP address I knew I could SSH to from my VM host. This, to me, seems easier than using the VM console for everything.

Add this clause (again, modified to match the MAC address you noted earlier) to /etc/dhcpd.conf. You have to place this above the last curly-brace.

        host static-client {
                hardware ethernet fe:e1:bb:d1:23:c4;
                fixed-address 10.13.37.203;
        }

Restart dhcpd.

doas rcctl restart dhcpd

Go ahead and fire up the VM, and attach to the console.

vmctl start test.vm -c

You'll see the seabios messages, the boot> prompt, and eventually, all the kernel messages and the login console. Log in and have a look around. You're in a VM! Make sure the interface got the IP address you expected. Ping some stuff and make sure NAT works.
$ ifconfig vio0
vio0: flags=8b43 mtu 1500
        lladdr fe:e1:bb:d1:23:c4
        index 1 priority 0 llprio 3
        groups: egress
        media: Ethernet autoselect
        status: active
        inet 10.13.37.203 netmask 0xffffff00 broadcast 10.13.37.255
$ ping -c4 8.8.8.8
PING 8.8.8.8 (8.8.8.8): 56 data bytes
64 bytes from 8.8.8.8: icmp_seq=0 ttl=54 time=9.166 ms
64 bytes from 8.8.8.8: icmp_seq=1 ttl=54 time=7.295 ms
64 bytes from 8.8.8.8: icmp_seq=2 ttl=54 time=9.178 ms
64 bytes from 8.8.8.8: icmp_seq=3 ttl=54 time=25.935 ms

--- 8.8.8.8 ping statistics ---
4 packets transmitted, 4 packets received, 0.0% packet loss
round-trip min/avg/max/std-dev = 7.295/12.893/25.935/7.568 ms

Again, you can use <enter>~. to exit the VM console. You probably want to log off before you do that.  Go ahead and SSH in as well.

$ ssh axon@10.13.37.203
The authenticity of host '10.13.37.203 (10.13.37.203)' can't be established.
ECDSA key fingerprint is SHA256:f39GrAZouHQ3L+3/Qy3FHBma5K+eOe84B9QoFwqNpXo.
Are you sure you want to continue connecting (yes/no)? yes
Warning: Permanently added '10.13.37.203' (ECDSA) to the list of known hosts.
axon@10.13.37.203's password:
Last login: Sat Apr 29 14:21:54 2017
OpenBSD 6.1 (GENERIC) #19: Sat Apr  1 13:42:46 MDT 2017

Welcome to OpenBSD: The proactively secure Unix-like operating system.

Please use the sendbug(1) utility to report bugs in the system.
Before reporting a bug, please try to reproduce it with the latest
version of the code.  With bug reports, please try to ensure that
enough information to reproduce the problem is enclosed, and if a
known fix for it exists, include that as well.

$

Forward ports through the NAT (optional)

One last thing I did was to port-forward SSH and HTTP (on high ports) to my VM so that I could get to the VM from anywhere on my home network.

Add these lines to /etc/pf.conf directly under the vmd NAT rule we added earlier.

pass in on $ext_if proto tcp from any to any port 2200 rdr-to 10.13.37.203 port 22
pass in on $ext_if proto tcp from any to any port 8000 rdr-to 10.13.37.203 port 80

Reload the pf configuration

doas pfctl -f /etc/pf.conf

You should now be able to ssh to port 2200 on your host VM's IP. Obviously, browsing to port 8000 won't work until you've set up a web server on your VM, but this was how I started out when working on the PHP/MySQL guides.

2017-04-15

PHP/MySQL Walk-Throughs updated for OpenBSD 6.1

I've stopped maintaining the page for nginx because it hasn't received many views since I updated it about six months ago. I suspect that nginx on OpenBSD is not all that popular because the httpd that ships with OpenBSD provides almost the same functionality as a basic installation of nginx. The pages for httpd in base and Apache2 now cover PHP7 and both configurations appear to work really well.  

PHP/MySQL on OpenBSD's relayd-based httpd 
HiR's Secure OpenBSD/Apache/MySQL/PHP Guide

Feel free to comment on this post if you find any discrepancies or have suggestions. Comments are disabled on the walk-through pages.

(2017-04-23) Edited to add: I went ahead and re-worked the nginx guide, based on the httpd guide with new formatting.
PHP/MySQL with nginx on OpenBSD

2017-04-11

OpenBSD 6.1 Released

I just saw a subtle hint from beck@ that OpenBSD 6.1 is live on the mirrors. Judging from the timestamps on the files,  it looks like the OpenBSD developers stealthily dropped 6.1-Release onto their FTP servers on April Fool's day and didn't tell anyone...

Go get it.

Edited to add: The OpenBSD 6.1 release page has been changed. It's official.


2016-11-27

Introducing wiconn: A text-based 802.11 wireless network manager for OpenBSD

When I switched back to OpenBSD as my primary daily-use operating system back in 2011, my biggest complaint was the lack of an easy-to-use tool for managing wireless networks. I only used maybe two or three different wireless networks daily. I just used a few shell scripts that statically configured the network card for each of these environments. Any time I'd go somewhere else, though, it would be a pain to manually configure it.

Almost exactly five years ago, I did something about it, and I called it wiconn.sh. Since I already had one-off scripts for my home and office networks, Wiconn started as a script to display open networks. It would display only the open ones, and prompt me for an SSID, and it could remember the BSSID (MAC Addresses) of open networks I used to protect me from things like my own Evil WiFi setup and other "evil twin" style wireless attacks.
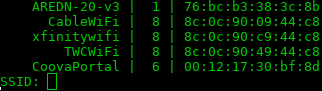
That first version looked something like this:


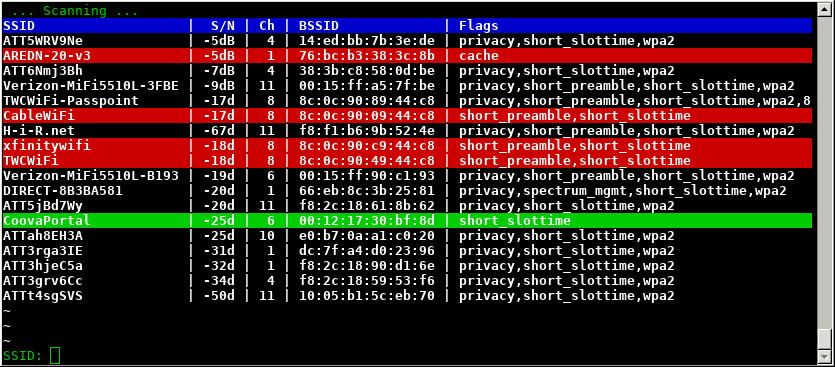
Wiconn evolved over time. By late 2012, I'd given it a bunch of features and made the interface look nicer. All SSIDs were being listed with color-coded backgrounds for the network you're connected to, and open networks. Visually, it hasn't changed much since 2012. This is how Wiconn looks today:
https://github.com/n0xa/wiconn

Over this long holiday weekend, I finally got it to a place where I feel like sharing it. Since it's already in the garage for maintenance, I figured I might as well put wiconn on GitHub.

Features:
  • Written primarily in Bourne shell (/bin/sh)
  • No dependencies: Relies only on the OpenBSD base distribution
  • Built-in protection from common wireless attacks
  • Easily connect to saved networks with one command (no scanning or prompt)
  • 2-Clause Simplified BSD license
There's still some more work to do.  I'd like to have it detect that one of your saved networks is in the list and ask if you'd like to join it. I'm also using NetBSD a bit more, and feel like there might be a way to make it work well on both OpenBSD and NetBSD from the same codebase, despite small differences in command syntax and output format between them.

Anyhow, for the growing number of folks who are giving OpenBSD a shot lately, I thought I'd share. Feedback is welcome, and more information is available through the documentation via GitHub.

n0xa/wiconn on GitHub

2016-10-29

OpenBSD vmm Hypervisor Part 1: Walk-through

Thursday night, I recorded a video while tinkering with vmm. I covered some basics of using it, networking, and installing OpenBSD inside a freshly-created VM. Sorry for the stammering and poor audio quality. Of course, the real fun was figuring out how to get it transcoded into webm and uploaded to youtube from within OpenBSD. I learned a lot about ffmpeg this week. Enjoy.

FYI, I used these same VMs to help me update and test the nginx and httpd PHP/MySQL articles. They're (finally) up-to-date for OpenBSD 6.0. Better late than never, right?

2016-10-20

Iodine DNS Tunneling

I first wrote about DNS Tunnelling back in 2010. Even back then, commodity tools to facilitate it were at least five years old. I covered OzymanDNS, DNS2TCP,Heyoka, and DNSCAT in 2010.

A few years ago, I was introduced to Iodine, and it's been my go-to tool for DNS tunnelling ever since, frequently with great success. Iodine has several different modes, and will try various query types, packet sizes and timing parameters, usually making the connection as reliable as it can be. Without any adjustments, it doesn't try to be stealthy, but if you dig into the manual client options and you know what your adversary is looking for (e.g. Snort/Suricata rules, Bro, FQDN length, volume of queries, etc.) you might be able to get Iodine to fly below the radar.

Just like the very first articles I wrote, the technique requires you to set up a sub-domain with a name server. Here, I set up a subdomain for *.t.h-i-r.net, and I've assigned it a name server of tn.h-i-r.net. I had to specify an A record for it: the IP address of a VPS I'm leasing (which also hosts much of HiR's presence aside from this blog). You could easily point it to your home IP address -- so long as you can NAT port 53 UDP to it.

I'm using Google Domains for this, but almost any DNS control panel should let you define NS records for subdomains and A records for hosts similar to how it shows up above. Previously, I'd demonstrated using GoDaddy and ZoneEdit DNS control panels.

Once you have established these DNS configuration entries, and made sure that UDP traffic can get to port 53 on the tunnel server, you should be ready to get Iodine installed. Most GNU/Linux and BSD flavors I've used lately have Iodine in the package repository. That includes OpenBSD, Arch Linux, Kali, and Ubuntu. If you're using Mac OS X, there's a Homebrew recipe that seemed to work last time I tried.  The Iodine page has Windows and Android binaries available for download. I have not yet tried them.

You probably want to leave the iodine server (iodined) running on your tunnel server at all times, so that it's ready when you need to use it. Since iodine uses a privileged port and creates TUN/TAP interfaces, you need to run it as root. At a minimum, to start the Iodine server, you need to specify a password, a network (in CIDR notation) to allocate for the tunnel, and the subdomain you configured above. I'm using a pretty small network mask (/29) which allocates only five client IP addresses. As I'm the only one using this tunnel server, this is fine. It might even be overkill.

# iodined -P r3d4c73d 172.16.0.1/29 t.h-i-r.net
Opened /dev/tun0
Setting IP of tun0 to 172.16.0.1
Adding route 172.16.0.0/29 to 172.16.0.1
add net 172.16.0.0/29: gateway 172.16.0.1
Setting MTU of tun0 to 1130
Opened IPv4 UDP socket
Limiting to 5 simultaneous users because of netmask /29
Listening to dns for domain t.h-i-r.net
Detaching from terminal...
#


On the client machine, it's assumed that you can connect to a network, but unrestricted Internet access isn't working. In my example, I'm on a somewhat restricted hospital Wi-Fi network that isn't allowing SSH, and has restrictions on what one can browse on the web. Most of my favorites are being blocked because they're "hacking" related.

Ideally, a recursing DNS server is available. As long as you can see the NS record you set up, there's a pretty good chance Iodine will work. The client also needs to run as root (or via sudo) and the bare minimum configuration requires a password and the subdomain.

$ host -t ns t.h-i-r.net
t.h-i-r.net name server ns.t.h-i-r.net.

$ sudo iodine -P r3d4c73d t.h-i-r.net
Opened /dev/tun0
Opened IPv4 UDP socket
Sending DNS queries for t.h-i-r.net to 208.67.222.222
Autodetecting DNS query type (use -T to override).
Using DNS type NULL queries
Version ok, both using protocol v 0x00000502. You are user #0
Setting IP of tun0 to 172.16.0.2
Adding route 172.16.0.0/29 to 172.16.0.2
add net 172.16.0.0/29: gateway 172.16.0.2
Setting MTU of tun0 to 1130
Server tunnel IP is 172.16.0.1
Testing raw UDP data to the server (skip with -r)
Server is at 168.235.84.117, trying raw login: OK
Sending raw traffic directly to 168.235.84.117
Connection setup complete, transmitting data.
Detaching from terminal...


Once you have the connection established, the remote end should be reachable via the "Server tunnel IP" shown in the output. In this case, that's 172.16.0.1. Typically, this is where I set up a Dynamic proxy with ssh.

$ ssh 172.16.0.1 -D 1080
Last login: Thu Oct 20 17:44:19 2016 from 172.16.0.2
OpenBSD 6.0 (GENERIC.MP) #0: Fri Sep  2 16:10:46 CEST 2016
 

$

Back in the real world, I set Firefox proxy settings up to use localhost at port 1080, and enabled remote DNS. Configuring the proxy in other browsers may vary. You may even have a system-wide SOCKS proxy setting.


Firefox now can browse through this SSH session, which is tunnelling over DNS.


Back on the tunnelled SSH session, I used the ~# SSH escape command to list open tunnel connections. This will verify that you are browsing through the tunnel.

The following connections are open:
  #2 client-session (t4 r0 i0/0 o0/0 fd 6/7 cc -1)
  #3 direct-tcpip: listening port 1080 for www.h-i-r.net port 80, connect from 127.0.0.1 port 16128 to 127.0.0.1 port 1080 (t4 r1 i0/0 o0/0 fd 9/9 cc -1)
  #4 direct-tcpip: listening port 1080 for www.blogger.com port 443, connect from 127.0.0.1 port 25392 to 127.0.0.1 port 1080 (t4 r2 i0/0 o0/0 fd 10/10 cc -1)
  #5 direct-tcpip: listening port 1080 for apis.google.com port 443, connect from 127.0.0.1 port 46746 to 127.0.0.1 port 1080 (t4 r3 i0/0 o0/0 fd 11/11 cc -1)
...


It's hard to see here, but I grabbed a Wireshark screen shot of Iodine in action a few weeks ago. The heartbeat packets are all pretty short. They can get quite large when the time comes to send a lot of data. Here, Iodine has chosen to use NULL records.


2016-10-19

Laptop CPU upgrade -OR- The quest for OpenBSD vmm(4)

I have been itching to play with vmm. I tried to get it working on an old Acer laptop and an IBM System X server, without any luck. I asked what was up, and heard from jbg@ that vmm requires a CPU with Nehalem microarchitecture or newer, and that the Intel P6200 in this machine lacks some of the instructions needed for vmm. Well, that would have been nice to put in the documentation. Perhaps I'll submit a diff.

I decided it'd be fun to try to upgrade the CPU in the Acer so I can finally play around with vmm in -CURRENT. Believe it or not, I've never attempted a laptop CPU upgrade. I've only replaced CPUs with the same spec before, replaced thermal interface compound, and upgraded RAM and hard drives. I went on the hunt for  PGA988 (Socket G1) Arrandale-based processors with 35w TDP (so the existing heat sink and fan, designed with the P6200 in mind, can keep up).  Sure enough, some of the first-generation i5 and i7 mobile processors fit the bill nicely.

On a really tight budget, I scored an i5 540M for $12 shipped. At the high-end, I could have splurged on an i7 640M to really wring everything out of it -- as far as I can tell. The only difference between the CPU I bought and the best i7 I could shoehorn into this laptop are an additional 1MB of SmartCache and 250MHz. Since my goal was simply to get vmm working, $12 was a bargain.

Many laptops make it a breeze to change hard drives. Some even have easy access to swap RAM, WiFi adapters, and optical drives. This Acer is easily serviceable for these parts. The CPU is a bit more difficult to get to. It's on the bottom of the motherboard, and it requires one to remove the keyboard, the top of the base, remove a handful of ribbon cables and connectors, and completely remove the motherboard, heat sink and cooling fan as a single assembly. Once the board is exposed, it's pretty simple to remove the heat sink, open the socket and swap processors.

P6200 (left) and i5 540m (right) immediately after swapping processors
The most crucial part of upgrading the CPU is making sure you have a good thermal interface between the processor dies (shiny metallic parts) and the body of the heat sink. I used a thermal paste that I've had good luck with in the past. For a 35w CPU, you don't need to splurge, but you should follow the instructions closely if you are unfamiliar with the process.

I slapped most of the parts back together without re-assembling the entire laptop case to see if it would even boot. Remember, this was uncharted territory for me. Looks like success!

Core i5!
Of course, there's still a matter of whether the BIOS will pass the virtualization options to OpenBSD. This is basically the worst BIOS setup I've ever seen, and it doesn't give me any options for virtualization.

I had already compiled a fresh OpenBSD kernel with vmm(4) enabled, so I went ahead and put the laptop back together, and booted the vmm capable kernel,started vmd and fired up the virtual machine.  No errors! I attached to the virtual serial console, and a few seconds later, saw the kernel booting.

Sweet success!

This coming weekend, I'll probably try to figure out how to get networking configured. This definitely isn't Parallels Desktop, but it's not any more daunting to set up than QEMU was.