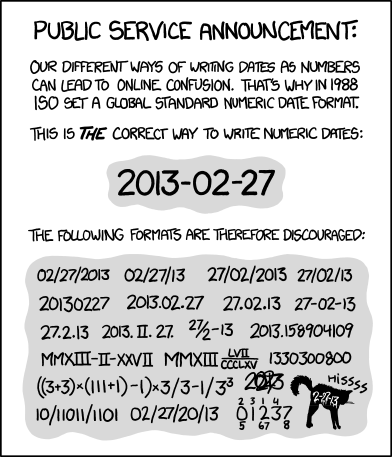
2013-02-27

ISO-8601

This. So much this.

In C:
#include <stdio.h> #include <time.h> #define SIZE 0x100 int main () { time_t t; char buffer[SIZE]; struct tm ltime; t = time (0); localtime_r (& t, & ltime); strftime (buffer, SIZE, "%Y-%m-%d", & ltime); printf ("%s\n", buffer); return 0; }
In Bourne-derived shell:
#!/bin/sh iso8601=`date +%Y-%m-%d` echo $iso8601
In Perl:
#!/usr/bin/perl use POSIX qw/strftime/; my $date = strftime "%Y-%m-%d", localtime; print "$date\n";
In Ruby:
#!/usr/bin/ruby iso8601 = Time.now.strftime("%Y-%m-%d") p iso8601
In PHP:
<?php $iso8601=date('Y-m-d'); print $iso8601."\n";
In Python:
#!/usr/bin/python from datetime import date iso8601=date.today().isoformat() print iso8601
Got it? Good.

2013-02-12

Making a bootable USB installer for OpenBSD

Edit (April 24, 2016): A Few years ago, OpenBSD developers started issuing an "installXX.fs" image which was designed to be written to a USB drive with dd(1). This makes the article below mostly obsolete.

From pretty much any unix-like operating system, you should be able to use dd to write the .fs image to the USB stick directly, like this:

sudo dd if=install59.fs of=/dev/rsd2c  

(Just make sure you have the right target device specified. You don't want to overwrite the wrong drive!)

--- 

When I first installed OpenBSD to my netbook, I had tried several ways to get the ISO written to a USB stick including unetbootin, using dd to directly write the image to USB, and a few other tricks. The Googles showed me a workable yet rather complicated way to do it, but that sounded like a pain in the butt. I didn't have an external USB optical drive, but I had the hardware to hack one up. This is really how I did that first OpenBSD install:
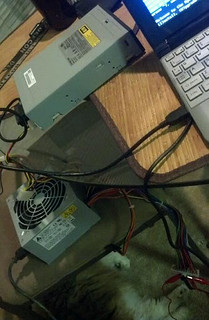
hacky

Earlier, I had actually installed OpenBSD to a USB stick, and run the whole system directly from USB, including a swap partition, logs going to /var and the whole nine yards. OpenBSD's gratuitous logging and swap utilization killed that USB stick in a matter of months after daily use, but the thought hit me to use that same method here. By default, the bsd.rd package is installed to the root filesystem to use in a recovery situation. This is an initial ramdisk, a bare-bones userland with just enough tools to install or rescue a system. So that's what we're going to do.  The TL;DR goes something like this:

  1. Boot a desktop from the boot CD
  2. Insert the USB stick you wish to use
  3. Choose "Install" from the CD's menu.
  4. Format the USB stick, and install OpenBSD to it. If it's a 4GB stick or larger, the default partitioning scheme will work great. Otherwise, make one root partition without swap. Install only the base, bsd, bsd.rd and etc packages.
  5. After install, re-mount the cd and copy the install files to the root partition.
  6. Create an etc/boot.conf file on the USB stick (mounted to /mnt) with "bsd.rd" as the first and only line.
  7. Shut down the system. The USB stick will now boot on most servers and netbooks lacking optical drives, and will go directly to the installer. All the OpenBSD install packages will be right there on the USB stick.
 Here's the walk-through.

I booted up the system, and after the installer menu popped up, I plugged in my USB stick. I did this to make it obvious what its device id is. You can tell it's sd0 in this image. Adjust accordingly. At the menu, I chose "I".
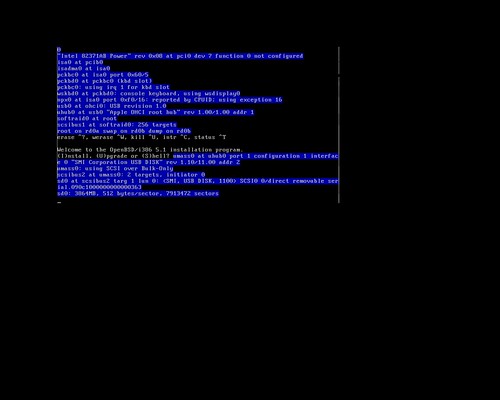
obsd-plugusb

You can see I'm choosing sd0 here. Again, use the right device, or you may damage important filesystems.
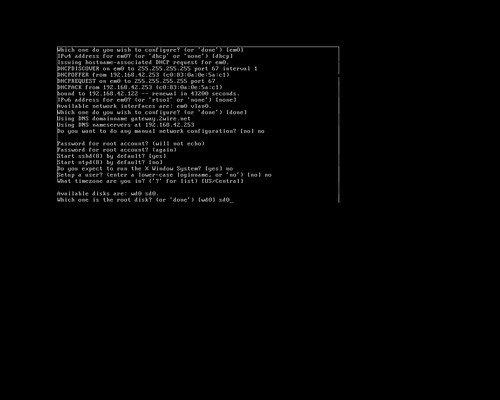
obsd-disk

I just rolled with the default partition sizes here. The install files are a little over 100 megs, so they'll fit in the root partition. If you're an avid OpenBSD user, feel free to mess with the disk options here, but the defaults work well on a 4GB stick (the smallest I had laying around). obsd-disk2
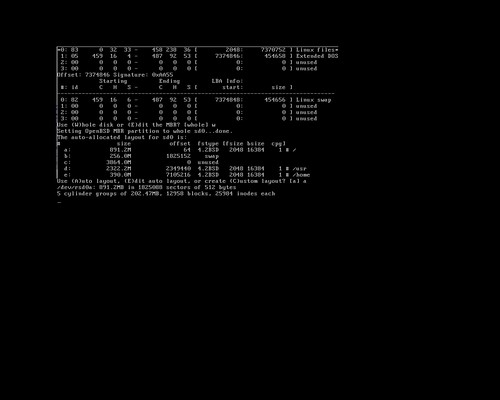
When the time comes to install sets, the only ones you really need to get an installation environment up are bsd, bsd.rd, baseXX.tgz and etcXX.tgz (where XX is the release number) - I had an official OpenBSD 5.1 install set at my desk, so I used it for this example. The numbers will change for each release, but the process works the same. obsd-sets
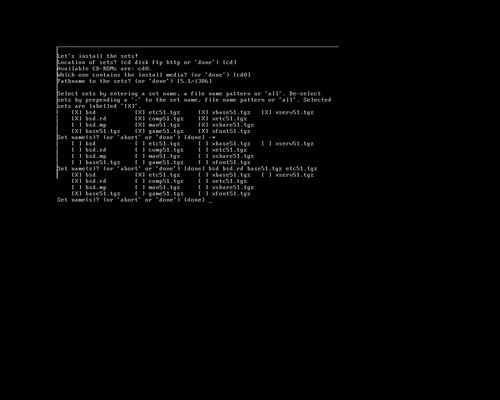
When the installer exits, it will un-mount the CD. You'll want to re-mount it to copy the install sets to USB. Also note that I set mnt/etc/boot.conf to "bsd.rd" - This forces the USB stick to boot directly to the installer ramdisk, so you'll be ready to go! obsd-boot-sets
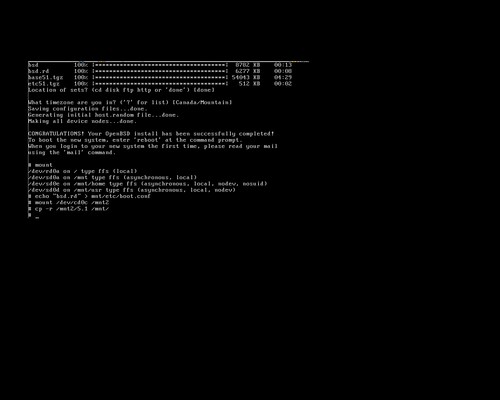
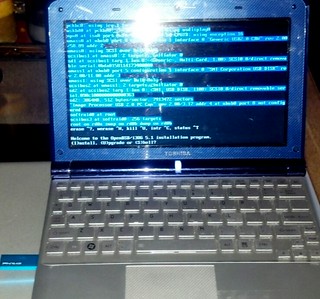
To test, I put the USB stick into my netbook and fired it up. Untitled
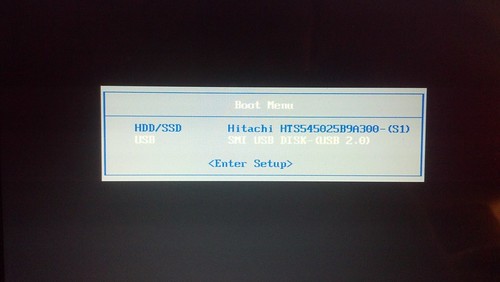
Voila!
Untitled

2012-11-03

Introducing: nginx/MySQL/PHP stack on OpenBSD

While our walk-through for Apache/MySQL/PHP  on OpenBSD is quite popular, the upgrade documentation for OpenBSD 5.2 is quoted thus:

nginx (see also nginx(8)) has been added to OpenBSD, ultimately to replace the Apache 1.3 derived httpd(8). For new installations, you are encouraged to utilize nginx rather than httpd, existing installations are encouraged to start planning replacing the stock httpd with nginx. 

With Apache 1.3 being awfully long in the tooth, most of us saw something like this coming. With that, there's a new walk-through that covers the basic configuration of nginx, MySQL and php-fpm to create a working, secure and chroot-enabled web application environment in OpenBSD 5.2.

Introducing: The OpenBSD nginx/MySQL/PHP stack

2012-11-02

OpenBSD 5.2 Released

OpenBSD 5.2 was released yesterday; That means it's time to update the OpenBSD Apache/MySQL/PHP page!

Some changes I noticed right away while updating the walk-through:

  • pkg_add defaults to interactive mode. For example, when trying to resolve ambiguous packages (multiple versions available in the repository), it prompts you for which package you want to install. It will also do this for dependencies, and may ask other questions during installation.
  • The MySQL Server package comes with an optional-use script to help lock down MySQL and remove all test data. 

You can see the detailed changelog for more details. I noticed that nginx ships by default now, and that there have been other improvements all around. This post is even coming from within Chrome on OpenBSD 5.2.


2012-10-28

MySQL logging for OSSec

From their website: "OSSEC is an Open Source Host-based Intrusion Detection System that performs log analysis, file integrity checking, policy monitoring, rootkit detection, real-time alerting and active response."

I use OSSec in several places. In my home lab and on my web servers (hosted elsewhere) for starters. While OSSec alone can't take the place of an enterprise-grade SIEM, the HIDS component can work well with them. If you're running a relatively small shop on a limited budget, it might be good enough, especially if you're willing to invest some time into tinkering.

I thought it'd be easier to report on OSSec's alerts if it were somehow able to store them in a database. As it turns out, OSSec can be made to log much of its information to either MySQL or PostgreSQL, but the documentation is a bit spread out and hard to follow.

First things first, you'll have to (re)compile OSSec, and and you'll need the MySQL bits and pieces for both OSSec MySQL connector as well as a working MySQL server, assuming you want MySQL to work locally with the OSSec server. So make sure you have all the packages you'll need:

sudo apt-get install build-essential libmysqlclient-dev mysql-server

Fetch the OSSec source code and extract it. http://www.ossec.net/

On Ubuntu 12.04 LTS and with OSSec 2.6.0, I had to apply this patch: http://pastebin.com/Pg3pDtr0 - It changes one line in a single Makefile, but it wouldn't compile properly otherwise.

In the "src" directory of the OSSec source code, run "make setdb" and if the proper libraries are installed, you should see something like this:

Error: PostgreSQL client libraries not installed.
Info: Compiled with MySQL support.

Before you install OSSec, you need to create the database, add a MySQL user for OSSec to use, and import the schema.  You can change the username and password below to suit, obviously.

mysql -uroot -p[password]
mysql> create database ossec;
mysql> grant INSERT,SELECT,UPDATE,CREATE,DELETE,EXECUTE on ossec.* to ossec@localhost;
mysql> set password for ossec@localhost=PASSWORD('53Cr37p4ss');
mysql> flush privileges;

  
cd src/os_dbd (in the OSSec source code directory)
mysql ossec -uossec -p53Cr37p4ss < mysql.schema


Go back to the OSSec source code base directory, and run install.sh (as root or with sudo) - Your options will vary, but the defaults are usually sane. 

Once OSSec is installed, you need to add the following snippet to the end of ossec.conf (usually in /var/ossec/etc) - Remember to make sure you edit this to reflect your actual database information.

<ossec_config>
    <database_output>
        <hostname>localhost</hostname>
        <username>ossec</username>
        <password>53Cr37p4ss</password>
        <database>ossec</database>
        <type>mysql</type>
    </database_output>
</ossec_config>


To enable the ossec-dbd database logging, you must run /var/ossec/bin/ossec-control enable database

Restart ossec (/etc/init.d/ossec restart) and you should be good to go. On my installation, OSSec immediately begun populating the "signatures" table, and after a short while, alerts were logging to the "alert" and "data" tables. 

My next step is to generate some scheduled email summary reports, but all in all, having logs in a database will certainly make poring through them a much easier task.

2012-07-31

Emergency power show-down

Being an amateur radio operator and a nerd in general, I make sure I have emergency power available. This is in the form of gel cells, several UPS units and of course the obligatory inverter for road trips. I have a solar panel that can put a reasonable charge back into my gel cells with one bright day's worth of sunshine. I don't feel like I need a generator. If the power goes out for a week or two over a wide area, most of my gadgets will be marginally useless, and I'm pretty comfortable living without electricity, as I go backpacking and camping frequently.

I do use my netbook for certain digital modes with amateur radio, and I could see it coming in handy for emergency operations. Considering the electronics I might choose to use sparingly in a power outage, I did some experimentation over the weekend.

My netbook requires 19VDC, and It seemed silly to me to turn DC into AC, and step it all the way up to 120 volts, just to step it back down, rectify and filter it for devices that fundamentally operate on DC to begin with. The same goes for desktop PCs that take 120VAC and turn it into +-12VDC, 5VDC and 3.3VDC. The rest of my "ham shack" runs fine on car batteries. Why not my computers?

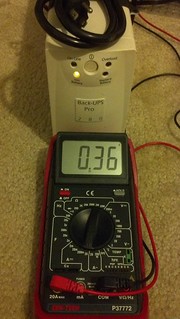
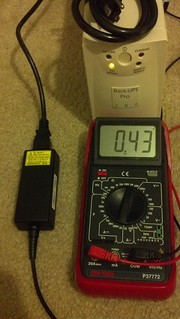
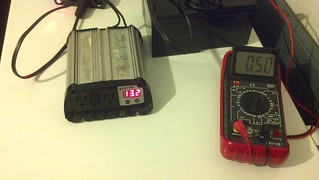
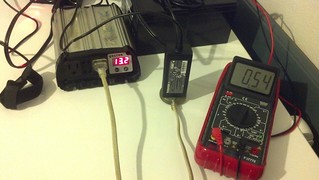
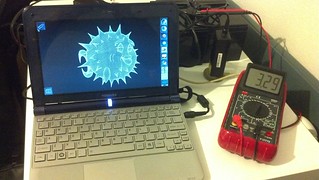
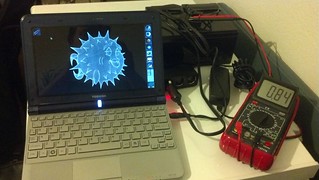
In all of the following photos, you'll see amperes on the display, but I'll reference watts. The battery pack was sitting at 13.2 volts for all of these tests.

To baseline this thing, I went with the obvious choice of plugging into one of my UPSes. I have a feeling this is how most folks would choose to operate their computer in a power outage if it were an option.

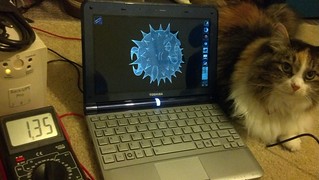
The UPS consumes a paltry 5 watts without a load. This is looking pretty good.


Plugging the power brick in bumps consumption up less than a watt for a total of about 5.7 Watts.


With the laptop booted up and running on the UPS, battery consumption tops out at around 20 watts. I noticed numbers higher than 1.5 amperes momentarily. One of our cats also has some obsession with laying on warm electronics such as power bricks.


Next, I tried my 450 Watt inverter. Without a load, it uses about 6.6 watts. Not terribly surprising. It has two noisy fans and a display to power as well.


Plugging the power brick in without any load bumped consumption up to 7.1 watts. This is similar to what happened with the UPS, but still less efficient.


Attaching the netbook spiked the load to about 43 watts total. Ouch!


Finally, I tried operating my laptop on a DC-to-DC power supply. This was vastly more efficient than relying on an inverter, and considerably better than my UPS as well. The DC-DC converter consumed 11 watts from my battery pack.


The clear winner is obviously the DC-to-DC converter. If the laptop were the only thing in use, I could expect about four times the run time from the DC converter compared to using my inverter.

The DC converter I used was originally for a Macintosh G3 PowerBook, and was set for 24 VDC. My netbook requires 19VDC, and I was fortunate enough to find a set of potentiometers on my old DC-DC supply to allow me to adjust the voltage, and then I hacked a plug onto it that works for my netbook.

Most laptops require somewhere between 15-24 VDC, and are sensitive to dirty power. Good DC-DC converters are capable of dealing with 10-30+ volts of input and provide stable, clean power on the output suitable for sensitive electronics. They're easy to find, if a little pricey compared to traditional transformer bricks. They are often sold as "Laptop Car Chargers"

Similarly, a company called PicoPSU makes a tiny solid-state DC-to-DC power supply that plugs directly into a computer motherboard's ATX connector and provides power cables for a few hard drives or other peripherals as needed. They're not designed to run powerful desktops or servers, but work fine for lower-power workstations or "book PCs." You'll have to find a way to power a monitor, though. Hint: many LCD displays can be powered by a DC-DC converter, too.

2012-07-24

Westlake Hardware: My hackerspace?


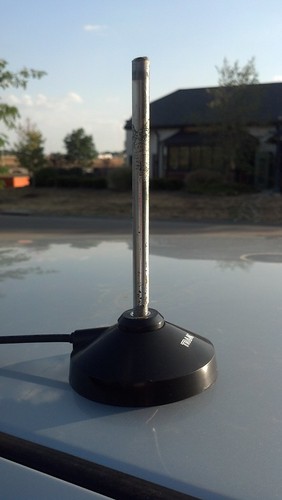
It started as a simple trip to the hardware store. My mission was to find some 3/8" threadrod at 24 threads per inch. I was going to chop it with my dremel to a length of 6 and 9/32 inches long and use it as a 1/4 wavelength antenna in a mount similar to the one shown above. What I found were many kinds of threadrod, but nothing that would screw into either of my antenna bases.

I opted for a piece of 3/8" smooth rod without threads, figuring I could just wander over to the hardware store's selection of threading dies and pick up the one I  needed to cut a dozen or so threads into the rod. There, I found many dies, but not the 3/8" x 24 I needed for the project. There was a spot for the die I needed, but it was empty.

I finally cornered a sales associate, who looked up the part number, said they had one in stock, and even scoured the shelves looking to see if someone had placed it in the wrong spot.  What happened next took me by surprise. The associate went around to the back shop, pulled a full set of dies out of the tool chest, found the one I needed, and brought me around to the vise and tossed me some cutting oil and gloves so I could tap threads onto the rod myself. While I was working away, curiosity got the best of him. "What are you building?" he asked.  I explained that I was building a very cheap antenna, and explained that I was going to take it home and cut it to length so that it resonated at about 448 MHz. That's about the time he took me over to the chop saw with a cutoff wheel and a bench grinder. He found a couple pair of goggles and we got to work.

So there you have it. I walked in, spent a few bucks on a steel rod, got about 20 minutes of free shop time and left with a finished product. Westlake, you're like having a hackerspace a mile from home!