Series: Make your own lock picks
Part 1: Grind out a simple lock pick
Part 2: Make a tension wrench
Part 3: Advanced lock pick profiles
In this series, I'll show you how to make a set of high-quality lock picks from stuff you either already have laying around the house, or materials that are easy to acquire for cheap.
This is the third part of the series, where I will discuss some more advanced lock pick designs and what purpose they serve. You can use these templates to grind out your own lock picks using the skills you learned in Part 1.
I actually made a few more picks the same night that I wrote Part 2.
Left to right: Small diamond rake, medium hook pick and multiple peak bogota-style rake.
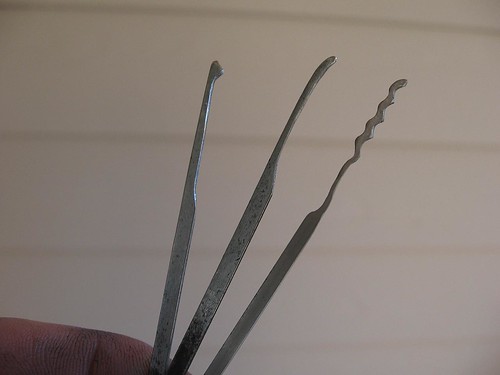
The Bogota rake was made from one of the leftover wiper rails. The others were made from street sweeper bristles.
As a general rule, any pick with a single curve (called a "hook") is designed for single-pin picking. This is where the locksmith applies light tension to the cylinder, feeling for which of the pins in the lock is binding. The binding pin will be harder to move than the others. Applying gentle pressure to that pin should push it up to the shear line. A distinct sensation will be felt through the tension wrench when this happens. Then, the locksmith finds the next pin which is binding. This process goes on and on until all pins have been set and the plug rotates, unlocking the lock.
Any pick with multiple peaks or odd shapes are called "rakes" or "jigglers". While applying tension with the tension wrench, these rakes are used to try to jar the pins to the shear line quickly. This technique has several advantages and several disadvantages. As a general rule, it works quite effectively on cheap locks like what you find on filing cabinets or low-end Kwikset door locks.
Here's a thread on LockPicking101.com with some excellent photos of real lock picks with rulers to help you scale them. These profiles can help you cut out some more advanced pick designs.
The most basic way to copy a lock pick profile like this is to wing it and go by sight. This works for some of the more basic hook pick shapes quite well.
For more intricate rake designs meant to exploit pin spacing, it's advised to print the pick template out at a 1:1 ratio (actual size) on paper and use it as a real template to cut with. There are a few ways to accomplish this. You may cut out the shape with a precision knife or razor such as an X-ACTO, and glue it to the pick media of your choice. As heat can destroy paper, and water (quenching) can separate glue, this can be a tricky process. You can also cut the template out and use it as a stencil, and paint your pick media with a high-temperature spray paint. Alternatively, you can just go slow and frequently hold the template to your pick to see how close you're getting.
One fascinating technique I haven't put any of my own research into involves electrochemical etching. I haven't personally seen the results, but if you sand the factory paint off of a hacksaw blade, then use a robust spray paint (like underbody paint from the auto parts store) to paint the stencil design onto the blade, you can use a power supply to energize a saltwater bath which will eat away all of the exposed metal. This should, in theory, leave a pick-shaped piece of hacksaw blade in the saltwater. I honestly don't feel right going into the specifics of electrochemical etching of steel here without having tried it myself, but there's a lot of information on the web about it. A fellow lockpicking enthusiast sparked this technique and linked to an article about making reed valves for two-cycle engines with EC Etching. If I get around to trying it myself, I'll let you know how it goes.
Series: Make your own lock picks
Part 1: Grind out a simple lock pick
Part 2: Make a tension wrench
Part 3: Advanced lock pick profiles
2008-07-13
Make your own lock picks - Part 3
![]()
blog comments powered by Disqus
Subscribe to:
Post Comments (Atom)


