2008-03-30

Sysadmin Sunday: Subversion

Sorry for the recent lack of Sysadmin Sunday posts. I don't always have good Sysadmin content thought up. Sometimes I do, but I don't have time to actually set up an environment to demonstrate it. Sometimes I don't even have time to get around to writing much of anything.

So, we're back this week with a tutorial on setting up Subversion, a revision control system that, in my opinion, is much better and user-friendly than other revision control systems (such as CVS). You'll see me (and many others) casually use "SVN" when referencing Subversion. You can use subversion to synchronize directories (folders) across different workstations, to collaborate changes on large documentation or programming projects, or to simply have a revision control and change rollback system for your files. It works with binary and text, but can take up a lot of hard drive space on the server for large or frequently-changing data sets.

Installation
Initially installing Subversion varies on the platform and package management system available. I am installing subversion on Ubuntu Gutsy Gibbon Server Edition. Here, it's as simple as:
$ sudo apt-get install subversion

On FreeBSD 6.3, I got it installed using pkg_add as well, with no problems.
$ sudo pkg_add -r subversion

Subversion packages are available for many platforms, but if you wish to build it from source, the documentation is quite good.

HiR Reading Room
Of particular note is the O'Reilly and Associates book: Version Control with Subversion. It is free and open source, so it's also available to read in its entirety on the web. I personally liked it enough that I bought the paperback book, as I dealt with subversion on a daily basis at my last full-time job. If you'll be doing a lot with Subversion, this is a great book to have around as a reference guide.

Please note that I'm not dealing with any encryption whatsoever, so you should probably make sure that your svn server isn't accessible from the Internet. Being behind a private firewall or cheap router will work for testing this at home. Read the book for information on securing SVN with ssh or using better authentication options. There's even a web-based SVN Server, which allows your users to browse the repository with a browser while using all of the flexibility and authentication modules at Apache web server's disposal. All of that and plenty more is covered in this book.

Starting svnserve
First, make a directory to keep the repositories in. A repository is simply a directory on the SVN server where data is stored. I chose /var/svn/repositories.
$ sudo mkdir -p /var/svn/repositories

Then, we need to start our svnserve daemon. As I mentioned before, there are several ways to run SVN. Just starting a vanilla svnserve daemon is the easiest way but not always the best way. For the purposes of this demonstration, I will keep it simple.

Place "svnserve -d -r /var/svn/repositories" (or whatever repository root you chose) in the startup scripts, usually in /etc/rc.local. Either reboot, or run "[sudo] svnserve -d -r /var/svn/repositories" from the command line to start it. This restricts svn to exporting only the contents of /var/svn/repositories.

Your first repository
Let's set up our first repository. On the SVN Server, run the following. You may choose whatever you wish for the repository name, but it has to be under the repository root you defined when you started svnserve.
$ sudo svnadmin create /var/svn/repositories/hir-test/

You should create a username and a password by editing the "svnserve" and "passwd" files in the "conf" directory under the repository you just created. Keep in mind that passwords are all in plaintext for this example. It's not really the best way to do things, but it is the simplest.

$ vi /var/svn/repositories/hir-test/conf/svnserve.conf
un-comment the following lines:
anon-access = read
auth-access = write
password-db = passwd


$ vi /var/svn/repositories/hir-test/conf/passwd
Add a line like the following to the end of the file to define your username and password:
axon = setecastronomy

Now, go to a client computer (or simply access it locally but through the svn:// url scheme) and use SVN to check out the repository:
[axon@floaty-fbsd ~]$ svn checkout svn://axon@192.168.0.108/hir-test/
[axon@floaty-fbsd ~]$ cd hir-test
[axon@floaty-fbsd ~/hir-test]$ ls -la

total 8
drwxr-xr-x 3 axon axon 512 Mar 29 21:37 .
drwxr-xr-x 20 axon axon 2560 Mar 29 21:38 ..
drwxr-xr-x 6 axon axon 512 Mar 29 21:37 .svn

Copy a file into the repository, or make a new file. Your choice. Then use "svn stat" to see the status of the files in the directory.
[axon@floaty-fbsd ~/hir-test]$ cp ~/internet-resume.doc .
[axon@floaty-fbsd ~/hir-test]$ svn stat
? internet-resume.doc

SVN doesn't recognize the file, hence the "?" before the file name. We must first add the file with "svn add"
[axon@floaty-fbsd ~/hir-test]$ svn add internet-resume.doc
A (bin) internet-resume.doc
[axon@floaty-fbsd ~/hir-test]$ svn stat
A internet-resume.doc

At this point, SVN is aware of the file, but it still hasn't uploaded it to the svn server. If we go to another machine and check out the repository, it will still be empty. (sorry, I used the DNS name in this example but it's the same server as 192.168.0.108)
axon@hosting:~$ svn checkout svn://axon@lampdev.labs.h-i-r.net/hir-test
Checked out revision 0.
axon@hosting:~$ cd hir-test/
axon@hosting:~/hir-test$ ls -la
total 12
drwxr-xr-x 3 axon axon 4096 2008-03-29 16:52 .
drwxr-xr-x 5 axon axon 4096 2008-03-29 16:52 ..
drwxr-xr-x 6 axon axon 4096 2008-03-29 16:52 .svn
Back on the client machine where we added the file, though, use "svn commit" to update the central repository on the SVN server. You should always commit with a message saying what changes were made. use --message for that. It should then prompt for your password.

[axon@floaty-fbsd ~/hir-test]$ svn commit --message "added my resume"
Authentication realm: 2c608312-9cd3-44f0-b88e-356728a5cc35
Password for 'axon': setecastronomy (not shown on screen)
Adding (bin) internet-resume.doc
Transmitting file data .
Committed revision 1.

Now, whenever you check out the repository elsewhere, the files will be in sync. Use svn update to refresh your local repository to the latest version:
axon@hosting:~/hir-test$ svn update
A internet-resume.doc
Updated to revision 1.
axon@hosting:~/hir-test$ ls
internet-resume.doc

When you delete, copy or move files within a local copy of the repository, it's best (practically mandatory) to use svn delete (svn rm), svn copy (svn cp), and svn move (svn mv) for these tasks, respectively.

So far, the commands we've covered the following for client machines. This should be enough to get you up and running.
svn checkout svn://[user@]host/repo-name - Checks out a local copy of the repository
svn update - Refreshes the local repository
svn add - Adds version control to new files in the local copy of the repository
svn commit --message "test message" - Updates the central repository
svn delete
filename - remove a file from the local repository
svn rm filename - same as above
svn copy filename1 filename2 - make a copy of a file within the repo.
svn cp filename1 filename2 - same as above
svn move filename1 filename2 - move a file from one place to another in the repo.
svn mv filename1 filename2 - same as above

There is also a windows shell extension available, called TortoiseSVN. This puts a TortoiseSVN menu in the list when you right-click while browsing files on Windows. From here, you can check out, update, add, commit and manipulate repositories right from within Windows.

2008-03-29

Testing an ATX Power Supply

Things you'll need:

  • Tools to open your computer case
  • A voltmeter or multi-tester, preferably a digital multimeter (DMM)
  • A paper clip or a small piece of wire to use as a jumper.
A friend of mine was having trouble with one of his computers. At first, it sounded like a power supply problem, so I gave him some advice on testing the power supply.

A power supply can make or break your computer. It's often one of the first components to fail because of the high temperatures and abundance of electrolytic capacitors. Heat and capacitors aren't usually a good combo, and running the computer with a clogged fan can raise temperatures in the PS high enough to damage the caps. A power supply may also take the brunt of the damage in a power surge, as well -- especially if the computer is turned off.

There are a few things to understand about the ATX Power Supply. First off, ATX power supplies are soft-triggered, meaning that they're always pulling a little bit of electricity from the wall. They're powered on not with a hard physical switch, but with an electronic relay activated by the motherboard. Therefore, a little bit of electricity has to be going to the motherboard even when the computer is off, so that it can tell when you have hit the power switch.

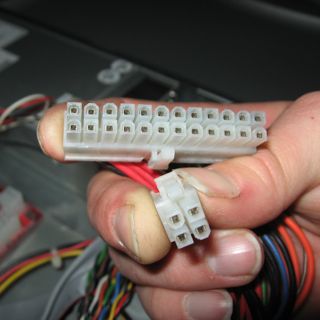
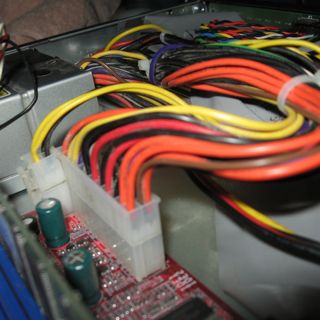
Another thing is that most newer computers require extra power for the motherboard, this comes in the form of two additional 12VDC wires and two additional grounds molded into a four-prong plug (called a P4 plug) that supplements the traditional ATX plug:


Before we begin testing, unplug the computer from the wall outlet, open the case, and unplug all the Power Supply cords from the motherboard, drives and all accessories. Notice that there are many black wires on the main ATX plug. If you have a DMM with an ohm-meter or continuity tester, you should check to make sure all of the black wires have continuity. These are all chassis ground wires, and you can use any one of them to test the for the power supply. Hook one test lead up to any black wire, then make sure that there is little to no resistance between that black wire and all the other black ones. Be sure to check the grounds on the P4 plug and Molex (hard drive) plugs.

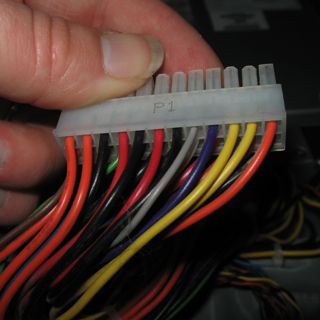
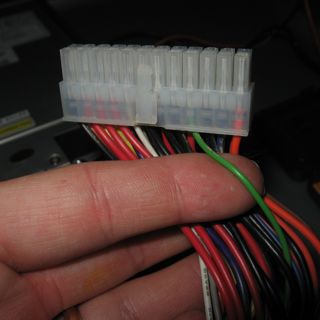
Now, you may plug the power supply into the wall outlet again. The only wire we need to test right now is the purple wire. Take note of it, as it may look a lot like the black wires or a blue wire if you don't have plenty of light. It will be the fourth wire in, next to the two adjacent yellow wires on the main plug as shown below:


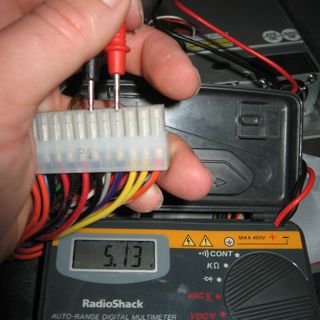
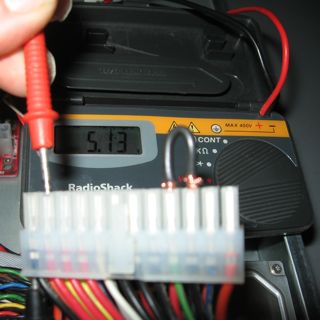
Test the voltage between this purple wire and ground. This is the "standby" power, and should be near 5VDC.

If this doesn't register any voltage, there may be a fuse blown internally to the power supply, or it could be something more catastrophic. If the voltage is wildly out of spec (like 2.3VDC or 8VDC), something is very wrong. Trash it and replace your power supply.

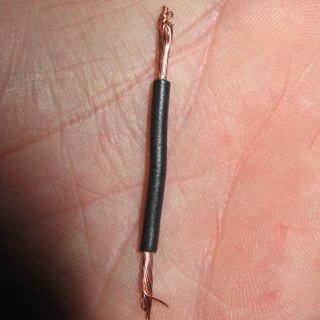
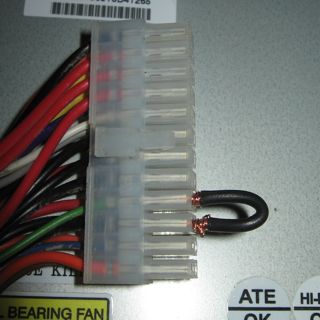
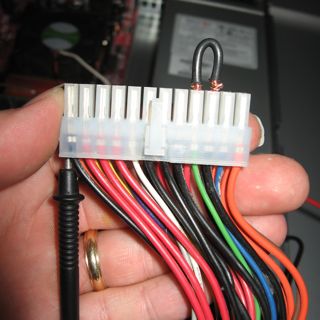
Now, you'll need your paper clip or a jumper wire. I chose a jumper wire because it's insulated and I didn't want to run the risk of hitting the jumper with my DMM's test probes. I'm just careful.


Find the green wire. This is the power-on wire.


When the green wire is jumpered to ground, the power supply fan should spin up. If this doesn't happen, something is wrong, but it could just be a clogged fan so you should at least check the voltages before you go shopping for a new power supply. Make SURE you jumper the green wire to a black wire, not the purple one. I don't know if it would hurt anything, but the PowerON wire is not designed to be hooked to anything other than ground.


I attached the ground probe to one of the ground wires by jamming it into the back of the ATX plug, so that I only have to fiddle with the positive test probe from here on out. That makes taking these pictures a little easier. ;)


First, I tested the voltage of all of the red leads. These should be +5VDC. Not surprisingly, they are the same voltage as I saw on the Standby Power rail which should also be +5VDC. To be sure the power supply is intact, check ALL of the red, yellow, blue and orange wires on ALL plugs, even for the P4 and Molex hard drive power plugs. A single broken or damaged connection can be the difference between a healthy computer and one that's unstable or may not even boot.


Test all of the leads except for the brown, green, and gray ones. The green is obviously in use and working at this point. Brown and gray are both voltage sense connections that you don't need to bother with. Your power supply may or may not have a white wire. It's optional in the ATX specification but most new power supplies have them present. Use the table below to determine the voltage specifications for each color. Note that these are voltages as related to chassis ground (black wires). Again, if any of these voltages are wildly out of spec or you notice an open circuit (0 volts), you should probably replace the Power Supply or have it looked at by a competent computer repair professional. Opening up a Power Supply voids its warranty and exposes components that could probably hurt you even if it's unplugged.


ColorVoltage
Purple (standby)+5VDC
Red+5VDC
Yellow+12VDC
Orange+3.3VDC
Blue-12VDC
White (optional)-5VDC

2008-03-28

Copying and pasting between workstations with web mail

Occasionally, I have to quickly get information copied and pasted between my personal laptop and my desktop. Maybe it's a URL or a shell script. Who knows?

I usually have GMail fired up on my laptop anyways, so I simply create a new mail, then paste the text into the e-mail body and save it as a draft.


I go to the other computer, open up the draft, and copy the contents to the clipboard.


Other options do exist (such as X2VNC and friends), but don't always work too well between platforms for clipboard activity. Note, you can also use file attachments in a draft.


You can do this with pretty much any web mail client that supports drafts, and it's not quite as cumbersome as actually e-mailing yourself. You can just trash the draft when you're done, or use a draft as a transient scratch pad for data you wish to access from multiple computers.

Mac OS X: Pwned in two minutes flat - CanSecWest

Coverage like this might seem somewhat odd given the fact that most of the HiR crew are Mac users.  As it turns out, this is likely an issue with Safari, which I've been known to hate on very frequently.  Safari and I just don't get along.  Never mind the fact that FireFox is tied up with something else and I'm making this post from within Safari (much to my chagrin, given Safari's lack of compatibility and frequent crashes with Blogger).  


This year, the PWN 2 OWN hacking competition at CanSecWest was over nearly as quickly as the second day started, as famed iPhone hacker Charlie Miller showed the MacBook Air on display who its father really was. Apparently Mr. Miller visited a website which contained his exploit code (presumably via a crossover cable connected to a nearby MacBook), which then "allowed him to seize control of the computer, as about 20 onlookers [read: unashamed nerds] cheered him on." Of note, contestants could only use software that came pre-loaded on the OS, so obviously it was Safari that fell victim here.


Full story on InfoWorld

2008-03-24

Why high-sec locks are pickable

Ross Kinard put out this paper on high sec locks earlier this month (found via [blackbag] today).

It outlines why several high-security locks are still vulnerable to manipulation and picking. Although it's often a more complex task to pick a Medeco or a Mul-T-Lock, the same flaws in manufacturing and normal wear end up creating many of the same vulnerabilities. It's just more difficult to pick these locks because there are more hoops to jump through, if you will.

Ross discusses the Two-Stage method of unlocking -- something that few lock manufacturers employ -- and why it's crucial to making a lock more difficult to pick. Ross uses Abloy's Disc Blocking System as an example of a very strong system that is highly resistant to straight-forward manipulation attacks.

If you like physical security, lockpicking, high-res photos of locky goodness and technical diagrams, this is a great read. It's not terribly verbose, either. I think it also goes without saying that Blackbag belongs in your RSS reader. Right now.

Sun Microsystems: Breakin' the law, Breakin' the law?

... Moore's Law, that is. Sun currently has laser technology in its crosshairs with the intent to boost speeds of communication between chips on computers. While this has been a theoretical way to vastly improve processing power, no one's actually pulled it off and put it into production yet. A quote I found amusing from the article:

“It’s like the difference between having someone next door and having to get on an airplane to fly across the country,” said Alan Huang, an optical networking designer at the Terabit Corporation in Menlo Park, Calif. “This would be a way of breaking Moore’s Law.”

While Moore's Law actually involves an exponential increase in the number of transistors that can be effectively crammed onto a silicon wafer, I don't see how this technology will actually break Moore's Law, per se. It might just render Moore's Law obsolete by allowing multiple-CPU computers to scale much more efficiently.

Full story: [nytimes] via [engadget]

2008-03-23

Hak.5 - Shmoocon Special

The Hak.5 guys went to Shmoocon and pumped out an hour.5 long interview with five high-profile hackers. Vista (in)security, GSM Cracking, SSD/Flash data recovery, and the new version of BackTrack are covered, among other things. It's worth a watch, but don't get caught slacking off at work! An hour and a half is a long lunch break.

Hak.5 Season 3 Ep. 8