Showing posts with label hack. Show all posts

2014-04-12

Baofeng Antenna Hacking

The infamous Baofeng. Specifically, I have the UV-5RA model. This is a lot of new hams' first handheld radio, and perhaps first radio period. I picked this one up because it was half the price of paying for a new battery to get my Yaesu VX-7R back on the air, and I had to get a reliable handheld radio quickly. I've had this one for about a year. I'm not sure I'd recommend it as a first radio unless you're really on a budget, but for what it is, I've been pretty happy with it. Lack of features compared to my Yaesu radios aside, my only complaints are that it poor intermod rejection, and the receive CTCSS squelch frequently fails to keep RF noise from coming through the speaker when there's not a real carrier there.

One thing that a lot of people complain about is the OEM antenna, but people complain about stock antennae on all handhelds. I stay pretty close to the repeaters I use frequently, so mine hadn't given me any problems until recently. A few weeks ago, I noticed that I had trouble picking up a repeater that's REALLY close during the weekly storm spotter net. Checking into these discussions weekly, even in the off-season, is one way to check that your equipment works. Mine wasn't. After testing everything else, the OEM antenna turned out to be the culprit. I cut it open to see what's inside. In my case, the wire going from the center SMA pin to the antenna coil had broken loose. You can see the antenna guts below.

I have a lot of antennae with male SMA connectors for my Yaesu handheld radios. A lot of these inexpensive Chinese radios (Baofeng included) use a female SMA antenna for whatever reason. Instead of coughing up $20-$40 at the local candy store for a new antenna that works with my Baofeng, I picked up an SMA coupler similar to one you can find at Radio Shack. It has flats on the sides, so I used a pair of needle nose pliers to screw it tightly into the Baofeng. You don't want to strip the coupler or the radio's connector, but it should be pretty snug there, so that it'll stay in the radio when you unscrew antennae from it. I had this Comet SMA-24 laying around, and chose to use it on the Baofeng. It comes with a rubber spacer, which comes in handy for this install. The new antenna fits on nicely with the addition of the spacer. Without it, a little section of the coupler shows through. The end result is that all my other HT antennae now work perfectly on this radio.

2011-01-22

Building 2D Movie Glasses

3D movies have gained ridiculous ubiquity in the theater lately. Some movies tend to use the effect to a more pleasant degree than others, but I think most of us can agree that many movies don't need to be released in 3D. Some people get headaches or feel distracted by the over-use and exaggeration of the stereoscopic effects of these movies.

If you've watched a 3D movie, You've probably taken your glasses off in the middle, only to see a double-vision mess caused by being able to perceive both video channels at the same time with both eyes. Watching a movie this way is likely even more frustrating than enduring the side-effects of 3D.

Obviously, I'd suggest not seeing movies in 3D if you are prone to these side-effects, but perhaps your group of friends just HAS to see this movie in 3D, or maybe your schedule makes it more convenient to see a 3D showing. Here, I'll show you how to take two normal pairs of disposable RealD glasses and hack them so that your eyes only see one of the two video channels, effectively stripping the 3D effect from the big screen. The sad part: you still have to wear the stupid glasses.

There are several families of 3D video. RealD(tm) is currently the most commonly deployed 3D cinematic technology, and it uses something called circular polarization. Some of you might be familiar with polarized lenses used in sunglasses and camera filters. Those are usually linear polarizers. Linear polarizers are also used on LCD screens and have a number of other commercial applications. It would be possible to show movies with the left and right channels polarized linearly at right angles to one other, but this would force moviegoers to hold their head in such a way so that the lenses remained perfectly level, or else video brightness and channel separation would fall to pieces, although brightness always suffers a little when using polarized lenses.

Circular polarization works similarly, but the light is polarized in a helical fashion. This is a much more complicated process that solves several of the problems with linear polarization. One channel is polarized in a clockwise helix while the other channel is polarized counter-clockwise, allowing the lenses to filter out the other channel without being constrained the way linear polarizing lenses would as I mentioned above. The easiest ways to demonstrate this are to look through a pair of these disposable goggles and into a mirror, or look at one pair of 3D glasses through another pair. Apologies in advance for using crappy camera phone pictures for this. It's all I had on hand.

3D Glasses facing one another


You would think all we have to do is take one of the lenses out and flip it over, so that both lenses only show the clockwise or counter-clockwise channel. I thought so too, but there seems to be more at play than I suspected and that won't work. Edit: each lens contains two filters bonded together, a polarizer and a "quarter wave plate", and flipping one lens over puts these filters in the improper order.

You'll have to tear into two pairs of 3D glasses, but the good news is that you can make two pair of 2D glasses out of them and give one to a friend. In a pinch, you could probably do all of this right there in the theater with nothing more than a simple Classic Swiss Army Knife. I'd recommend making these ahead of time, though.

If done correctly, this will get rid of most of the artifacts of stereoscopic cinematography, and hopefully relieve any side effects you might suffer.

RealD frames are snapped together in two pieces. With a small screwdriver, knife or other prying device, you can separate the inner part of the frame. We just need the lower part of one side of the frame to come apart far enough to slip the lens out.
Pry the frame apart

Slide the lens out of the frame, being careful to not scrape it up.
Slide the lens out of one side

Perform the two above steps on the opposite lens of the second pair of glasses.

Using scissors, trim the thin lens material so that you can fit each lens into the "wrong" side of the other frame. Don't trim so much that it's prone to fall out of the frame, but trim enough that it won't bend or crease when you put it back into the frame.
Trim the lens so it will fit inside backwards

Carefully slide the lens into the other frame, being sure it slides into the thin slot snugly. Remember, we're taking the left lens of one frame and putting it into the right side of another frame, and/or vise versa. You don't really need to put the second frame together if you only need one set of 2D glasses.
Insert the trimmed lens

Snap the frames back together, then wipe the lenses clean, as they're sure to have fingerprints all over them.


If you did it right, you should see that the movie looks the same through both eyes, and that looking at yourself in the mirror shows both dark lenses through both eyes, instead of just the lens you're looking through being dark.

2010-09-20

What I personally learned at CyberRAID

One last post from me on the inaugural CyberRAID event here in Kansas City.


Leadership
I'm not sure why I was chosen as team captain. Maybe it was because I knew more people on my team than everyone else, because I seemed more confident or because I was one of the first ones present. I wasn't nervous. I felt like I was as prepared as I was going to be. I had my plan, tools and more than half my life behind me that I've spent doing security work in some capacity or another. I thought I was ready to orchestrate a defense team, too, so I happily accepted the position of Captain at the start of the game when people told me "Go up to Dwight! Get our info!" It's not that I can't orchestrate a defense team, but I wasn't as ready as I had thought I'd be, and my plan fell apart pretty quickly.

My plan was to get people organized by what they're good at, and set them on a task. I kind of succeeded at that, but I did plenty of things wrong from the beginning. First, I was stressed but I haven't completely forgotten my manners. My requests probably sounded like a bossy demand followed by "please." Next, I didn't enforce these roles nor did I evaluate how it was going. Some roles changed without much communication. More than once, someone stepped on the toes of someone else who was already working on something. I'm thankful that there wasn't any apparent infighting on my team. Everyone remained rational.

I've lead teams on many projects in my career, but I have no formal management experience or training. I've been an IT worker in a crisis situation more times than I can count. I've never had to lead a crisis response, though. To manage people and work on technical things at the same time is a truly herculean task -- one that I feel I only barely stumbled through.

I learned a lot about myself and hardships faced by leaders in a crisis situation. I also gained a new perspective on IT workers. Among my team, I had some of the most brilliant and capable security minds I know of in the region. On the first day, we had grand ideas and the right mindset, but our implementation of them was slipshod at best. Our good communication skills were the only thing standing between what we had (which was still a good effort) and unabashed anarchy.

Things I learned about leadership and IT teams (and thus, what I need to work on myself):

#1: Technical leaders must lead first and foremost, and help second.

#2: Groups of geeks require a little bit of guidance to avoid replicating (or undoing) work.

#3: Good communication is vital, and its prerequisite is good rapport.

#4: Change management is an extension of good communication. Yeah, I went there.

On the technical side, there were so many things that I'd do different right from the start.

#5: Get visibility to the DMZ network and I'd immediately scan it from the outside while the firewall and system admins work to start locking down obvious things.

#6: Additional Virtual Machines on the DMZ. It would have been great to have a decent (and familiar) IDS on a Span Port. It might have also been fun to have a few honey pots sitting on the DMZ. Had I thought about this ahead of time, I could have totally made it happen. These are tools any one of us could have brought along for the ride in VMs.

#7: Egress filters from the start. There's no good reason not to. They make sense in the enterprise, and they make sense in the game.

Things I'm taking back to the office:

#7: Egress filters! I'm mentioning it twice. Blind SQL injection and RCE exploits are very popular, so crafty hackers and pen-testers often try to leverage these vulnerabilities to launch some process that can notify them that their exploit has worked. This might be popping an xp_cmdshell to launch ping with a special payload they can look for in return, or it may be something much more quotidian, such as a reverse_tcp or meterpreter call-back from metasploit. Again, egress filters make sense in the real world. To further this point, watch out for obscure tunneling through ICMP and DNS. Ideally the DNS server your DMZ uses should not allow recursion.

#8: We all know that despite our best efforts, a dedicated adversary will find a way in. For some reason, this exercise made it sink in a little better. It's been a while since I've worked somewhere that was breached on my watch. This further boosts my desire to learn more about modern post-breach activities both defensive (forensics, containment) and offensive (post-exploitation, pivoting). I have some serious reading and research to do!

Who else was at CyberRAID, CCDC, SANS ICE II or any other recent exercise like this? What did you get out of it?

2010-06-09

Reprogramming Respironics CPAP and Bi-Level BiPAP Machines

-- OR --
All Your Sleep Apnea Are Belong To Us

Disclaimer: Messing with CPAP settings can cause your machine to no longer function as required by your doctor, and may lead to bad things happening to the operator. Use only the settings that your doctor or sleep technician has prescribed.

I have some oddball CPAP and BiPap machines laying around and I had to reprogram one of them for a good friend of mine. While I was at it, I decided I'd like to figure out what lies in the "forbidden" area that only sleep technicians know how to get to. I'd heard from a friend who uses a CPAP that programming them usually involves unplugging it and pressing some buttons. So I started putzing around with this older model, the Respironics SleepEasy.


It's set to apply constant pressure of 6cm/H2O. Boring. There's not much that one can do with the buttons available to be pressed. They're for things like adjusting the heater attached to the humidifier reservoir, and enabling "Ramp Mode" which, from what I can tell, starts you off at a lower pressure as you try to get to sleep.


After a few minutes, I found that pressing the + and - buttons while plugging in the power did something interesting.


It's an unlock icon on the screen. Pressing + and - now adjusts the CPAP pressure in .5cm increments.


Pressing the humidifier button in this mode allows you to cycle through a few interesting diagnostics and settings. Shown below is the menu that allows the technician to completely disable the humidifier heater. Why? No idea.


This is the screen for adjusting Ramp Mode's initial pressure.


I also got my hands on a more expensive and elaborate bi-level CPAP machine, the Respironics BiPap Plus M Series. These machines usually apply a higher pressure when they sense that you're inhaling, and then drop to a lower pressure while exhaling. There are more buttons and a higher-quality display on this model.

Usually, this is the screen you get in standby mode. Hitting + for "Setup" in the default user mode gives the operator very few useful options.

Holding + and - while plugging it in didn't work on this model. Next, I tried plugging it in while holding the arrow keys, and that did the trick.

Note the unlock symbol as well as a new menu option for "Data" which has a very rich array of statistics buried beneath it.

This machine hasn't been used.

Once unlocked, hitting the Setup menu button provides a lot of features, including the inhalation pressure...

And exhalation pressure.

There you have it. It seems like most Respironics machines are programmed by holding down +/- and arrow keys. These machines seem to be pretty popular. Maybe this quick walk-through will help someone who has to buy (or sell) a used machine.

Sorry I've been silent for so long. I'm still getting settled in at the new job. It's going great, and I have a great team, but there is a lot to do. Also, frankly, my brain is usually mush by the time I get home. Hopefully, I start playing with some cool and new shiny things outside of work again soon.

2010-01-27

Remapping the MacBook Keyboard

I love OS X, and I also have this thing for Apple hardware, especially their laptops. You can rant and rave about "Apple Tax" until you're blue in the face. You won't sway me. One thing that kind of irks me, though, is the keyboard on the MacBook series.


While the sunken, chicklet-style keyboard garnered much criticism in 2006, I like the feel of it. As you can probably tell from the title of this article, my primary complaint isn't in the style of the keyboard. It's in the keys that seem to be missing. In OS X, the MacBook's scant 78-key input device makes sense. Other keys are nice, and are provided on the full-size keyboards for the desktop behemoths, but as a general rule, the slimmed-down laptop keyboard gets things done.

Being an Operating System Junkie, however, I often find a need for some oddball key that's nowhere to be found. In Linux and BSD (or when SSH-ing) from Windows using PuTTY, Shift-Insert pastes text to the terminal. There's no Insert key. In Windows, I'd rather not install vestigial bloatware to grab screen shots. Alt-PrintScreen is the old standby. There's no PrintScreen button, either.

At the same time, there are keys I rarely use in OS X, and they become completely useless on any other platform. They also happen to be near the places that I expect Insert and PrintScreen to be on a full-size keyboard.

There are registry hacks to remap keys on Windows. RandyRants has a great write-up on this, and wrote SharpKeys to help people easily re-map their keyboards. In my case, I wanted to remap F12 to function like PrintScreen, and the Keypad Enter key (next to the arrows, shown prominently in the photo above) to function as the Insert key.


The resulting registry patch is included so that you need not install vestigial bloatware just to remap your MacBook keyboard. Save the text below to a file called "remap.reg" and import it to your Windows Registry -- usually, by double-clicking it. Still, SharpKeys a nice utility to know about, particularly if you have any portable computers lacking a full set of keys.

Windows Registry Editor Version 5.00

[HKEY_LOCAL_MACHINE\SYSTEM\CurrentControlSet\Control\Keyboard Layout]
"Scancode Map"=hex:00,00,00,00,00,00,00,00,03,\
00,00,00,37,e0,58,00,52,e0,1c,e0,00,00,00,00

On Linux and BSD, xmodmap will do the same thing, a lot easier. I didn't bother remapping Print Screen, but getting Enter to function as Insert was important. Create a file called ".xmodmaprc" in your home directory, and add the following content to it:
keysym KP_Enter = Insert Insert Insert Insert
The next time you log in to Ubuntu, you'll get a dialog asking what you want to do with this file:


Load the .xmodmaprc file, and if you wish, choose to not show the dialog again. Click OK.

On BSD and perhaps many Linux flavors, you may have to manually edit some files to load xmodmap. You can usually put this line at the beginning of your .xsession or .xinitrc file to load the .xmodmaprc file when X starts. Alternatively, you can run it in an xterm to make sure it works:
xmodmap .xmodmaprc
These tricks work just as well on bare metal as they do in a virtual machine, or at least as tested in VirtualBox. That's a major annoyance out of the way for me!

2010-01-26

Getting the Lock Code on an LG Mobile Phone


A few weeks ago, my trusty LG Env3 met its untimely demise in a washing machine. I immediately yanked the battery out first. None of the usual tricks worked. I tried many of them, but here are a few that HAVE worked for me in the past with other peoples' phones:

  • Take it apart and blow-dry the electronics
  • Seal it in a container of uncooked rice or other desiccant overnight


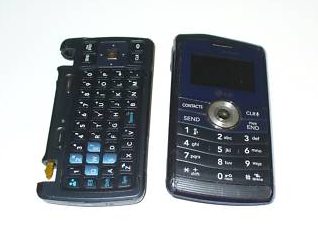
This isn't about drying a phone out, though. I surfed eBay and was taken aback by the prices for used but working Env3's. So I decided to buy a broken one. Preferably one with a mechanical problem where the non-damaged mechanical parts from my electronically-fried phone could be put to good repair use. Like this one:


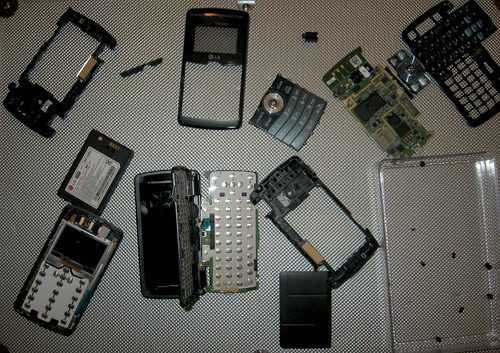
Lo and behold, the case was pretty well damaged and the ribbon cables joining the two halves had been severed. Otherwise, the phone seemed to be in okay shape. Commence repair. We are Env3 of Borg. Parts everywhere, mix and match a frankenphone. What a mess!


There's not much I can teach you about this. If you have the know-how to disassemble the pieces of two nearly-identical non-working objects and you know which parts are bad, you can probably assemble one good working unit. That's not what this is about, either.

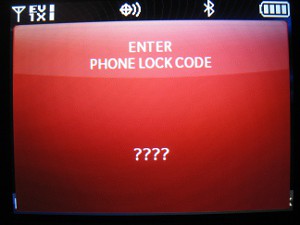
This is about what happened to me once I powered on the resulting piecemeal ware -- something that happens probably more often than you'd think, whenever you buy a used phone from someone you don't know: The Lock Code... OF DOOM.


By default, the lock code is the last-four digits of the phone's programmed phone number during initial programming. This is different than the SERVICE CODE which is usually six zeroes. In the case of the eBay phone, though, we don't know the phone number. The easiest way to find out is to access the service menu. On newer LG phones, you enter "##PROGRAM" followed by the VX- model number, and hit send. The model number can usually be found inside the phone behind the battery compartment.


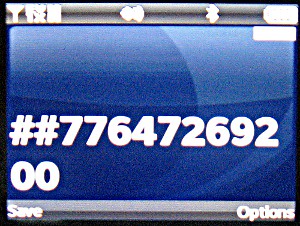
If it's a QWERTY clamshell like mine, the phone must be opened and the code must be entered on the QWERTY keyboard. Example: The Env3 is a VX-9200 and the service menu is accessed by hammering in [Sym]3[Sym]3PROGRAM9200[SEND] which shows on the screen as "##77647269200"


A prompt will show up for the service code. Again, this is 000000 by default.


Access the "Service Programming" menu, usually the first option. And don't change anything.


You'll see the Mobile Equipment ID and ESN on the first screen...


...and the Phone Number on the second screen. Write the phone number down. Exit the service programming menu. This will usually cause the phone to turn off or reboot.


Try the last four digits of the phone number as the unlock code. Usually, this works. When you call your provider to activate your phone, this unlock code should be changed to the last four digits of your phone number, and you're in the clear. Consult your user manual if you wish to de-activate locking.

In my case, however, the user was savvy or paranoid enough to know that friends who know the mobile number could probably guess the lock code. That is to say, the lock code on this phone was NOT the last four digits, and I was still locked out of the phone I paid for. At this point, I'm thinking that it'd have been nice for the seller to remember there was a lock code and to provide it. Oh well. Who am I to let a little 4-digit code get in my way? Not bloody likely.

Most phone service techs will charge $30 to $50 to remove the lock code. Highway robbery is somewhat expected with these guys, though. Enter my good old friend: QPST. Officially for service technician use only, QPST is a suite of programs for troubleshooting and programming phones using Qualcomm's lineup of mobile baseband processors. I used QPST in an article just over 2 years ago when discussing tethering.

The same thing applies. You can't buy QPST, but it's "out there" and you can easily download it or get it from a friend who works in the industry. You also have to run it on Windows, or at least in a virtual machine. If you do try to get it "in the wild" you should probably have a good anti-virus solution installed. You'll also need a data cable for your phone. LG's newer phones ship with a data cable and a USB Wall-Wart, so you probably already have a data cable.

Once you have the phone hooked up and the drivers installed, you should be able to see the phone in the QPST Configuration tool. If not, click "Add Port" and add one of the USB Serial ports. Select the phone from the list and launch the "Service Programming" tool from the "Start Clients" menu.

Flip over to the "1X/HDR Security" Tab and click the "Read From Phone" button. Voila. You've found the lock code! Below, you can see it was set to 4776. You should also be able to change it from this menu, but I didn't bother trying.


While there are some pretty cool things you can do with QPST aside from the things I have covered on HiR, you can also brick or damage your phone when you mess with it at this level, so think before you act.

2009-12-09

How to better fix the GDM "face browser" login issue

It's really not that hard. I went poking through the documentation for gdm-simple-greeter and found an option outlined called disable_user_list. It took me a bit to figure out how to disable the feature, and I broke gdm a bunch of times before googling it and finding a great post by [daten] on the Fedora forums that outlines it.

So first, if you followed my angrily-penned directions from last night, undo that with these steps:

In a terminal window, execute:
$ sudo dpkg-reconfigure gdm
(select gdm instead of xdm at the dialog box)


$ sudo /etc/init.d/xdm stop
(X11 will bail. Go ahead and login at the console prompt)

Continue as below, starting with the gconftool-2 command. You don't have to stop gdm, obviously. You can just start it.

If you didn't switch to xdm first...


Now, we can simply tell gdm to disable the user list with a lengthy gconftool-2 command. Make sure you scroll to see the whole thing:

$ sudo gconftool-2 --direct --config-source xml:readwrite:/etc/gconf/gconf.xml.defaults --type bool --set /apps/gdm/simple-greeter/disable_user_list true

Log off. The change may not take effect until you stop and start gdm. If you still see the user list, press ctrl-alt-F1 to get to the console, log in and run the following commands:

$ sudo /etc/init.d/gdm stop
$ sudo /etc/init.d/gdm start

At that point, you should have a new, still squishy and pretty login screen without the face browser of doom.


FYI, "axon" wasn't filled in automatically, I had to type it. This is much better!

2009-12-08

Fixing Ubuntu's broken excuse for a login screen

This is fscking unacceptable. Yah, it's slick. All windows-esque. Whatever. I hate it. I'd like to be able to type my user name in, and not have a freaking list of enumerated accounts sitting there on my damn login window. Now get off my lawn *shakes cane*


Today, it finally annoyed me enough that I'd be willing to do whatever was needed to fix it. How about a real display manager?

In a terminal window, run:
$ sudo apt-get install xdm

You'll get a prompt. Select xdm.

Then, log off from your workstation, and hit Ctrl-alt-F1 to go to the text console. Log in with your user account and run the following commands to shut down gdm and start our new, tasty xdm.

$ sudo /etc/init.d/gdm stop
$ sudo /etc/init.d/xdm start

New, ugly but functional login screen. Yay.

By the way, the link to the Debian logo is buried in the xdm configuration file /etc/X11/xdm/Xresources. If you really want to change it, you can edit this config file and/or Bring out the Gimp and start crack-a-lacking.

fin.