
Being an amateur radio operator and a nerd in general, I make sure I have emergency power available. This is in the form of gel cells, several UPS units and of course the obligatory inverter for road trips. I have a solar panel that can put a reasonable charge back into my gel cells with one bright day's worth of sunshine. I don't feel like I need a generator. If the power goes out for a week or two over a wide area, most of my gadgets will be marginally useless, and I'm pretty comfortable living without electricity, as I go backpacking and camping frequently.
I do use my netbook for certain digital modes with amateur radio, and I could see it coming in handy for emergency operations. Considering the electronics I might choose to use sparingly in a power outage, I did some experimentation over the weekend.
My netbook requires 19VDC, and It seemed silly to me to turn DC into AC, and step it all the way up to 120 volts, just to step it back down, rectify and filter it for devices that fundamentally operate on DC to begin with. The same goes for desktop PCs that take 120VAC and turn it into +-12VDC, 5VDC and 3.3VDC. The rest of my "ham shack" runs fine on car batteries. Why not my computers?
In all of the following photos, you'll see amperes on the display, but I'll reference watts. The battery pack was sitting at 13.2 volts for all of these tests.
To baseline this thing, I went with the obvious choice of plugging into one of my UPSes. I have a feeling this is how most folks would choose to operate their computer in a power outage if it were an option.
The UPS consumes a paltry 5 watts without a load. This is looking pretty good.

Plugging the power brick in bumps consumption up less than a watt for a total of about 5.7 Watts.

With the laptop booted up and running on the UPS, battery consumption tops out at around 20 watts. I noticed numbers higher than 1.5 amperes momentarily. One of our cats also has some obsession with laying on warm electronics such as power bricks.
Next, I tried my 450 Watt inverter. Without a load, it uses about 6.6 watts. Not terribly surprising. It has two noisy fans and a display to power as well.

Plugging the power brick in without any load bumped consumption up to 7.1 watts. This is similar to what happened with the UPS, but still less efficient.
Attaching the netbook spiked the load to about 43 watts total. Ouch!
Finally, I tried operating my laptop on a DC-to-DC power supply. This was vastly more efficient than relying on an inverter, and considerably better than my UPS as well. The DC-DC converter consumed 11 watts from my battery pack.

The clear winner is obviously the DC-to-DC converter. If the laptop were the only thing in use, I could expect about four times the run time from the DC converter compared to using my inverter.
The DC converter I used was originally for a Macintosh G3 PowerBook, and was set for 24 VDC. My netbook requires 19VDC, and I was fortunate enough to find a set of potentiometers on my old DC-DC supply to allow me to adjust the voltage, and then I hacked a plug onto it that works for my netbook.
Most laptops require somewhere between 15-24 VDC, and are sensitive to dirty power. Good DC-DC converters are capable of dealing with 10-30+ volts of input and provide stable, clean power on the output suitable for sensitive electronics. They're easy to find, if a little pricey compared to traditional transformer bricks. They are often sold as "Laptop Car Chargers"
Similarly, a company called PicoPSU makes a tiny solid-state DC-to-DC power supply that plugs directly into a computer motherboard's ATX connector and provides power cables for a few hard drives or other peripherals as needed. They're not designed to run powerful desktops or servers, but work fine for lower-power workstations or "book PCs." You'll have to find a way to power a monitor, though. Hint: many LCD displays can be powered by a DC-DC converter, too.
2012-07-31
Emergency power show-down


2012-07-24
Westlake Hardware: My hackerspace?

It started as a simple trip to the hardware store. My mission was to find some 3/8" threadrod at 24 threads per inch. I was going to chop it with my dremel to a length of 6 and 9/32 inches long and use it as a 1/4 wavelength antenna in a mount similar to the one shown above. What I found were many kinds of threadrod, but nothing that would screw into either of my antenna bases.
I opted for a piece of 3/8" smooth rod without threads, figuring I could just wander over to the hardware store's selection of threading dies and pick up the one I needed to cut a dozen or so threads into the rod. There, I found many dies, but not the 3/8" x 24 I needed for the project. There was a spot for the die I needed, but it was empty.
I finally cornered a sales associate, who looked up the part number, said they had one in stock, and even scoured the shelves looking to see if someone had placed it in the wrong spot. What happened next took me by surprise. The associate went around to the back shop, pulled a full set of dies out of the tool chest, found the one I needed, and brought me around to the vise and tossed me some cutting oil and gloves so I could tap threads onto the rod myself. While I was working away, curiosity got the best of him. "What are you building?" he asked. I explained that I was building a very cheap antenna, and explained that I was going to take it home and cut it to length so that it resonated at about 448 MHz. That's about the time he took me over to the chop saw with a cutoff wheel and a bench grinder. He found a couple pair of goggles and we got to work.
So there you have it. I walked in, spent a few bucks on a steel rod, got about 20 minutes of free shop time and left with a finished product. Westlake, you're like having a hackerspace a mile from home!
2012-07-19
Windows SysAdmin trick: All your MMC snap-ins in one spot
At work, I frequently deal with both UNIX and Windows servers. My UNIX background has taught me to avoid logging in to systems -- even workstations -- with an administrative account unless you really need to use the power, even if you're a sysadmin. This works really well until it's time to start managing enterprise-wide settings like AD, DNS and DHCP. There are a variety of ways to solve the problem. Most places provide sysadmins with a user-level account and then an administrative-level account. You can log off from your workstation and log in with a domain administrator account to manage things. That's a genuine pain. You can remote desktop to a domain controller and log in with your admin account. You can even set up a terminal server with RSAT and other useful tools, and have your admins log in to that for routine enterprise maintenance.
Alternatively, you can install Remote Server Administration Tools onto Windows 7 Enterprise, and using a few quick tricks, you can have all of the MMC Snap-Ins you like at your fingertips, while still using an unprivileged domain account on your workstation. Once you get RSAT installed, you may need to also use "Programs and Features" to enable the Remote Server Administration Tools roles or its sub-roles as desired.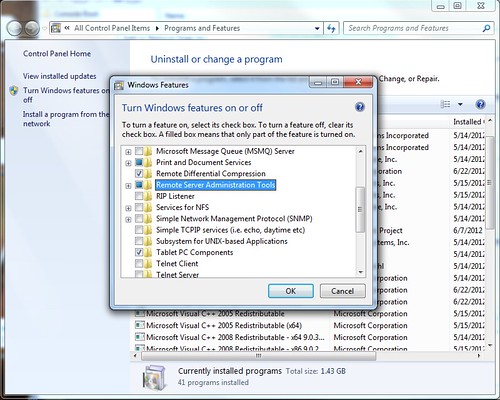 After installing RSAT, you'll notice an "Administrative Tools" item in your start menu, but the tools won't work unless you have domain admin privileges.
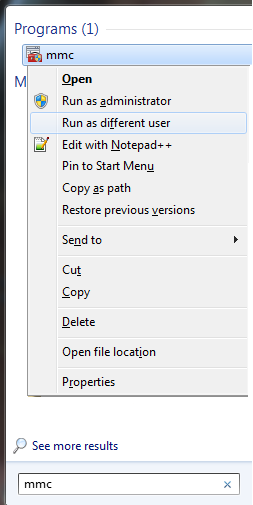
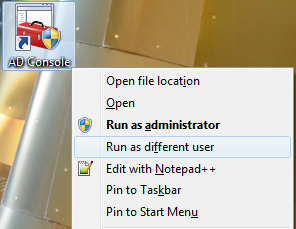
There's a trick to launching an authentication prompt before running any program on Windows. Hold shift, then right-click the program, and select "Run as different user." While you can do this to any of the Administrative Tools items in the start menu, We're going to use this trick to launch the Microsoft Management console so that we can make life even easier. Hit Start, then use the search to find mmc.exe. Hold shift. Right click it. Run as different user.
After installing RSAT, you'll notice an "Administrative Tools" item in your start menu, but the tools won't work unless you have domain admin privileges.
There's a trick to launching an authentication prompt before running any program on Windows. Hold shift, then right-click the program, and select "Run as different user." While you can do this to any of the Administrative Tools items in the start menu, We're going to use this trick to launch the Microsoft Management console so that we can make life even easier. Hit Start, then use the search to find mmc.exe. Hold shift. Right click it. Run as different user.
 Here, provide a domain administrator account. If you have UAC enabled (as you well should!) you'll be asked if you wish to allow mmc to make changes to your computer. Obviously, you do.
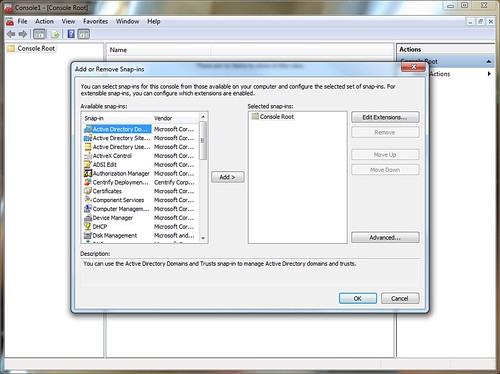
Once MMC is running, select "Add/Remove Snap-Ins" from the File menu. Here, you'll be able to load up a bunch of the individual modules from Start->Administrative Tools all into one MMC window.
Here, provide a domain administrator account. If you have UAC enabled (as you well should!) you'll be asked if you wish to allow mmc to make changes to your computer. Obviously, you do.
Once MMC is running, select "Add/Remove Snap-Ins" from the File menu. Here, you'll be able to load up a bunch of the individual modules from Start->Administrative Tools all into one MMC window.
 Once you have selected the tools you use frequently, you'll have a tree view of your favorite utilities, kind of like this:
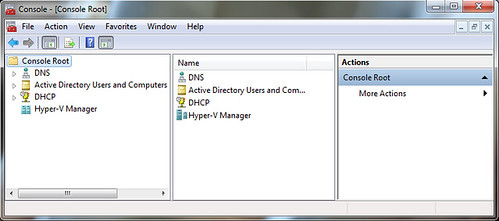 Be sure to connect the individual snap-ins to the servers you need, if they require it (Hyper V, DNS and DHCP in the above example need to connect to other servers) and once you have everything configured the way you plan to use it, use the File-> Save menu to stash the configuration file somewhere handy, such as on your network profile or hard drive.
I opted to create a shortcut on my desktop that launches mmc.exe C:\console.msc and I titled it "AD Console." When I run it, I have to remember to launch it with my domain admin account using the trick above. Now, taking care of the day to day tasks on the enterprise is simple.
Be sure to connect the individual snap-ins to the servers you need, if they require it (Hyper V, DNS and DHCP in the above example need to connect to other servers) and once you have everything configured the way you plan to use it, use the File-> Save menu to stash the configuration file somewhere handy, such as on your network profile or hard drive.
I opted to create a shortcut on my desktop that launches mmc.exe C:\console.msc and I titled it "AD Console." When I run it, I have to remember to launch it with my domain admin account using the trick above. Now, taking care of the day to day tasks on the enterprise is simple.
2012-07-16
OpenBSD and Windows 7: Multi-boot

A little more than a year ago, I switched my netbook over to OpenBSD 4.9. From the start, the netbook had been set up to dual-boot with Ubuntu or XUbuntu, so those 6 months running only OpenBSD really exposed how much I've come to rely on Windows, even if it's only occasionally. That's fine. I'm not an anti-Windows zealot and I use it every single day at work.
I decided to start from scratch one more time when OpenBSD 5.0 came out, and to attempt to dual-boot Windows 7 and OpenBSD. As it turns out, setting up Windows 7 and OpenBSD to coexist was covered in surprisingly fine detail in the OpenBSD FAQ. I've been running Windows 7 and OpenBSD side by side now for more than half a year. This setup has proven to be more stable than Ubuntu and Windows 7 dual booting, and I'm very pleased with this setup. I urge anyone interested in this to read the FAQ, but this post should give you a taste of what you're in for.
Before I nuked the whole system, I rsynced all of my data to a file server at home, then re-installed Windows from the recovery media. From Windows, I set aside a FAT32 partition for sharing files between the two operating systems, since OpenBSD can only read NTFS, and I left 10GB blank for OpenBSD. From there, the rest of the instructions worked great. Once you have Windows installed and your partitions set up, the short version goes something like this:
Install OpenBSD. DO NOT tell it to use the whole disk. I opted to use only one root partition and a swap partition. For a netbook, this makes quite a bit of sense. You'd rarely want to set up a server that way.
After the installer finishes and before you reboot, copy the partition boot record (first block of the openbsd partition) to a file called openbsd.pbr using dd as in the example below. Be certain to use the raw device and get the partition right. The example command below was taken from the FAQ and is probably going to differ for you.
# dd if=/dev/rsd0a of=openbsd.pbr bs=512 count=1
Copy openbsd.pbr to somewhere useful. I copied it to the Fat32 partition I created earlier on. You could copy it to a usb stick or upload it to another location. You'll need this on the Windows machine. When you reboot into Windows, move this file to the root of c:
Start a cmd.exe window as administrator (Start -> use text box to search for cmd.exe -> right-click it -> Run as Administrator), then set up the boot loader. Ripped directly from the OpenBSD FAQ again:
    C:\Windows\system32> bcdedit /create /d "OpenBSD/i386" /application bootsector
    The entry {0154a872-3d41-11de-bd67-a7060316bbb1} was successfully created.

    C:\Windows\system32>

As admonished before, the {0154a872-3d41-11de-bd67-a7060316bbb1}
GUID is system-dependent. Note the value you receive when executing,
and copy it into the following commands:

    C:\Windows\system32> bcdedit /set {0154a872-3d41-11de-bd67-a7060316bbb1} device boot
    The operation completed successfully.

    C:\Windows\system32> bcdedit /set {0154a872-3d41-11de-bd67-a7060316bbb1} path \openbsd.pbr
    The operation completed successfully.

    C:\Windows\system32> bcdedit /set {0154a872-3d41-11de-bd67-a7060316bbb1} device partition=c:
    The operation completed successfully.

    C:\Windows\system32> bcdedit /displayorder {0154a872-3d41-11de-bd67-7060316bbb1} /addlast
    The operation completed successfully.

    C:\Windows\system32>
Additionally, since OpenBSD is going to be my primary OS, I used the bcdedit command line options to further modify the Windows Boot Loader so that OpenBSD is displayed first and loaded by default after a brief prompt.
Upgrading OpenBSD is usually pretty easy. There's only one pitfall when you're upgrading OpenBSD in a multi-boot environment: Make sure you copy the PBR to C:\openbsd.pbr as you did in the initial multi-boot setup before you reboot after the upgrade installer exits. Failure to do this might render your openbsd install difficult to boot. You should still be able to boot your system from the install media if all else fails.
If you've installed packages, you'll need to upgrade them separately. Set the pkg_path variable to a repository for the version of OpenBSD you're installing (5.1 as of this writing) or if you're using my preferred method of using /etc/pkg.conf, edit that file since it'll still be pointing to the older package repository from before the upgrade. Then simply run "pkg_add -ui" through sudo or as root. This will find the new packages and upgrade all that are available. the "i" in the above command tells pkg_add to prompt the user for any questions (resolving dependencies, etc).
Edited to embed a highly relevant xkcd:


