
(Bug, via xkcd)
I recently introduced AsmodianX to the somewhat dated "FAIL!" Internet meme. That is, illustrations where something has gone wrong, captioned with the word "FAIL!" This can be a boat full of cargo that's about to fall overboard or a skateboarder doing a face plant. Things of that nature.
Of course, this evolved, and certain tragic situations (such as an entire truckload of beer bottles shattered on the highway) came to be labeled "Epic Fail!"
Epoch Fail is a terribly funny play on words with Epic Fail, obviously. This refers to Epoch time. The current POSIX Epoch started midnight, Jan 1, 1970 and will come to an end (run out of the 32-bit space) sometime in 2038.
2008-01-28
Epoch Fail!

2008-01-27
Stone-Age Sysadmin Sunday: Dealing with CPIO Archives
Some truly revolutionary things have been around in UNIX for a very long time because they're just that good. Some are around as-is: find, netstat or ifconfig for example. Others have been improved upon ad infinitum, like vim (a better, sleeker version of vi that somehow stays true to its vi roots).
Then, you have ugly things that just won't die. Case and point: cpio. Originally meant as a stream archiver for tape storage, any sysadmin worth their salt will eventually run across some silly software package or archive file that's in cpio format. And inevitably, getting data out of that archive will be important for one reason or another to avoid some "crisis." Cpio is legacy for many a good reason, but you will inevitably be forced to square off against cpio one of these days, and it's best not to enter the arena unarmed. This week will be a shorter, succinct edition of Sysadmin Sunday, as we delve into cpio.
Also, I started writing this article several weeks back. I usually queue up several articles ahead of time, especially the weekly Sysadmin Sunday feature. I had no intention of actually having to mess with cpio, but just like talking about what to do in the event of a catastrophic system failure often leads to having to deal with one, writing about cpio did not come without its consequences.
I was forced to deal with cpio last week at work. It seems there are some old scripts that keep using cpio for archiving data. I found out that the version of cpio that we had running wouldn't acknowledge files owned by users or groups with a UID or GID higher than 65,535. This is the typical "32-bit UID/GID" problem that got fixed in the REST OF UNIX back in the 1990s sometime. While poking around, I found that the earliest version of cpio was actually written by a caveman named Ungh in abacus-native machine code. The dude had serious skills. Apparently, though, no one's bothered to update it in the last few millennia.
Create a cpio archive
(not recommended... haha!)
(not recommended... haha!)
cpio expects standard input to bear a list of files to archive. The best way to do this is to pipe find output into it. Keep in mind that cpio does NOT strip leading slashes. If you restore a cpio archive that was from the root directory, it WILL over-write data starting at the root directory. For this reason, I recommend you cd to the root directory and run a find with a relative path from root instead of running find with an absolute path.
$ cd /; find path/to/archive | cpio -o > file.cpio
Extract files from a cpio archive
The simplest way to extract from cpio is like this:
$ cpio -id < file.cpio
$ zcat file.cpio.Z | cpio -id
And similarly, if you run across the bizarre gzipped cpio file, you can do this:
$ gzcat file.cpio.gz | cpio -id
2008-01-25
Friday Funnies - Nerd Humor
Physics Humor
Werner Heisenberg went for a drive and got stopped by a traffic cop.
The cop asked, "Do you know how fast you were going?"
Heisenberg replied, "No, but I know where I am."
What do you get when you combine a 30-mph car and a geese flying 10-mph West?
ERROR: You can't add scalar and vector quantities
Chemistry Humor
Two atoms bump into each other.
"Are you okay, buddy?", asks the first atom.
"I lost an electron" replies the second atom.
The first atom asks "Are you sure?"
The second atom snarls, "I'm positive!"
Susan was in chemistry,
Susan is no more.
For what she thought was H2O,
Was H2SO4.
Johnny, feeling life a bore,
Drank some H2SO4.
Johnny's father, an MD,
Gave him CaCO3.
Now he's neutralized, it's true,
But now he's full of CO2!
Jokes about cobalt, radon and yttrium are so CoRnY
Philosophy Humor
René Descartes walks into a bar. The bartender says "Hey pal, want a beer?"
Descartes replies "I think not." and disappears.
2008-01-24
Want a web developer job? Oh, the irony!
[eric] sent this job posting to me today and I just about fell out of my chair!
Quoted for evidence (I'm sure the posting won't last forever out there)
Obviously, they're talking about self-described "web developers" or "web designers" who take open-source web-apps and build around that. Still, worded this way, I have to laugh out loud.
- Title:
- PHP/MySQL Web Developer
- Skills:
- 6+ Years in PHP Programming with Proficiency using MySQL, Standards-compliant HTML
- Date:
- 1-24-2008
- Location:
- Kansas City, MO
- Area code:
- 816
- Tax term:
- FULLTIME
- Pay rate:
- Based on experience
- Length:
- Permanent
- Position ID:
- 073134
- Dice ID:
- 10217525
- Job description:
- Premiere Web development firm looking for experienced Web developers with the following characteristics:
* Proficient in PHP, MySQL, CSS
* Likes working in small, talented team environment
* Welcomes challenges, trouble-shooting and diversity of jobs
* Enjoys client contact
* Interested in learning new skill sets
* Hosting environment setup and management a plus
Note: Candidates who rely on open source code to solve problems need not apply.
Update! Looks like they got enough "what in the hell?!" responses to refine the last sentence:
Note: Candidates who rely on pre-packaged applications or frameworks such as Joomla or Cake to create web sites need not apply.Oh well, it was funny while it lasted.
UNIX Tip: Getting data out of wtmpx on Solaris
I recently had to do an audit and see who was logged in when some performance issues were being reported on one of our Solaris boxes. The problem? The performance issues had been talked about in an email thread for a long time before it fell onto my plate. The only way to find out who was logged in during that time frame was to pull data out of old backups of the wtmpx file.
On Solaris, wtmpx contains data such as what IP address a user connects from, when they logged in, and how long they stayed on. It's a binary, non-human-readable format. I did some research to figure out how to get usable data from it. The fwtmp command converts the wtmpx records to ascii, making it easy to parse them, for instance, with Awk. Unfortunately, this utility isn't in the path, and I don't know why. No matter, though. I'll tell you where it's at. It's a stream converter, so it takes the raw wtmpx file as input, and bars out plain text. This is how I usually run it:
$ /usr/lib/acct/fwtmp < /var/adm/wtmpx > wtmpx-`date +%Y-%m-%d`.txt
This creates an ascii wtmpx file with the current date as part of its filename.
See the man page for fwtmp for more information. It can also be used for importing records into wtmp. With some scripting, a nice log-rotation mechanism can be implemented.
2008-01-22
Perl: Convert epoch seconds to readable time
As a system administrator, It's not uncommon to run across time stamps represented in Epoch Seconds, that is basically the number of seconds that have passed since the start of Jan 1, 1970 UTC. I most often run across these time stamps stored in database records, but you'll see it elsewhere, too. An Epoch time stamp for any fairly recent date looks like a huge string of digits, such as "1201017672". Obviously, time stamps closer to the beginning of the 1970 Epoch are significantly smaller.
To make some kind of sense out of that stamp, you can use perl's localtime() function right from the UNIX command-line.
$ perl -e 'print scalar localtime('1201017672'); print "\n";'
Tue Jan 22 10:01:12 2008
2008-01-19
Sysadmin Sunday: OpenBSD 4.2, Apache, MySQL, PHP (OAMP?)
Editor's note: I know, I know. This is SATURDAY! But I'm putting this out there for a good reason. Today is also KC PHP User's Group's first meeting of 2008, and what better way to kick off the KCPUG new year than with some fresh AMP-Stack Content. So, here we go.
It used to be that some stuff had to be compiled by hand to make everything work just right, but the package/port guys finally nailed it. With the help of obsd_pkgscripts, OAMP is a breeze. The benefits of running your AMP-driven website atop OpenBSD are many, not the least of which are the facts that it's a minimalistic, secure, and high-performance platform out of the box.
OpenBSD already ships with Apache. It's a patched and tweaked version of Apache, but it's Apache all the same. You're already halfway to OAMP land with OpenBSD and Apache installed out of the box.
First, install the MySQL Server. I obviously chose to use my pkg_get.sh tool for this, but it's not needed.
$ pkg_get.sh mysql-server
Attempting to fetch/install package...
mysql-client-5.0.45: complete
p5-DBD-mysql-3.0008:p5-Net-Daemon-0.39: complete
p5-DBD-mysql-3.0008:p5-PlRPC-0.2018p0: complete
p5-DBD-mysql-3.0008:p5-DBI-1.53: complete
p5-DBD-mysql-3.0008: complete
mysql-server-5.0.45: complete
--- mysql-server-5.0.45 -------------------
You can find detailed instructions on how to install a database
in /usr/local/share/doc/mysql/README.OpenBSD.
Next, that README contains some useful information for more advanced installations and performance, but summarized, follow these instructions. I use sudo, and rarely use the root account. I recommend doing the same.
Create the DB:
-bash-3.2$ sudo /usr/local/bin/mysql_install_dbStart MySQL:
-bash-3.2$ sudo /usr/local/share/mysql/mysql.server startTo make MySQL Start up at boot, add the above mysql startup line to /etc/rc.local without the "sudo" at the beginning (optional but highly recommended). There is a "theoretically correct" start-up snippit on the documentation, but I've found this works just as well.
Set a password for mysql's root user (choose a better one than this):
-bash-3.2$ sudo /usr/local/bin/mysqladmin -u root password 'new-password'That's pretty much it as far as getting MySQL up and running is concerned. Now we just need to get PHP installed with the MySQL client library...
-bash-3.2$ sudo pkgscripts/pkg_get.sh php5-mysqlThen you have to follow the post-install instructions:
Attempting to fetch/install package...
php5-core-5.2.3: complete
php5-mysql-5.2.3: complete
--- php5-core-5.2.3 -------------------
To finish the install, enable the php5 module with:
/usr/local/sbin/phpxs -s
To enable parsing of PHP scripts, add the following to
/var/www/conf/httpd.conf:
AddType application/x-httpd-php .php
Copy the config file below into /var/www/conf/php.ini
/usr/local/share/examples/php5/php.ini-recommended
Don't forget that the default OpenBSD httpd is chrooted
into /var/www by default, so you may need to create support
directories such as /var/www/tmp for PHP to work correctly.
--- php5-mysql-5.2.3 -------------------
Enable this module in php.ini using the following command:
/usr/local/sbin/phpxs -a mysql
-bash-3.2$ sudo /usr/local/sbin/phpxs -sEdit /var/www/conf/httpd.conf and add the below line with the other AddTypes:
-bash-3.2$ sudo /usr/local/sbin/phpxs -a mysql
AddType application/x-httpd-php .php
I also recommend since we're going to be running PHP, adding index.php to the DirectoryIndex line:
DirectoryIndex index.html index.php
Save the httpd.conf file.
Now, copy the php.ini file over from the examples:
-bash-3.2-$ sudo cp \Now, make sure apache is set to start.
/usr/local/share/examples/php5/php.ini-recommended \
/var/www/conf/php.ini
If you plan on keeping all your web-related content content in /var/www, find the httpd_flags line in /etc/rc.conf and change it to httpd_flags=""
If you intend on giving users traditional ~username (public_html) directories, start apache without being chrooted. Chroot is more secure, but it's a royal pain if you want user home-directories on a vanilla OAMP box, and beyond the "quick and dirty OAMP" scope of this article. Find the httpd_flags line in /etc/rc.conf and change it to httpd_flags="-u" to disable chroot if you must.
The above change to httpd_flags will make apache auto-start upon reboot. You can manually start it with apachectl, though:
-bash-3.2$ sudo apachectl startMake a phpinfo example php file and move it into the web root.
/usr/sbin/apachectl start: httpd started
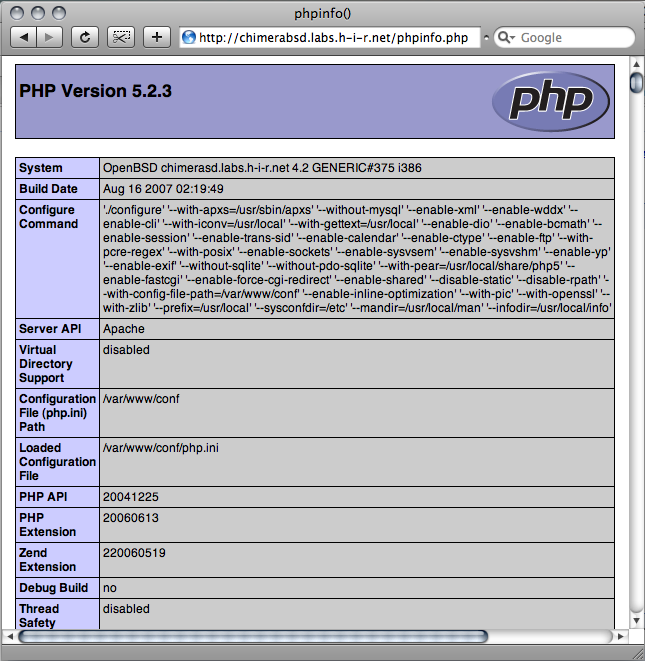
-bash-3.2$ echo "<?phpinfo();?>" > phpinfo.php
-bash-3.2$ sudo mv phpinfo.php /var/www/htdocs/Then test it out by pointing a browser to your new phpinfo.php file (example: http://10.23.45.67/phpinfo.php ) and you should see output from PHP. If you see a blank screen or just the phpinfo line, something went wrong. Re-check your steps.
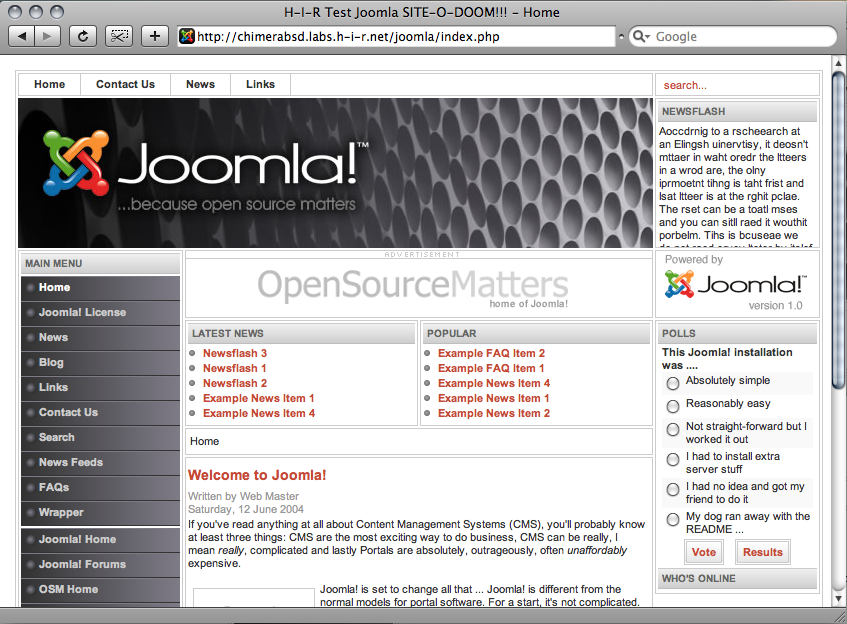
There you have it! As a test, I installed Joomla on this system (screen shot below). Joomla is a popular open-source CMS. I unpacked it into /var/www/htdocs/joomla and pointed my browser to it, following all of its instructions. This includes making a database, changing permissions on some of the Joomla files, and modifying some values in php.ini. The installation went off without any problems just like it would on any LAMP box. I'd imagine you'll see similar results with other *AMP packages such as phpMyAdmin, Xoops, and others.
UNIX Tip of the day: Freeware for Enterprise UNIX
Let's face it, Solaris and AIX are nice in their own right, but they don't have a whole lot of software out of the box. Add to that how cumbersome the compilers are and how it can be a pain to get source code to compile no thanks to oddball libraries, and you have a real dilemma. Sometimes, it would just be easier if you could install binary packages and be done with it.
AIX
- The old AIX Public Domain Software Library at UCLA is now gone, but I found a mirror of it here. This is as easy as it gets. The site is laid out in a logical hierarchy. Find the package you want, drill down and get the tar file for your architecture and AIX Version. All you have to do to get the binaries is extract the file with zcat filename.tar.Z | tar xvf -
- Bull freeware offers packages that you can (and should) install through AIX's own package manager. They outline the installation process nicely on their site.
- IBM Has their own, as well. The AIX Toolbox for Linux, which essentially gives you RedHat's RPM package manager for which to install a plethora of IBM-packaged freeware.
Solaris
- Sun Freeware, much like Bull, provides actual Solaris packages, not just binary executables. You have to install stuff that you download from them, but they document it well.
- Sun Microsystems offers a lot of Freeware with Solaris, but you have to install it from the companion CD. This is available for download as well. Alternatively, you can just download the individual packages you want. Note, you need an account to download stuff from Sun. Creating an account is free. So is borrowing an existing account. ;)
2008-01-17
Tracing processes with a laugh
I saw this on XKCD yesterday and had a good chuckle:

Of course, If I ran into something that was segfaulting, I'd pick up the pieces, and break out the tracer. If you've got a daemon or program that keeps segfaulting for no known reason, tracing is a great place to start.
In these examples, I'll just trace a quick ls command. In our case, ls doesn't have any problems, but the trace will contain all of the system calls that were executed. If you can replicate problems or crashes while tracing, you can spot where they're happening to report the problem to the developer or vendor of the application. Or, you can go back and double-check your damn pointers, human -- lest the computer eat your comp-sci homework.
Solaris
Truss is a command on Solaris that dumps all of the syscalls for a process. In its most basic form, you launch truss around the program you're going to troubleshoot. The below command-line takes truss' output and puts it in ls.truss.out before running ls normally, listing the files.
$ truss -o ls.truss.out lschuser.sh find.truss.out ls.truss.out megascan.sh test.pl
Or you can use truss to get system calls from a running process. For daemons you should launch truss as root or with sudo. -o sshd.truss.out tells it to write the data to sshd.truss.out, whereas -p 3088 tells truss to attach to process ID 3088, the made-up PID for our made-up instance of the ssh daemon.
# truss -o sshd.truss.out -p 3088You can view ls.truss.out to see what it found.
BSD
A little more complicated, you can use ktrace to do something similar. By default, ktrace creates a (non-human-readable) file called ktrace.out. You can specify the output file with -f.
$ ktrace -f ls.ktrace.out lsSimilarly, with the -p option, ktrace accepts a pid:
ls.ktrace.out pkgscripts obsd_pkgscripts-1.00.tar.gz static.key
# ktrace -f sshd.ktrace.out -p 3088
Then, the fun begins. You have to use kdump to read the syscalls from the file.
$ kdump -f ls.ktrace.out > ls.ktrace.txtHave a look at the results, if you wish.
2008-01-16
UNIX tip of the day: preserve attributes by copying with tar
This quick-n-dirty command-line, if run as root, will retain all file permissions, timestamps, and ownership data while doing a recursive copy of a directory. Linux (specifically, the GNU version of cp) has cp -a which does about the same thing as this. Under most BSD Flavors, cp -Rp does the same thing as well. That said, AIX, HP/UX and Solaris need love too. This works on any POSIX platform and comes in very handy in a pinch.
# cd source-dir ; tar cf - . | (cd destination-dir && tar xBf - )
Adjustments: You should be able make the last tar command "tar xvBf -" if you wish to see the filenames as they're being copied, without any problems.
This command should be run as root, or at least both tar commands run with sudo, otherwise tar may not have the permissions needed to read all of the files, or set all the permissions needed at the destination directory.
2008-01-15
Unofficial DUN Tethering guide: LG Chocolate (vx8550) Hack
-- OR --
Adventures of a new mobile phone Pt. 3...
Adventures of a new mobile phone Pt. 3...
Editor's note: this particular article involves downloading and installing software from un-trusted web site. That's dangerous. It also involves running Windows. That's also dangerous. To top it all off, it also involves software that interacts with your mobile phone at a very low level. That, too, is dangerous. In short, HiR isn't responsible if you get in trouble with the law or your service provider, get a virus from a russian s3ri4lz site, get somehow addicted to running Windows, or brick your shiny new gadget.
Now for the fun stuff. One of the things I kind of relied on my Motorola e815 for was dial-up networking (DUN) via bluetooth. I didn't necessarily use it a lot, but as a sysadmin that's always been a bit of a road warrior, I often find myself places where there simply is no Internet. Inevitably, the pager-of-doom goes off and I'm out at the lake camping or at a location where there's no obvious Internet connection available. Other times, I'll be on a commuter bus and have the burning desire to check the news, or do some research on something really quick.
Whatever the reason, I enjoyed this functionality. On the e815, this was simple to enable. A quick punch-of-numbers on the keypad and voila. My MacBook could see it as a bluetooth modem with surprisingly quick download speed nonetheless -- at times upwards of 1mbit/sec.
The LG Chocolate? Different story. My MacBook saw it, but I wasn't getting anywhere. The connection would be refused with an invalid login and password, even though my login and password were fine when using my e815. This had me concerned.
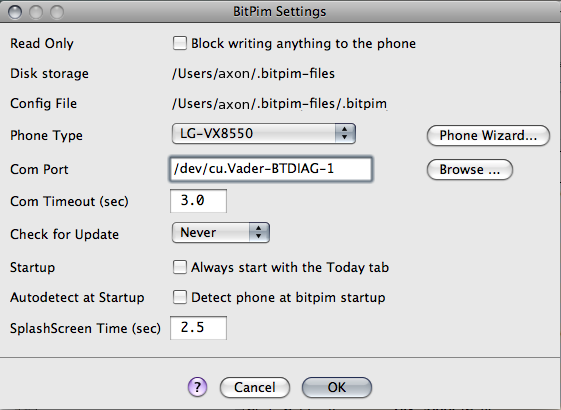
I did a quick bit of research, and found that the phone has some internal IDs that differ when used for DUN. There's no quick handset-hack for this. Two things were required: A Data Cable, and the proprietary software from Qualcomm (called QPST) for changing the phone's settings. Even BitPIM wouldn't help me here.
All of the Windows operations were done within Parallels Desktop on a small Windows 2000 partition with all the latest patches. This isn't saying much, I don't know when the last patch was released for Windows 2000 but it's a lightweight operating system that can run the few Windows apps that I am ever tempted to launch.
The first order of business was to find the software. Unfortunately, the location where I got it seems to be offline, but you'll have to search for it. The specific file I found was a compressed installer for QPST 2.7 Build 231. Other builds might work fine. I'll caution you that a lot of sites that I found contained massive amounts of shady stuff, so do this at your own risk. I scanned the downloaded file for viruses before transferring it to my Win2K virtual machine. This is only available for Windows. Once downloaded, install it. It's a pretty straight-forward next-next-next installation.
Next, of course, was finding the data cable. I went ahead and purchased the Verizon Chocolate music accessory kit. It was a relative bargain at only $45. Along with the USB Data cable, I also got a special stereo 1/16" headset, a 2GB TransFlash card and adapters. The package also came with drivers for the USB connection as well as software for managing music on the phone. I obviously had no intention of using their Windows software just to copy files to my phone, but the driver was also Windows-only. I installed the USB driver, inserted the 2GB card into my phone, and went on my way with the rest of this hack.
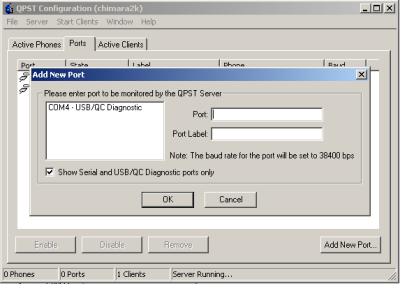
Once the drivers are installed, the phone shows up on a high COM Port. Make sure the phone is plugged in and if running Parallels (versus doing this on a dedicated Windows machine) make sure that the USB Device is enabled for Parallels (Devices > USB menu) then open QPST Configuration and hit "Add Port". If all's well, you should see your phone in the dialog. Select and add it accordingly.
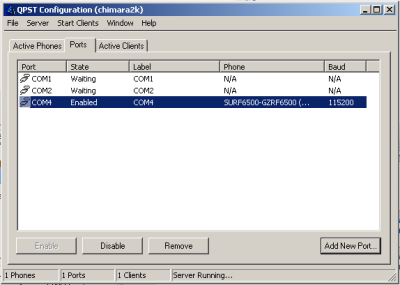
Once the port has been added, close QPST Configuration.
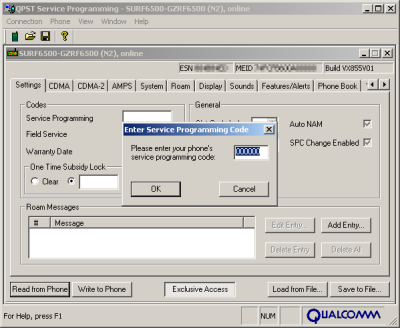
Next, open QPST's Service Programming tool. It should immediately prompt you to select your phone. Select it and continue. BEFORE YOU DO ANYTHING AT ALL, hit "Read from Phone", enter the SP code (usually 000000) and then save the data to a file. This will back-up your phone's configuration.
Now that that's out of the way, on the row of tabs across the top, scroll over until you find the M.IP tab. Expand the "NAI" and "Tethered NAI" columns so you can read them both clearly. You can see that Tethered NAI is not the same as NAI.
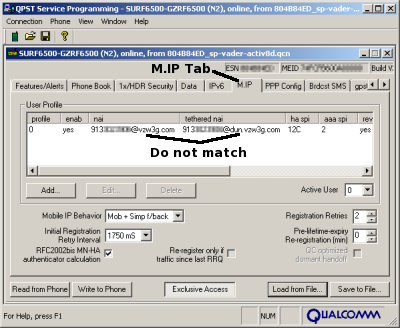
Edit Tethered NAI so that it matches.
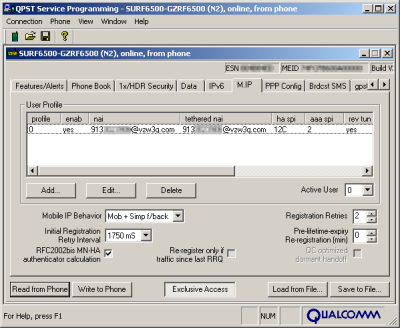
Then, save this configuration to a different backup file. Don't over-write your pristine backup, please. Finally, get your phreak on and click the "Write to Phone" button and cross your fingers.
Quit the QPST Service Programming tool. Your phone should reboot and be completely intact.
From there, you set up your dial-up networking as usual. This is straight-forward in both Windows and Mac OS X.
Phone Number: #777
User Name: the tethered NAI you used above, ex: 1234567890@vzw3g.com
Password: vzw (but anything should work)
Now that you have the cable with a driver for Windows, you can do USB Serial or bluetooth on Windows.
Without a USB Driver on OS X you can still do Bluetooth DUN. If you configured your phone's Bluetooth connection with the "Access the internet with this phone's data connection" option checked, it should simply ask for a username and password.
2008-01-14
UNIX tip of the day: cut columns from a text file
Most people who know their UNIX shells know of "cut", a utility which can grab only certain parts of each line within a text file. I'm kind of a weather geek, so I'll use some raw CSV METAR data from Weather Underground for this demo.
For instance, the following will grab the forth through tenth byte from each line of Data.csv:
$ cut -b 4-10 Data.csv
eCST,Te
53 AM,3
3 AM,37
3 AM,37
3 AM,37
3 AM,37
3 AM,37
3 AM,37
0 AM,37
If Data.csv happens to be a genuine comma-separated file, the following will grab the second and fifth fields (columns) from each line, using a comma as the delimiter between fields:
$ cut -f2,5 -d, Data.csv
TemperatureF,Sea Level PressureIn
37.0,29.79
37.0,29.77
37.0,29.75
37.0,29.69
37.9,29.66
37.9,29.65
37.0,29.65
37.4,29.61
This, as you can see, grabbed the Fahrenheit Temperature as well as the Sea Level Pressure (in Inches of Mercury), not like you cared. You're not here to check the weather. This is just a demo.
Unfortunately, cut always dumps the columns out in the order they're in in the file, regardless of which order you specify. For example switching the field order in the command line still nets you the identical output as before:
$ cut -f5,2 -d, Data.csv
TemperatureF,Sea Level PressureIn
37.0,29.79
37.0,29.77
37.0,29.75
37.0,29.69
37.9,29.66
37.9,29.65
37.0,29.65
37.4,29.61
Also, cut is really stupid about data that's organized in columns. Unless the formatting is very, very clean, it can be hard to get predictable results using cut.
For parsing data that's in columns (say, the output of the ls command, for example), it's better to take a crack at using awk. Awk is a somewhat intimidating beast for the unfamiliar user. For simply pulling data out of columns, though, it can't be beat.
Each column that awk identifies in a line is given an incremental variable, starting with $1. By default, awk uses white space as its field separator. Let's give this a try.
$ ls -la
total 16
drwx------+  2 axon  staff   136 Jan 14 13:50 .
drwxr-xr-x  14 axon  staff   646 Jan  4 17:38 ..
-rw-r--r--   1 axon  staff  2970 Jan 14 13:50 DailyHistory.csv
-rw-r--r--   1 axon  staff   672 Jan 14 13:50 Data.csv
Lets try to grab the owner and the file name only. That would be the third and ninth fields in the above listing.
$ ls -la | awk '{print $3 $9}'
axon.
axon..
axonDailyHistory.csv
axonData.csv
As you can see, there's no separation between the two fields now. You must separate your records within the print command. You can use a space, tabs, a comma, or whatever you wish. We'll just separate them with a space in quotes:
$ ls -la | awk '{print $3 " " $9}'
axon .
axon ..
axon DailyHistory.csv
axon Data.csv
Also, unlike cut, you can specify things in any order you wish. This is great for getting only the data you want from large CSV files or other tabular data right from the command line.
$ ls -la | awk '{print $9 "," $3 "," $1}'
,,total
.,axon,drwx------+
..,axon,drwxr-xr-x
DailyHistory.csv,axon,-rw-r--r--
Data.csv,axon,-rw-r--r--
2008-01-13
Sysadmin Sunday: obsd_pkgscripts for OpenBSD
I'll admit it. As much as I adore OpenBSD, its management of binary packages really could use some work. I've been using OpenBSD since 1998 after meeting Theo in person when HiR went to Defcon 6. Heavy daily use of OpenBSD came in 1999 or early 2000. Back in 2004, I finally got fed up. 4 years of daily use without a really great package management system had finally worn me down to my last nerve. With almost every new release, OpenBSD's dev team says they've improved pkg_add functionality, but truth be known, I still find it left wanting to this very day.
This week on Sysadmin Sunday, I'll discuss some tools I wrote to make OpenBSD sysadmins' lives a little easier.
What are my complaints about OpenBSD's package management? Just to name a few:
- No good way to search for packages by name
- The need to memorize long path names to install a binary package from an FTP mirror
- The need to guess at package file names (tricky with version numbers)
The premise was simple: Download a list of all the packages that are easily searchable, then make a script to search and install the packages via FTP, taking away the repetition, memorization, and guess work.
The package is available for download in the file archives of the HiR Google Group, but this download link may work as well:
obsd_pkgscripts-1.00.tar.gz (2.5 kB)
To install it, simply download it, uncompress it, and run the included pkg_update.sh script. I'm cheating and using lynx -source to download it. It comes by default with OpenBSD, shoot me.
$ lynx -source http://h-i-r.googlegroups.com/web/obsd_pkgscripts-1.00.tar.gz \As you can see, there's a README (I'd read it if I were you!), and three scripts: pkg_update.sh, pkg_scan.sh and pkg_get.sh. pkg_update, which we ran already, simply finds out what version and architecture of OpenBSD you're running and fetches the package index for that platform. It also creates the mirror configuration file if it doesn't already exist. This allows you to choose which OpenBSD mirror to use, if the default one isn't what you want.
> obsd_pkgscripts-1.00.tar.gz
$ file obsd_pkgscripts-1.00.tar.gz
obsd_pkgscripts-1.00.tar.gz: gzip compressed data, from Unix
$ tar xzvf obsd_pkgscripts-1.00.tar.gz
pkgscripts
pkgscripts/README
pkgscripts/pkg_get.sh
pkgscripts/pkg_scan.sh
pkgscripts/pkg_update.sh
$ pkgscripts/pkg_update.sh
cat: /home/axon/.tmpkg/mirror: No such file or directory
Package index directory does not exist! Creating Directory...
Package index directory created.
Downloading package index from ftp://ftp.openbsd.org/pub/OpenBSD/4.2/packages/sparc/ ...
Download complete!
pkg_scan.sh just tells you the names of packages that match your query. It simply uses grep on the package index. For instance, if we were looking for the xmms audio player, we'd find a lot of packages (xmms and all its plugin packages):
$ pkg_scan.sh xmmspkg_get.sh takes this a step further and actually installs the package. If you plan on running pkg_get as a normal user (recommended), you must have sudo access to run pkg_add. Otherwise, run pkg_get as root (not recommended). Optionally, you can add it to your path in the profile for your shell like I did. pkg_get.sh won't install a package until you have a totally unique package name. For example, autoconf is one of those bizarre packages where there are many versions available. If I try installing it with pkg_get.sh autoconf, I will get an error:
faad-xmms-2.0p5.tgz
py-xmms-1.06p0.tgz
xmms-1.2.10p9.tgz
xmms-bonk-0.12p0.tgz
xmms-esd-1.2.10p5.tgz
xmms-flac-1.1.2p1.tgz
... output truncated ...
$ pkg_get.sh autoconfBut if I enter a unique-enough filename, it will install it. You don't need to type the whole filename, just enough of it to not match more than one package.
autoconf-2.13p0.tgz
autoconf-2.52p1.tgz
autoconf-2.54p1.tgz
autoconf-2.56p0.tgz
autoconf-2.57p0.tgz
autoconf-2.58p1.tgz
autoconf-2.59p1.tgz
autoconf-2.60p1.tgz
autoconf-2.61p1.tgz
Ambiguous package name. Please be more specific.
$ pkg_get.sh autoconf-2.61OpenBSD's pkg_add has come a long way. It will automatically download any necessary dependencies if it can find them in the same directory as the binary package you're installing. As such, my scripts don't have to do the exrta work as long as the dependencies are out there to be downloaded. This can be witnessed if we try something more complex, such as ImageMagick, a command-line image manipulation tool:
Attempting to fetch/install package...
autoconf-2.61p1: complete
$ pkg_get.sh ImageMagick-As you can see, a few tiny scripts can make a world of difference when trying to install packages in OpenBSD.
ImageMagick-6.3.4.1-no_x11.tgz
ImageMagick-6.3.4.1.tgz
Ambiguous package name. Please be more specific.
$ pkg_get.sh ImageMagick-6.3.4.1-no_x11
Attempting to fetch/install package...
bzip2-1.0.4: complete
jasper-1.900.1: complete
jbigkit-1.6p1: complete
lcms-1.15: complete
netpbm-10.26.42: complete
ghostscript-8.54p1-no_x11:ghostscript-fonts-8.11p0: complete
ghostscript-8.54p1-no_x11: complete
libxml-2.6.29: complete
ImageMagick-6.3.4.1-no_x11: complete
... post-install message truncated ...
--- ghostscript-fonts-8.11p0 -------------------
... post-install message truncated ...
See Also:
More HiR Information Report Sysadmin Sunday articles
Related OpenBSD Man pages:
pkg_add(1)
pkg_info(1)
pkg_delete(1)
2008-01-11
Adventures of a new mobile phone Pt. 2 - BitPIM
Editor's Note: This is the second part of my adventures of converting to a new phone. The first two parts will cover synchronizing your contacts between my old phone and my new phone. Although I'm using Mac OS X for most of this series, the tool I'm covering in this article works on both Mac OS X and Windows.
So, either your first phone isn't supported by iSync, or both. Or perhaps you're a Windows user that's ready to give BitPIM a whirl. Whatever the case, BitPIM is the focus of this article.
In the last article, I discussed getting your contacts into your Address book from your phone via iSync. To get these contacts into a format usable by BitPIM, you must export the contacts. It's worth mentioning that any contact information manager including MS Outlook, Mozilla Thunderbird and most of the popular web-mail sites can export your contacts to a vCard file that BitPIM can load onto your phone. Again, if the screen shots aren't legible, click on them to get the full sized image.
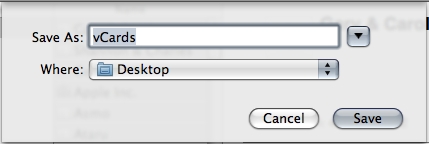
To get your contacts out of OS X's Address Book, highlight all of your contacts (or only the ones you want to load onto your new phone) and then use the File -> Export -> Export vCard menu.
I assume that you've already established a bluetooth or cable connection from your computer to your new phone following the instructions in Part 1. Once that's established, download and install BitPIM. Run it.
BitPIM is a bit of a kludgy beast. The UI isn't terribly intuitive. It won't work with all BlueTooth phones. Case and point, my e815 covered in Part 1 doesn't seem to get along very well with BitPIM, and I can't seem to get it to connect. BitPIM works on more phones than iSync, so between iSync and BitPIM you're likely covered.
First, get your phone working with BitPIM. Select "Preferences" from the "BitPIM" menu. Try the Phone Wizard, or adjust the settings manually. This isn't too hard.
We'll import the exported vCards we got out of Address Book:
You'll be prompted to merge or replace existing data. If this is the first time you've run BitPIM, you shouldn't need to do much else. Just walk through the prompts and get all your contacts into BitPIM.
Now, Click the "Write To Phone" button (Second icon on the upper left, between the "Read From Phone" icon and the Big H "Historical Data" Icon).
Select "Contacts" (and Add or Replace as you need) and hit OK. You'll see the progress meter at the bottom scroll a few times, and then when it's done, it will likely restart your phone.
You can also sync the BitPIM calendar to various calendars, for example Google Calendar, iCal, or a calendar on another phone. If your new phone supports it, you may be able to grab your calendar data and beam it to your phone easily with BitPIM. The LG Chocolate VX8550's calendar works well with BitPIM, so if you've got one, feel free to give it a shot. BitPIM has a lot of other functionality as well. Play with the Import and Export options in the file menu.
Beware that BitPIM does, in fact, alter your phone's internal data files. There is a possibility that you could brick your phone. All in all, I've had pretty good luck with it so far.
See Also:
Adventures of a new mobile phone Pt. 1
Other HiR Mobile Articles


Freaky Friday Unix tip of the day: Named Pipes
Named pipes, also called FIFO (First In/First Out) Buffers, are a simple way to get piped data into a command that is expecting to read data from a file, for simulated local client/server communication, or to queue up data for periodic processing such as with cron.
To create a named pipe, use the mkfifo command. The only options for mkfifo are -m and the filename. If invoked without a mode for the newly created named pipe, the current umask is used as usual. For example, an octal umask of 022 will be used to create files with permissions of 755 (rwx,r-x,r-x).
I like to use root-tail to put status messages on my graphical desktop. Root-tail compiles and runs on pretty much every UNIX flavor that handles X11, but it can't accept input from a pipe, though. It basically does a tail -f on a file.
One such status message I like is a periodic ping so I know if I'm still up on the wireless network. OpenBSD doesn't exactly give you an easy wireless-strength meter, nor do I care enough to see if there are any utilities out there to do it. So, I made a fifo for my ping output:
$ mkfifo /tmp/pingfifo
Then I started root-tail in the background (see the root-tail manpage for more info on configuration screen positioning):
$ nohup root-tail -i 1 -g 500x120+700+610 /tmp/pingfifo,red&
And finally, I launched my ping script and redirected it to the fifo, also in the background:
ping.sh
#!/bin/sh
while true
do
ping -c4 www.google.com
sleep 38
done
$ nohup ./ping.sh > /tmp/pingfifo&
The end result is a transparent text box on my screen that shows me what I want (under the needle of the turntable, on the far right):

Note:
Root-tail works great on log files as-is if you wish to use it that way. This quick snippit was written to demonstrate how Unix allows pipes to be created to act like files for commands such as root-tail that only deal with files.
See Also:
Sysadmin Sunday
root-tail home page
2008-01-09
KC BSD User Group Kick-off meeting
I attended the kick-off meeting for KCBUG this evening, and had some fun. There were only four of us and we seemed fairly diverse in background and with experience using BSD. I think we all walked away learning at least something.
There wasn't much structure, but things discussed included:
- Yaifo
- Subversion
- TRAC and DCL
- Source ports and binary packages on OpenBSD
- Appliance-esque installations
- Live CD BSD implementations
- OpenBSD for routing, load balancing, and firewalling
BSD Freaks and addicts, keep your eyes peeled. The next 2 installations of Sysadmin Sunday will feature some OpenBSD-Specific stuff.
2008-01-06
Sysadmin Sunday: Automate remote tasks with SSH
The SSH Suite can be leveraged to perform some pretty amazing tasks. I maintain hundreds upon hundreds of open systems as part of my job, but a good deal of my experience with SSH for batch processing came from a brief stint at a startup company that had employed a few hundred OpenBSD systems in an application-clustered environment. Keeping them in sync wasn't too hard once I came up with a few creative ways to get everything straight.
Currently, the most popular (and arguably most secure) SSH suite is OpenSSH which ships with almost all Open-Source operating systems and some commercial ones. Packages exist for most others, or there's always the source code.
For the un-initiated, SSH itself replaces RSH and Telnet as remote-access protocols for interactive logins. SFTP replaces the insecure FTP protocol with an encrypted, SSH-tunneled file transfer protocol. SCP replaces RCP with a secure remote copy protocol. At its core, SSH can simply authenticate these tools against the host's existing password database. The real power of SSH comes from its ability to use public keys to authenticate accounts. This kind of authentication is fragile if implemented improperly. If one account is compromised and the account has weakly-protected keys distributed to other systems, the impact of that one account can be much further-reaching. It is for this reason that I recommend using un-privileged accounts when using passwordless SSH keys.
Generating SSH Keys
To generate SSH keys for your account, you login to the account on the system that you'll be running automated or batch tasks from, then run ssh-keygen and follow the prompts, entering a blank password for the key.
To generate SSH keys for your account, you login to the account on the system that you'll be running automated or batch tasks from, then run ssh-keygen and follow the prompts, entering a blank password for the key.
-bash-3.2$ ssh-keygen
Generating public/private rsa key pair.
Enter file in which to save the key (/home/axon/.ssh/id_rsa):
Enter passphrase (empty for no passphrase):
Enter same passphrase again:
Your identification has been saved in /home/axon/.ssh/id_rsa.
Your public key has been saved in /home/axon/.ssh/id_rsa.pub.
The key fingerprint is:
5c:f4:64:3c:51:a3:a7:80:fd:fa:55:7a:06:f7:4d:84 axon@chimerabsd.labs.h-i-r.net
Distributing SSH keys
From here, you have to push the key out to each remote host by adding the contents of the id_rsa.pub file to the end of "authorized_keys" in the .ssh directory of the account you're going to be connecting to. My usual method goes something like this:
I chose, instead, to make a script to push the keys out to multiple systems, since I'll be demonstrating batch processing of remote commands. First, come up with a list of all the remote systems you wish to effect at the same time. I'm going to choose from a subset of HiR Lab boxes that I've got running right now:
File: labs.h-i-r.net.list
backtrack.labs.h-i-r.net
bouncer.labs.h-i-r.net
chimera.labs.h-i-r.net
chimerabsd.labs.h-i-r.net
lampdev.labs.h-i-r.net
The key push script:
File: key.pu.sh
#!/bin/sh
# mass ssh key push script by ax0n@h-i-r.net 2008-01-06
# Pushes ssh keys out to an entire list of hosts from a file
if [ -z $1 ]
then
echo "Syntax: $0 server-list "
exit 1
fi
boxlist=$1
for box in `cat $boxlist`
do
echo "-=-=-=- $box -=-=-=-"
ssh $box "cat >> .ssh/authorized_keys" < ~/.ssh/id_rsa.pub done
Then run key.pu.sh [server-list-file]. It will ask for passwords for each machine. That's the breaks, kid.
From here, you have to push the key out to each remote host by adding the contents of the id_rsa.pub file to the end of "authorized_keys" in the .ssh directory of the account you're going to be connecting to. My usual method goes something like this:
ssh user@remote.host "cat >> .ssh/authorized_keys" < ~/.ssh/id_rsa.pub
If this returns an error such as ".ssh/authorized_keys: No such file or directory", then you need to go to the remote host and create the .ssh directory manually. This ssh'es to the remote account, and runs "cat >> .ssh/authorized_keys", which takes any input and appends it to the authorized_keys file. At the same time, it's sending the contents of of id_rsa.pub to be appended.
The above command will prompt you for a password for the remote user, then exit immediately. From that point on "ssh user@remote.host" should no longer ask for a password, and then the account can be used for remote automation. Note: You can also enter a password during key generation, and this password will then be prompted for when ssh'ing to remote hosts. This hinders automation, however.
I chose, instead, to make a script to push the keys out to multiple systems, since I'll be demonstrating batch processing of remote commands. First, come up with a list of all the remote systems you wish to effect at the same time. I'm going to choose from a subset of HiR Lab boxes that I've got running right now:
File: labs.h-i-r.net.list
backtrack.labs.h-i-r.net
bouncer.labs.h-i-r.net
chimera.labs.h-i-r.net
chimerabsd.labs.h-i-r.net
lampdev.labs.h-i-r.net
The key push script:
File: key.pu.sh
#!/bin/sh
# mass ssh key push script by ax0n@h-i-r.net 2008-01-06
# Pushes ssh keys out to an entire list of hosts from a file
if [ -z $1 ]
then
echo "Syntax: $0 server-list "
exit 1
fi
boxlist=$1
for box in `cat $boxlist`
do
echo "-=-=-=- $box -=-=-=-"
ssh $box "cat >> .ssh/authorized_keys" < ~/.ssh/id_rsa.pub done
Then run key.pu.sh [server-list-file]. It will ask for passwords for each machine. That's the breaks, kid.
-bash-3.2$ ./key.pu.sh labs.h-i-r.net.list
-=-=-=- backtrack.labs.h-i-r.net -=-=-=-
axon@backtrack.labs.h-i-r.net's password:
-=-=-=- bouncer.labs.h-i-r.net -=-=-=-
axon@bouncer.labs.h-i-r.net's password:
-=-=-=- chimera.labs.h-i-r.net -=-=-=-
Password:
-=-=-=- chimerabsd.labs.h-i-r.net -=-=-=-
axon@chimerabsd.labs.h-i-r.net's password:
-=-=-=- lampdev.labs.h-i-r.net -=-=-=-
axon@lampdev.labs.h-i-r.net's password:
Testing the SSH keys
Now that the keys are pushed, remote work will be simple. Try to ssh to any of the systems in the list. It should just work without a password:-bash-3.2$ ssh axon@backtrack.labs.h-i-r.netIf you wish to run a single command remotely, then exit, you can also add the command to the end of the command line like this:
Last login: Sun Jan 6 22:34:20 2008 from 192.168.0.107
Linux 2.6.21.5.
backtrack ~ $ logout
Connection to backtrack.labs.h-i-r.net closed.
-bash-3.2$ ssh bouncer.labs.h-i-r.net uname -aSimilar to my key push script is one that I wrote to run a command across all of the systems in a list file:
OpenBSD bouncer.labs.h-i-r.net 4.2 GENERIC#851 sparc
File: mass-ssh.sh
#!/bin/sh
# mass ssh script by ax0n@h-i-r.net 2008-01-06
# Runs the same command across an entire list of hosts from a file
if [ -z $2 ]
then
echo "Syntax: $0 server-list command-string"
exit 1
fi
boxlist=$1
shift
commandstring=$*
for box in `cat $boxlist`
do
echo "-=-=-=- $box -=-=-=-"
ssh $box "$*"
done
Let's see it in action by running the "uptime" command across my lab environment:
-bash-3.2$ ./mass-ssh.sh labs.h-i-r.net.list uptimeNotice how I don't get prompted for any passwords. It's important to note that my account on these systems is a non-privileged account without access to sudo or membership in any special system groups such as root, wheel, adm, or bin. You could use this script with a privileged account for adding or removing users, but I'd keep very tight security on any system with passwordless ssh keys. It's mostly useful for seeing who is logged in, checking for high system loads, and whatnot.
-=-=-=- backtrack.labs.h-i-r.net -=-=-=-
22:53:40 up 5 days, 5:21, 2 users, load average: 0.24, 0.05, 0.02
-=-=-=- bouncer.labs.h-i-r.net -=-=-=-
10:07PM up 2:31, 0 users, load averages: 0.28, 0.15, 0.10
-=-=-=- chimera.labs.h-i-r.net -=-=-=-
16:53 up 1 day, 6:02, 3 users, load averages: 1.44 1.32 1.15
-=-=-=- chimerabsd.labs.h-i-r.net -=-=-=-
10:54AM up 2:32, 1 user, load averages: 0.32, 0.14, 0.10
-=-=-=- lampdev.labs.h-i-r.net -=-=-=-
16:53:19 up 2:08, 0 users, load average: 0.08, 0.02, 0.01
Transferring files
sftp works much like ftp. The syntax is "sftp user@host.name" and then it either prompts for a password, or if SSH keys are present, uses those. After that, most of your usual FTP commands work as usual. In the following example, I do not have SSH keys from chimera (my laptop) to itself (localhost):
chimera$ sftp axon@localhost
Connecting to localhost...
Password:
sftp> ls
Desktop Documents Downloads Library Movies Music Photos
Pictures Public Sites myphotos scp.sh
sftp> cd Photos
sftp> ls
06-06-07_1911.jpg 06-25-07_0600.jpg PowerLinkChain.jpg
sftp> get PowerLinkChain.jpg
Fetching /Users/axon/Photos/PowerLinkChain.jpg to PowerLinkChain.jpg
/Users/axon/Photos/PowerLinkChain.jpg 100% 12KB 12.4KB/s 00:00
Better yet, in my opinion, is scp, the secure replacement for rcp. The syntax is simply the same as "cp" with the exception of it accepting a user and host name and a colon in front of the filename. This allows you to copy files over the network via an encrypted channel from the command-line. I'll do the same thing as before, from chimerabsd (which has ssh keys to chimera) to my home directory locally:
-bash-3.2$ scp axon@chimera.labs.h-i-r.net:Photos/PowerLinkChain.jpg ~And as you guessed, I also have a program for pushing a file to a list of hosts as well.
PowerLinkChain.jpg 100% 12KB 12.4KB/s 00:00
File: pu.sh
#!/bin/sh
# mass scp push script by ax0n@h-i-r.net 2008-01-06
# uses scp to push one file out to an entire list of hosts from a file
if [ -z $2 ]
then
echo "Syntax: $0 file server-list [remote-path]"
exit 1
fi
boxlist=$2
pushfile=$1
rempath=$3
for box in `cat $boxlist`
do
echo "-=-=-=- $box -=-=-=-"
scp $file $box:$rempath
done
If you have trouble getting SSH keys to work, make sure the "PubkeyAuthentication" option in the sshd configuration file (usually /etc/ssh/sshd_config) is set to "yes" and un-commented.
In Closing
My scripts were quick and dirty examples -- use the scripts as a template for more complex tasks, such as uploading and unpacking a tarball nightly, running a database backup via mysqldump, or any other thing you can imagine. You may wish to add an option for an alternate username, or hard-code a username into your own scripts. Once SSH keys are in place, you can automate many non-interactive tasks via Cron or At as well.
2008-01-01
Adventures of a new mobile phone Pt. 1
Editor's Note: This is the first part of my adventures of converting to a new phone. The first two parts will cover synchronizing your contacts between my old phone and my new phone. These instructions should work pretty well for most Bluetooth-enabled phones, or for phones that you have a Data Cable and drivers for. I'm using Mac OS X for most of this series with the exception of the final article, which will cover the proprietary Windows-based tool used to manipulate my specific phone for additional functionality that I wanted.
Well, the time has come for a new phone. It's not that my trusty Motorola e815 hasn't been great, because it has been. In fact, I was reluctant to give it up. I got it in 2005 or so. Since then, it's been buried in snow, had the case cracked, and other torturous events. The thing keeps ticking. Truth be known, I'll probably hold onto it just in case I fail to bond with my new gadget. So, why is it time for a new phone? Because it's FREE -- with a 2 year contract, of course! If I don't upgrade, I'm basically giving away an offer for a free phone. I've been with Verizon in one form or another (i.e. Cellular One) for about a decade, though. In general, I've got nothing but great things to say about them. Another 2 years won't hurt anything.
First things first: My current phone has almost 100 phone numbers, and almost 80 unique contacts. Re-entering all of that information into a new phone doesn't sound like my idea of a fun way to waste an entire weekend.
With iSync, I can pull all the data out of the e815. iSync works with quite a few phones, so yours might be on the list. If you're using only Windows, I don't know how to sync your phone to Outlook or whatnot, but I'd imagine it can be done easily enough. Let's get started! If you have trouble making out the screen shots, click to zoom in on them.
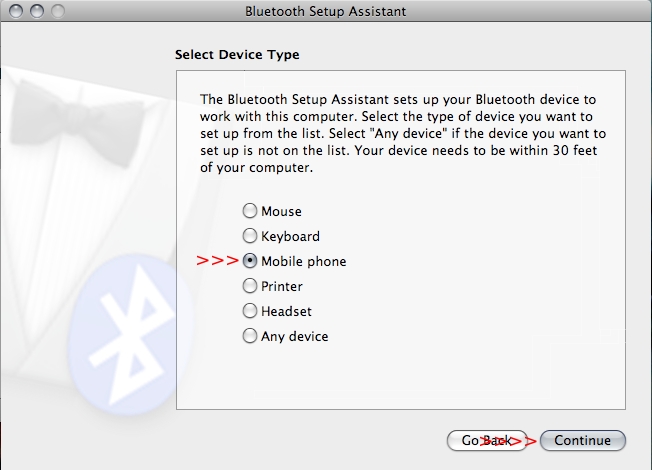
First, get the phone connected via Bluetooth. There's probably a "discoverable" mode on your phone that you'll need to activate. See your documentation for how to do it. Once it's in discoverable mode, it's time to go to work.
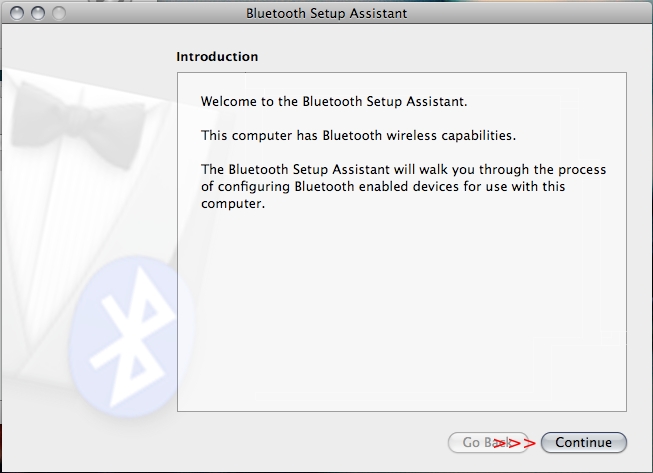
Select "Set up Bluetooth device" from the bluetooth menu:
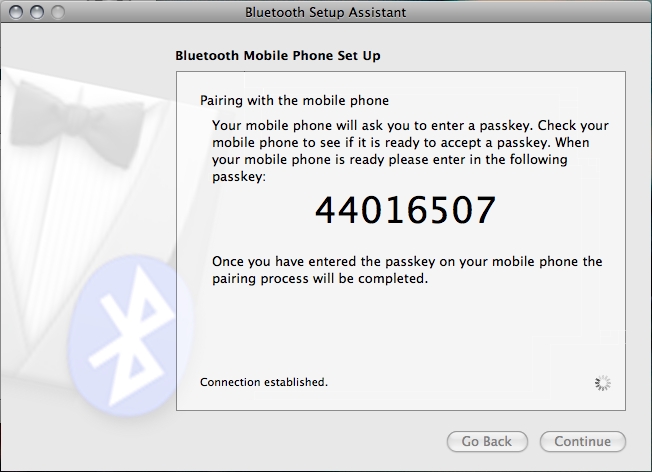
Next, just work through the prompts including the bonding PIN which you'll have to enter on your phone's handset. Note that I'm in a public place and people have other bluetooth enabled devices nearby with clever names such as "The Blade!" (oooo, scary)
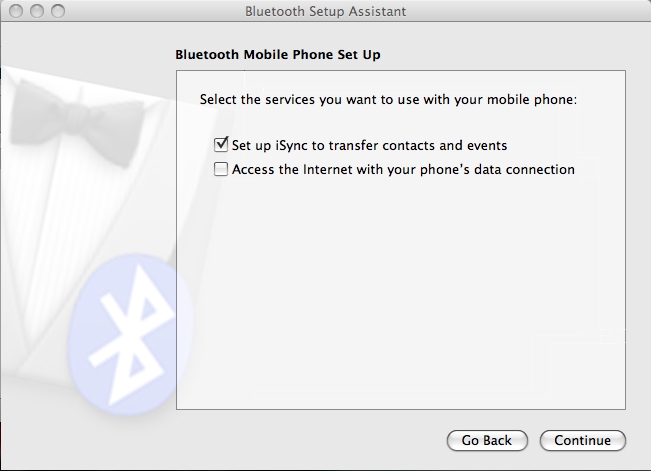
We won't need to enable the Internet connection through the phone, so you can un-check it if you want. When you activate bluetooth on your new phone, you can choose to enable it if you plan on tethering later on. Note that this is potentially against the terms of service for your carrier unless you cough up the cash for a data plan.
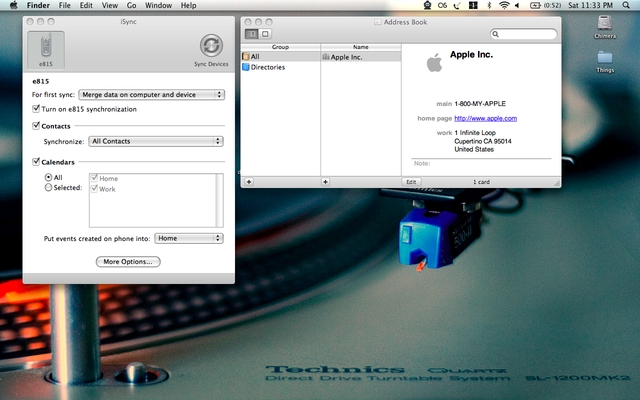
Once complete, iSync should launch on its own. It not, start it manually. With that out of the way, fire up Address Book (in Applications) as well. The default settings for iSync should be fine. Go ahead and Sync:
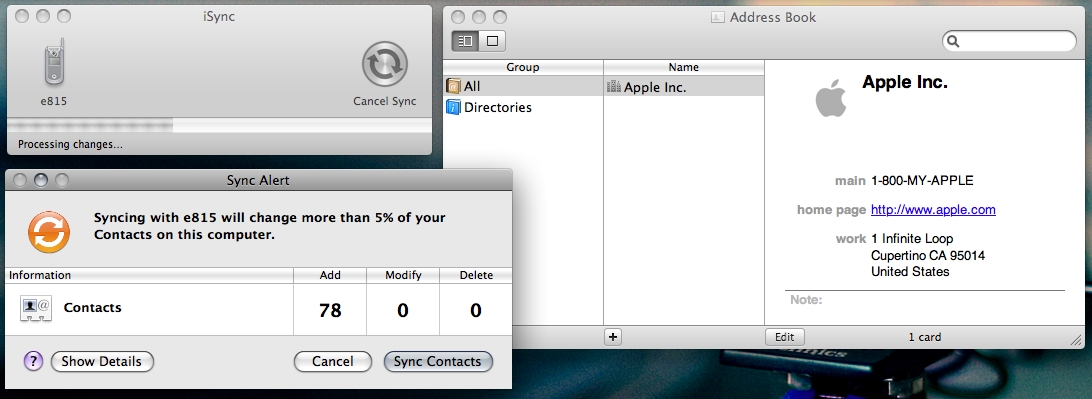
iSync, in true Apple form, will try to protect you from doing something stupid like updating a ton of information in its Address Book without permission from you. Go ahead and sync the contacts.
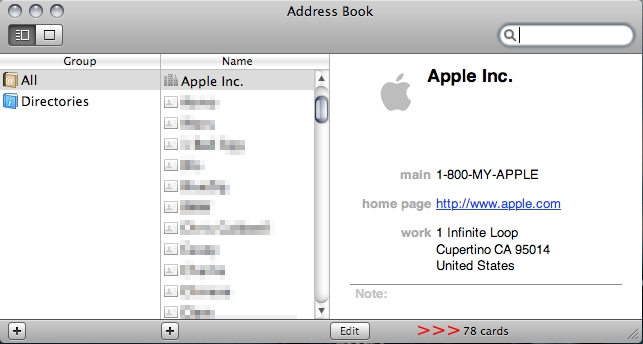
You'll now see all your contacts in the Address Book. You didn't think I'd actually show you all the names of people I talk to, do you?
Now, if you're lucky and your new phone is ALSO supported by iSync, you can shut off your old phone, fire up your new phone, and do the exact same procedure all over again. The Address Book will store all your contacts. Syncing your new phone will move all the contacts and their numbers over seamlessly.
Unfortunately, my new phone, the second-generation LG Chocolate (VX8550) isn't supported. Tune in for Part 2, where I'll discuss using BitPIM to help you out if you're dealing with unsupported phones.


Subscribe to:
Posts (Atom)


