
It's that time again! Bring your questions, projects, interesting topics of discussion, war stories and conspiracy theories. As a reminder, the official 2600 meeting start time is 5:00 PM local time, but the Greater Kansas City folks tend to start trickling in at 5:30 or so.
If people are interested, I'll go over some of the common complaints of this lock and how so many people manage to lock themselves out of it forever. I might live stream it on uStream. I might actually lock myself out of this lock forever, too, but hopefully not.
(Crossposted from KC2600)
Showing posts with label lockpicking. Show all posts
Showing posts with label lockpicking. Show all posts
2012-02-03
February 2012 KC2600 Meeting
2012-01-14

2011-07-24
Lock Fail
Simplex-style pushbutton locks are ubiquitous in the medical industry. They're used on medicine carts, cabinets, lockers and doors. This is a cabinet that is designed to hold a thin-client workstation and/or patient record portfolios, and restrict access to ethernet ports.


Yep. You can open this one by sliding the exposed latch with your finger.
Also: if you happen to shoulder-surf the code for one of these, you can almost guarantee every other cabinet in the same hospital uses the same code.
2010-02-26
Risk Assessment: Electronic Lock Impressioner
I've kept kind of quiet about this wonderful device. It's an electronic lock impressioner.

Barry Wels talks about the possible mode of operation on his excellent Blackbag blog. I kind of assumed that's how it worked, since it claimed to work only on Ford locks for the time being.
Meanwhile, people are freaking out, labeling it "a car thief's wet-dream."
While I could agree that this device has some potential value to nefarious ne'er-do-wells, there's a fatal flaw in the media panic: You can't steal a car by impressioning the lock.
This device will give you a series of numbers, known as a key code. If you told me the key code to a car right now, I'd honestly have no clue what that key should look like. I could look it up on the Internet, probably. But then I'd need to get out my dremel, a file, a key blank and my digital calipers. If I had a cheap key-milling machine, it might save me a little bit of time. If I spent several thousand dollars, I could get a computer-controlled machine that would simply spit out a key with the right cuts. If I was convincing enough, I *MAY* be able to trick a professional locksmith to cut a key exactly to a code, but most of them would be hesitant to do this without seeing an original key, even if it was a badly damaged one.
The barrier to entry here isn't exactly high, but it's not like you can simply insert this tool into a car door and immediately drive off with it. It's going to take quite a bit of effort or a pricey initial investment for this tool to pay off. The initial investment has already been made by licensed locksmiths who already have these tools laying around. J. Random Carthief, however, probably does not. A successful auto-theft ring MAY have these tools at their disposal. As we already know: if you're being targeted by a sophisticated attacker, it's game over. They'd probably just tow your car away, repo-man style, and break it down at a chop shop.
Let's just assume for the sake of argument that you used this device to get the key code for the car's door, and spent the time to fabricate or acquire a matching key. That's a lot of hassle, but now you can open the car's door, maybe its trunk and glove box. You could even put the key in the ignition. But you couldn't steal the car. Let me explain.
This is my car. I got it a decade ago. Do you like my license plates?

At of the time of purchase, Ford (and many other manufacturers) had already been using two-factor authentication of some variety behind the scenes for years to activate the ignition system. Long gone are the days of pulling a bundle of wires out of the steering column and touching some wires together to start the car, as are the days of simply getting a copy of the car key.
Inside many keys, there's an RFID module or some other device that's somewhat unique to the key. On snazzier cars, this is an encrypted challenge/response module that can't be easily copied. On others, it's a small handful of static "signatures" which may be easy to clone with an RFID programmer or other specialized tools. Either way, without the proper code, the car won't start. In fact, if this module is missing or un-recognized, the car will often completely disable its Engine Control Unit for a period of time, usually 10 minutes.

To provide a further layer of complexity to the issue, the end-user must provide proof of owning two separate keys in order to authorize new keys to start the car. In my case, if I had two keys and lost one, I would need the dealership or a high-end locksmith to attach a special computer to my car in order to authorize a new key. That keeps the valet guy from copying your key and activating it himself. Typically, these systems require the programmer to stay connected to the car for a period of one hour before new keys can be added. Even a miscreant would need unfettered access to your car for a whole hour in order to configure a key that works.
In short, the Electronic Lock Impressioner would give a bad guy the ability to make a key that allowed him to steal the stuff in your car, and nothing else. That person would be much better off shattering your window with a brick. In the hands of a good locksmith who has all the proper tools and skill to create a key from a key code and re-program your car's ignition system, this tool should save many hours that would otherwise be spent replacing or re-keying locks. This savings will ultimately be passed on to the customer. In my opinion, this is a revolutionary device that provides benefits to the locksmith industry as well as people who need to use their services. It does so without providing much incentive to car thieves.
2010-01-23
Review: Master 1500iD "Speed Dial" lock

I had been using a derivative of the somewhat vulnerable Master 175 Padlock. I have always been a proponent of security in depth, so a somewhat chintzy lock combined with a very sturdy bike rack, a length of towing chain, and a parking garage with patrolling officers and cameras everywhere provided adequate layered protection. Also, in fair weather, several other lesser-secure bikes would be parked with mine, adding a layer of Darwinian Bicycle Security.
Advantages that made me choose this lock were many. First, the shrouded hasp meant it was likely to be resistant to shimming. Also, the "combination" could be entered in low-light conditions and while wearing gloves. This is important, because the parking facility I was using at the time was not heated (so it was cold!) and they'd switched to fluorescent lights that never really warmed up or achieved full brightness whenever it was below freezing. On REALLY cold days, some of the lights would refuse to turn on. All of these factors made this lock look like a solid winner for the situation.
Note: This lock is meant to keep your mobile phone and sunglasses safe in the locker room at the gym. It's meant to keep middle-school kids from stealing your homework. Alone, it's not the best tool for locking up a bicycle or anything valuable.
One of the first things I wanted to know was how it worked inside. I also wanted to know how difficult a task it was to get it open without completely destroying it. To the first end, I stumbled on Michael Huebler's 1500iD visualization flash simulator, and subsequently the PDF breaking down most of the facts on this lock.

In fact, Michael had covered most of the angles I was hoping to discover on my own, and did a better job than I could've done here. Therefore, it's worth the read if you're interested in locks, locksport or mechanical things.
By the way, with a good set of drill bits meant for cutting steel, it took me about 7 minutes to get into the lock on my workbench without completely destroying anything. In practice, an attacker would use a large set of bolt cutters since the hasp isn't completely shrouded. This should make short work of a lock like this one in just a few seconds.
I noticed a few collisions, another point that mh's article brought to attention. The lock opens when the four wheels are in the correct state, and every movement of the joystick changes the state of three out of the four wheels. It is for this reason that there is more than one way to get to almost any given state. Using the state in the screenshot above, Right-Left-Down-Left is the combination shown. The same state can be accomplished with Up-Right-Down-Left.
In short: The number of combinations is unlimited, but the number of mechanically-possible states is markedly finite: 7,501 to be exact. mh likens this to the mechanical version of a hash function. I can't think of a more concise allegory for it.
Mechanically, I think Master did a lot of stuff right. First off, the hasp acts as the wheel reset mechanism. This allows the hasp to be locked with a gate that doesn't rely on a spring. Even without the hasp shroud, there is no way to shim this lock. The best you could hope for is to wiggle a very thin wire in through the reset slot on the back to probe for the various gate positions.
If nothing else, the inner workings are innovative. It's simultaneously bizarre but fitting that Master would test new technology in a "toy" lock like this one. Perhaps there's a way to make it scale, either via more positions per wheel, or more wheels to gain more state space.
2009-10-22
Dissecting a Simplex lock
Some guys at CCCKC brought part of an old-school Simplex lock down to the cave. I've always wondered exactly how they work and what kinds of vulnerabilities they have.

Pushbutton locks like this (and older designs with the buttons arranged in a pentagon shape) have been around for ages, but I've never had one in my hands before. I have always guessed that:
- They are 100% mechanical (requiring no electricity)
- The order doesn't matter.
- Any combination from 1-5 digits would be viable
- Each button can only be pressed once
I'll explain how these hypotheses work out as I go along.
Starting out, you can see where the inner door knob will attach on the other side of the wall. The nub at the top (or, to the left in this photo) is strange to me. As it turns out, it's used to reset the combination.

Once open, the lock mechanism inside is covered by a metal shroud. Some pivoting arms can be seen.

Here, I have swung the arm going to the combination mechanism out of the way, and I'm pulling the shield away. There's no power in here, so hypothesis #1 is true.

Here, I've re-attached the arm with the shield removed. Every time a button is pressed, the pawl associated with it rotates a little. The bar seen across the top of them will increment any of the lower numbers at the same time. If you press "1", only the first pawl moves. If you press "3", then pawls 1, 2, and 3 move at the same time. This means that the order in which buttons are pressed DOES matter. Hypothesis #2 is false.

Here is the other side of the combination mechanics. Visible is a gate with 5 fingers. When the outer knob is turned and the gate can't fit into the pawls (wrong combination) the furthest left bar (vertical in this photo) stays upright. The pivoting arm buckles, and the inner knob does not turn. The bolt work (not visible) is not withdrawn.

When the gate is aligned, the pivoting arms are allowed to swing up a bit (angled left a bit in this photo), and the inner knob is caught. The bolt is withdrawn and the door is allowed to open.

To reset the combination:

- Enter the current combo
- Activate the combination reset. I'm activating it with my finger in the above photo, but twisting that nub in the first photo does the same thing. It should "click" when you get it pressed. You do not need to hold the button.
- Turn the door knob to clear the combination.
- Enter the desired combination.
- Turn the door knob again.
- Test the new combination. You don't want to get locked out!


So what about hypotheses #3 and #4?
I got a few surprises:
- If you accidentally turn the knob twice during a combination reset, you end up completely clearing the combination. If this happens, the door will open without you entering anything. Obviously, if you DO enter something in this state, it'll be wrong and won't open.
- More than one button can be pressed at a time, and it's part of the combination. You can require any combination of keys to be pressed simultaneously, up to and including all five at once. 2/3, 1, 4, 5 is a valid combo, and you can't press 2, 3, 1, 4, 5 or 3, 2, 1, 4, 5 to make it work.
#3 was incorrect on a technicality. Any combination of 0-5 keypresses is valid.
#4 is correct. Once a button's been pressed, pressing it again does nothing, but you CAN press multiple at once to increase the complexity of the combination.
All in all, this was a fun little way to spend an hour or so at the cave. I was happy to finally get to learn how these fascinating relics work. As with any combination lock, once you can see the mechanics of it while you mess with it, it's pretty easy to get it to pop open.
The sheer reliability and simplicity of the mechanics leaves me in awe. It's no wonder you can still see these in airports, hospitals, post offices and elsewhere. This is certainly one of the more clever locks I've dealt with.
Props to Rob K for helping me get some higher quality shots of the combination mechanics.
2009-04-02
If at first you don't succeed...
Drill it!
Surbo (from i-Hacked) brought in his tubular pick tool last week. We tried and tried to get into the lock. None of us at CCCKC had much luck.
Frogman, DJ_Goku and I went at it with the drill this evening. Oddly enough, I found some lock-drilling bits in our favorite dumpster several years ago. They came in handy tonight.
Frogman will probably be around with a more thorough article once he's assessed what all is really inside his mysterious phone-card vending machine.
Last minute reminder: KC 2600 at Oak Park Mall. Friday April 3rd. We'll probably be there around 5:00 PM.


2009-03-26
Lever Lock Guts
This lock had to be destroyed during replacement because the key was lost. I've already removed some of the levers from this lock. In total, there were 10.
8 of the lever tumblers are configured like this. There are two peices with teeth to join them together. This way, you can re-key them however you want. There are 7 different positions that are usable in this design. The Cut-out on the right side that's surrounded by two sharp points is the slot where the lever lock's gate is supposed to go. Until all of these are lined up perfectly with the gate, the lock will not open. The sharp points are there to make it difficult to pick or impression the lock, because they'll catch on the gate, making you think that you've picked this lever properly when in fact you may not have. It also makes it difficult to maintain tension on the bolt or gate to keep the lever in place while you work on other levers.
Not shown: Between each of the above levers, there's also a thin metal shim. This keeps the levers from rubbing against each other, but also makes picking difficult regardless of bitting patterns.
The remaining two levers are shaped like this. They're not able to be re-keyed, but you can stack them wherever you want in the lock. The oblong pivot hole (on the left side) also prevents one from using gate tension to hold it into place. This tumbler will simply fall past the gate once you stop manipulating it. Since there are two of these levers in this lock design, you would in theory have to pick both of them at the same time, and you'd have to do it only after all the other levers are perfectly aligned and held in place by lock tension. This design is also such that if you hit the upper or lower part of the slot, it will jam the lock and you'll have to release some tension and try again.
Here's the broken lock, mostly disassembled.
Here are all the guts. You can see the pile of shims in the lower left corner of this photo.
Unfortunately, the main part of the bolt including the gate were snapped off, so this lock is completely useless for practicing on or using. It did give me a look into some fairly advanced security features I'd never before seen in lever locks before, though.
Locks of this variety are most often found in safe deposit boxes. As you can see, it's often easier to simply use destructive force to open them if you don't have the key.


2009-03-14
Recognition Systems Handkey II
I had a good dumpster diving haul last night. I scored a dome camera (which needs some electronics repair, should be easy) and a Recognition Systems (now owned by Schlage) Handkey II biometric hand scanner. I found one exactly like this several years ago, but ended up refurbishing it and selling it on eBay. Only a small group of people know where I get this stuff.

On the back of the HK-2, a wiring diagram is provided. This device can be used in a network with other HK-2 machines (in slave or master mode), in conjunction with other access controls (badge/card reader and a centralized "brain"), or in standalone mode. The wiring on the back allows you to hook this up to an electronic door latch, magnetic lock or anything else that can be controlled by a relay.

In the lower left corner, there are some DIP switches. As my HK-2 was already configured, I was unable to use it even though it powered on and seemed to be working fine. In the instruction manual (included in the box I found this in!), I found out which switches to flip in order to reset its memory back to default. This allowed me to set it up from scratch just as if I'd acquired it from the manufacturer.

Once it's back to factory mode, setup for standalone mode is a breeze. Users are "enrolled" by providing a user ID number (from 1-10 digits long) and then they're asked to scan their hand three times. It takes only a few seconds per user, so enrolling a fairly large number of people when deploying this solution isn't going to take forever. It is possible to enroll users by their left hand if, for example, they do not have a right hand.
It's worth mentioning that when these devices are used in stand-alone mode, they don't provide that much security. A chintzy, 4-pin cylinder lock holds this device to the wall. If you can pick it (or if you tug hard enough), the HK-2 will flop open and give you access to the wiring and the DIP switches. From there, you can attempt to trip the door relay yourself (using the exposed wires) or you could even de-program the HK-2 and add yourself as the new administrator. Of course, This method would get noticed quickly, as everyone else would be denied access.

The HK-2 uses an array of six very bright Infrared LEDs to cast light onto your hand. The platen is reflective and contains a digital pattern. Also, there is a mirror on the left side of the platen, and a reflective strip to the right side. As far as I can tell from my testing, the HK-2 only concerns itself with the outline and the cross-section of your hand. It does not appear to make a heat map of your hand and blood vessels or anything of that nature.

Once you enter your user ID number, it prompts you to place your hand on the platen as shown in the diagram. All the points lit up with LEDs need to be touched by your finger. Again, if the user enrolled with their left hand, the diagram won't look right but it's still possible to use it.

If the hand placed on the platen is a close-enough match to the enrolled hand, it verifies the hand and grants access. The number below tells you how close of a match your hand is to the enrolled profiles. Smaller is better. If you notice this number getting bigger, you may wish to have the administrator re-enroll you. This can be due to weight gain or loss, growth, or the addition of a ring.

I may have some more to write about this in the future. I'm still tinkering with it for now.
2008-12-28
Cracking Master Thumb-Wheel Padlocks
While on a bike ride today, I found this on the roadside:
It's a Master 175, as stamped into the bottom plate shown below. There are many locks in this series, including shrouded hasp models (177 series) and black coated ones (178 series). Internally, they're all identical. The only thing different is the color and the length of the hasp. Most people know that Master's cheap dial-combination locks are vulnerable to a variety of attacks. These are sold as "construction grade" locks. I figured I could put it to use if I could get the combination. I didn't feel like breaking it apart.
Tension probing
Many thumb-wheel combination locks like this (including the ones you see built-into attache briefcases) have a weakness that allows you to determine the combination by feel. You pull on the hasp or otherwise try to open the lock while spinning the wheels until you find one that is hard to turn. Turn it until it feels like it snaps into place. Move on to the next wheel that is binding, and work your way through them until the hasp opens.
The Master 17x locks don't suffer this vulnerability. Being "construction grade", I suppose that's a good thing. To open the lock, you must enter the right combination, then push the hasp in. If the combination is correct, it will pop all the way out and open. If it's not correct, it'll just retract to its locked position. This makes brute force attacks exponentially more difficult.
Bypass
Another vulnerability with some thumb-wheel locks is a nifty bypass method. If you can trigger the hasp release without entering the combination at all, it'll open for you. This is usually done by wiggling some metal around the thumb wheels to probe the inner mechanics of the lock, then attempt to release the hasp that way. While that's good and well, I want to know the combination so that I can use it. Open or closed, this doesn't do me much good.
Cam probing
This is what I'm interested in. Each wheel has a cam attached to it. These cams have dimples, flat spots or notches which allow the gate to drop into place when the correct combination is entered. As the wheels' clearance between the metal bottom plate is pretty tight, I've opted to use a thin feeler gauge, made for rebuilding automobile engines. These tools are cheap, cheap. I think this one cost me $4 at AutoZone.
Each of these blades varies in thickness. The number on top is in thousandths of an inch, and the number below is in thousandths of millimeters. I found that the .0015" was simply too flimsy (it's about as thick as a sheet of aluminum foil, but made of steel and much stronger), so I went with the .002".
I had to do some tinkering. For starters, I didn't know which side of the wheel to probe, so I started with the left side. There's a ridge around the thumbwheel that keeps the feeler from going in more than 1/10" or so. I wiggled it around and eventually got it in between the metal plate and the thumbwheel, and inserted as far as it would go. Then, I started carefully turning the wheel while gently pressing the feeler inward. This promptly got me nowhere. I couldn't feel anything happening at all.
I moved to the right side of the thumbwheel, and I had it! I still had to weasel in around the ridge of the thumbwheel, though.
Note that the feeler is not sticking in very far. You can see the rounded edges of the feeler.
While turning the wheel, the feeler dropped noticably into place (in the middle of 2-3 on the 3rd wheel as shown), and I could feel it getting pushed back out if I tried to spin the wheel further.
Note the peculiar location of the flat spot on the cam. It's between two numbers on this model. That will help us in a moment.
Find all of the flat spots and jot them down, in my case, it was:
5/6, 7/8, 2/3 and 5/6
In this position, it shouldn't surprise you that my lock didn't open.
The gate is usually 90 degrees or 180 degrees from the wheel alignment mark. That means it's either directly opposite the alignment mark, directly above the wheels, or directly below them. Given that the flat spots were between two numbers, this rules out the gate being opposite the alignment mark. Turning the wheels 180 degrees would land them at: 0/1, 1/2, 7/8, and 0/1, which isn't really a combination Master had in mind.
I chose to rotate all of them 90 degrees upward, toward the lower numbers. Starting with the dials at the position you wrote down:
Nudge all four dials upward to the number that sat below the alignment mark
Then move all four dials upward two more spots (decreasing numbers unless you start at 0)
Press the hasp in, and it opens!
Similar methods work on a large number of locks. You just have to tinker. Now you know how almost all thumb-wheel padlocks work!
In Review
The instructions for cracking a lost/forgotten/unknown combination on a Master 17x series thumb-wheel padlock:


- Hold the lock with the bottom plate facing you and the numbers right-side up.
- Use a feeler gauge (I used .002") between the right side of the thumbwheel and plate.
- Carefully turn the thumbwheel while applying gentle pressure on the feeler gauge.
- Write down where the feeler sinks into the lock deeper. It will always be between two numbers on 17x locks.
- Turn all four wheels to the locations you wrote down.
- Turn all four wheels upward to the number on the bottom of the split.
- Turn all four wheels upward two more whole numbers.
- Press hasp in to open
2008-10-01
A Peek Inside A Simple ATM Machine
This article is a derivative of an article I wrote a while back ago, which was published in 2600: The Hacker Quarterly 22:3 (Autumn 2005). If it looks familiar, that's why.
In [2600 Magazine] issue21:4, I discussed the workings and "unofficial" reset method for
LaGard ComboGard vault locks. [Also archived on HiR] This time, I've got a whole ATM to work with.
The ATM I scored is a Diebold CashSource+ 100. This is one of those smaller
indoor ATMs that you would find inside a convenience store. It features a
monochrome LCD, eight option keys beside the screen, a number pad with four
function keys (Shift, Cancel, Clear, and Enter) receipt printer, slots for
one cash box and one "reject" box. The card slot is a horizontal swipe-through
under the screen. There's a single five-tumbler lock on the front door. Once
opened, you're given access to 3 things: The combination dial, the vault door
bolt control, and a pair of buttons that let you swing the top compartment
upwards.
Once you squeeze the buttons together and swing the top compartment open,
you're given access to the printer, the main power switch, the modem, and some
Macintosh-style serial cables plugged into the backside of the LCD/Keypad.
The printer uses standard thermal receipt paper, and there's only one printer,
so there's no "live" paper audit trail. I'd imagine it's stored in memory, but
it may not keep an audit trail at all. The modem in my ATM is a generic 33.6k
serial modem. When I power the unit on, it attempts to dial the mother ship,
but I am not curious enough to hook it up to a phone line to see what happens.
Of course, all the interesting stuff is held within the vault. On my CSP-100,
the vault lock was a LaGard 3332-3, which is a 3-number (0-100) mechanical
combination lock with wires that can be used for sensing bolt position and
a "duress" combination. These wires on my ATM were simply wire tied and un-
used. A duress combination is the combination you dial in when you're being
forced against your will to open the vault. To activate duress mode, you dial
in the combination normally, except the last digit, you dial to the "change"
index, which is another mark about 20 degrees to the left of the "open" index.
This causes a plastic arm inside the lock to trigger the duress switch.
The duress wiring (white and blue wires) can be used in combination with a
silent alarm or telephone dialer to notify the police or an alarm monitoring
company. The bolt position switch that I mentioned (red and black wires)
operates in the same way, but is triggered whenever the lock is opened
regardless of duress mode. This can also be used with an alarm system or
with a buzzer so that an audible alert is heard when the vault is opened.
This lock can be easily replaced with one of many combination locks on the
market, including electronic combination locks such as the LaGard ComboGard
I wrote about in 21:4, Kaba Mas (or Mas Hamilton) Cencon S2000 or Auditcon.
The combination on the existing mechanical lock can also be changed, provided
you have a change key, which my ATM came with, taped to the vault door.
Detailed combination changing instructions are available from LaGard, I found
them by Googling for: change combination instructions group 2m
Once the correct combination (or the duress combination) has been entered,
the other knob will turn, which retracts the locking bolts that hold the door
shut. Once that knob is turned, the door opens, and you've got full access to
the cash boxes, reject box, the main power supply, control board, combination
lock housing (for changing the combination using a change key) and the
conveyor belt that moves the money around. The reject bin is where money goes
that comes out of the cash box "out of spec", that is, multiple bills stuck
together, comes out at an angle, folded, or damaged. There are several kinds
of cash boxes. The one that came with my CSP-100 was a locking cash box that
had a red/green tamper indicator on it. The locks on my reject box and cash
box were both operated by the same 7-pin cylinder key. The tamper indicators
will trigger at almost any sign of forced entry including simply removing them
from the ATM. The boxes can not be re-inserted when the indicator is red, and
the key is needed in order to clear the indicator.
The ATM knows what kind of cash boxes are inserted by means of an array of
buttons inside the ATM that are operated by plastic nubs on the back of the
cash box. I do not know what the coding is, but the reject box had its
plastic nubs in a different pattern than the $20 cash box that my ATM came
with. Most cash boxes can hold upwards of 2,000 bills (2,500 if they're
fresh, crisp, new bills), so a fully loaded cassette of $20 bills could store
up to $50,000. It's doubtful that you would see an ATM of this puny stature
loaded with more than a few thousand dollars at any given time, though.
Pressing the small blue button on the lower front of the inside frame of
the ATM allows allow you to firmly yank the innards out on a rolling rail
system. This gives you better access to the money conveyor belt system,
the main system board, the sides of the cash box area, and the main power
supply.
The vault is made of heavy guage steel, which probably is the main reason that
this thing is so heavy. I certainly see why not very many ATM's get stolen.
They might look small and easy to manage, but you would need 2 or 3 men and
a pickup truck to make a successful and timely getaway with this small ATM,
and good luck getting the vault opened up. It would certainly be more
trouble than it's worth.
I have not even tried to get into the ATM's diagnostics or settings yet. There
are no power outlets in the storage unit I'm keeping the ATM in, so I'll have
to move it somewhere else to continue tinkering beyond the mechanical realm.
Given the severe lack of external controls (and a user or installer manual),
I am thinking that the setup/maintenace process needs to happen either over
the on-board modem, or with an external device such as the ATM programmers
I've found in the dumpster before. I can't see where I'd hook such a device
up, though.
That's the mechanical breakdown of a simple ATM. As I experiment some more,
look for another article on programming, setup, auditing, and diagnostics.


2008-08-12
Post-DefCon
Wow. I'm still on the mend from the crazy weekend. Even though it's already Tuesday, I lived through today with a serious case of the Mondays. The arid environment in Las Vegas combined with lack of proper water intake, lack of sleep, lack of food, excess of alcohol consumption and some travel woes really put a damper on my week so far.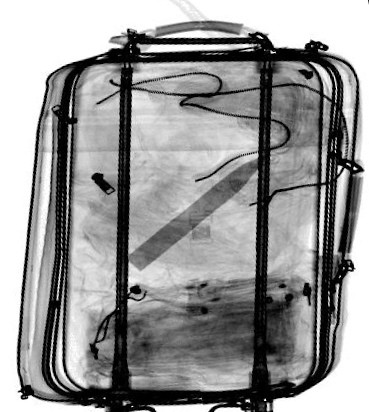
At the end of my airport post last Thursday, I made a reference to an article I was writing in regards to smuggling lockpicks in my carry-on luggage. Also, I've been promising the guys at i-Hacked that I'd be willing to write some stuff for their site on occasion.
I delivered on both promises yesterday with my first i-Hacked guest post: Sneaking Lockpicks past the TSA in carry-on luggage. Within half a day, it already got the attention of Security Monkey and was posted on IT Toolbox. Then, it got submitted to Digg, although it's still a far cry away from hitting the front page. Feel free to Digg it up. Today, Network Security Podcaster/Blogger Martin McKeay posted his own take on getting lockpicks back home safely and his technique (used last year coming home from ShmooCon) is pretty similar to the one I came up with. I guess I wasn't expecting this much buzz about it.![]() In other news: while at DefCon, I was talking to Jur1st. He's the founder of Cowtown Computer Congress, a group that is striving to unite all the small yet talented cliques of hackers, geeks, and user-group-goers in Kansas City. Meetings are held every Thursday. More info can be found on their site. The current big project is establishing a hackerspace in Kansas City. Hackerspaces are buildings that members can use for user group meetings, collaborative projects, lab testing and social events. Every hackerspace is unique to suit the needs of its patrons, so it should be interesting to see how this one plays out.
In other news: while at DefCon, I was talking to Jur1st. He's the founder of Cowtown Computer Congress, a group that is striving to unite all the small yet talented cliques of hackers, geeks, and user-group-goers in Kansas City. Meetings are held every Thursday. More info can be found on their site. The current big project is establishing a hackerspace in Kansas City. Hackerspaces are buildings that members can use for user group meetings, collaborative projects, lab testing and social events. Every hackerspace is unique to suit the needs of its patrons, so it should be interesting to see how this one plays out.
I find it fascinating that the 2600 meeting that most of the HiR guys have attended since the mid-90s (I've attended regularly since '93) actually has a little bit of stigma attached to it. Our little "splinter cell" (as other Kansas Citians are calling us) has remained consistently small for the last 5 or 6 years, with 5 religiously regular Attendees (Frogman, Asmodian X, c0g, Dan and myself) and as many as 5 visitors per meeting who we see infrequently. Average age is mid-30s but only because c0g is fucking up our average. :P
I'm pretty stoked to start taking part in the Congress. There's actually a lot of talent in KC. We're just too jaded and cliquey to see the others. I really hope CCCKC fixes that.
I promise to start posting some details on the talks I went to as soon as I start feeling more like a human.
2008-07-28
HiR Reading Room: No Tech Hacking
Johnny Long has been around as an info-sec writer and presenter for a while. In No Tech Hacking, he takes the reader through some of his twisted adventures, flippantly poking fun at some of the "security" he's encountered along the way.
When it comes to penetration testing and security awareness in general, there's a pretty massive human element that's simply ripe for the picking. There's also a lot of low-tech stuff that can be leveraged to your advantage. For many, the obvious first move on taking over a network is enumerating your target with ping sweeps and port scanners. If you want to get into a building, you might brush up on your lock-picking skills or reach for a brick to throw into a window. While these techniques have some kind of merit (not always good), it's often more effective to go low-tech (or No Tech!) as much as you can.
Johnny covers his low-tech tricks in detail and often with photos and screen shots. It's more than just social engineering and tailgating to get your mark. It's about thinking through info-sec problems with a different mindset than you're probably used to. Profile your targets and pay attention to seemingly useless details.
From bypassing locks to using exposed information via the Internet, people watching to vehicle profiling: there's a lot of low-tech information contained in this book, and you're almost guaranteed to learn something you hadn't thought of before.
No Tech Hacking closes with some sage advice to would-be no-tech victims. It was an entertaining and informative read. I hope I can see Johnny speak one of these days. He won't be talking at DefCon this year, but maybe he'll be there.
2008-07-13
Make your own lock picks - Part 3
Series: Make your own lock picks
Part 1: Grind out a simple lock pick
Part 2: Make a tension wrench
Part 3: Advanced lock pick profiles
In this series, I'll show you how to make a set of high-quality lock picks from stuff you either already have laying around the house, or materials that are easy to acquire for cheap.
This is the third part of the series, where I will discuss some more advanced lock pick designs and what purpose they serve. You can use these templates to grind out your own lock picks using the skills you learned in Part 1.
I actually made a few more picks the same night that I wrote Part 2.
Left to right: Small diamond rake, medium hook pick and multiple peak bogota-style rake.
The Bogota rake was made from one of the leftover wiper rails. The others were made from street sweeper bristles.
As a general rule, any pick with a single curve (called a "hook") is designed for single-pin picking. This is where the locksmith applies light tension to the cylinder, feeling for which of the pins in the lock is binding. The binding pin will be harder to move than the others. Applying gentle pressure to that pin should push it up to the shear line. A distinct sensation will be felt through the tension wrench when this happens. Then, the locksmith finds the next pin which is binding. This process goes on and on until all pins have been set and the plug rotates, unlocking the lock.
Any pick with multiple peaks or odd shapes are called "rakes" or "jigglers". While applying tension with the tension wrench, these rakes are used to try to jar the pins to the shear line quickly. This technique has several advantages and several disadvantages. As a general rule, it works quite effectively on cheap locks like what you find on filing cabinets or low-end Kwikset door locks.
Here's a thread on LockPicking101.com with some excellent photos of real lock picks with rulers to help you scale them. These profiles can help you cut out some more advanced pick designs.
The most basic way to copy a lock pick profile like this is to wing it and go by sight. This works for some of the more basic hook pick shapes quite well.
For more intricate rake designs meant to exploit pin spacing, it's advised to print the pick template out at a 1:1 ratio (actual size) on paper and use it as a real template to cut with. There are a few ways to accomplish this. You may cut out the shape with a precision knife or razor such as an X-ACTO, and glue it to the pick media of your choice. As heat can destroy paper, and water (quenching) can separate glue, this can be a tricky process. You can also cut the template out and use it as a stencil, and paint your pick media with a high-temperature spray paint. Alternatively, you can just go slow and frequently hold the template to your pick to see how close you're getting.
One fascinating technique I haven't put any of my own research into involves electrochemical etching. I haven't personally seen the results, but if you sand the factory paint off of a hacksaw blade, then use a robust spray paint (like underbody paint from the auto parts store) to paint the stencil design onto the blade, you can use a power supply to energize a saltwater bath which will eat away all of the exposed metal. This should, in theory, leave a pick-shaped piece of hacksaw blade in the saltwater. I honestly don't feel right going into the specifics of electrochemical etching of steel here without having tried it myself, but there's a lot of information on the web about it. A fellow lockpicking enthusiast sparked this technique and linked to an article about making reed valves for two-cycle engines with EC Etching. If I get around to trying it myself, I'll let you know how it goes.
Series: Make your own lock picks
Part 1: Grind out a simple lock pick
Part 2: Make a tension wrench
Part 3: Advanced lock pick profiles

2008-07-10
Make your own lock picks - Part 2
Series: Make your own lock picks
Part 1: Grind out a simple lock pick
Part 2: Make a tension wrench
Part 3: Advanced lock pick profiles
In this series, I'll show you how to make a set of high-quality lock picks from stuff you either already have laying around the house, or materials that are easy to acquire for cheap.
In the second part of this series, I will show you how to make a tension wrench. Tension wrenches are usually made of spring steel. They're inserted into the keyway with the lock pick to apply a slight amount of turning force to the lock cylinder. This helps the locksmith feel when the pins hit the shear line, and keeps set pins from falling back down. It's difficult (and silly) to even try picking a cylinder or wafer lock without a separate source of tension, so this should be considered a must-have tool.
Tools and things you will need to follow along doing it my way:
- Beer (very important, or not. But good to have)
- A rotary tool such as a Dremel would be helpful
- Grinding discs for the dremel
- Two pairs of pliers or adjustable crescent wrenches
- Diagonal Plier Cutters (Dikes)
- Eye protection
Making tension wrenches from windshield wiper blades:
I thought I was going to have to go dumpster diving on my way home from work this afternoon to find an old wiper blade in the trash bin behind some car parts store. As luck would have it, I found some old blades in the middle of an industrial park on my way home. They'd been run over and mangled, but that's okay.

Using pliers, remove the blades and the metal rails around them.

Here are the parts we're after. They look a lot like those street sweeper bristles, don't they? You can throw away the rest of the wiper blade and arm assembly.

Using pliers, bend the wiper blade rail as shown. Bent this way, the long part will act as a spring to give us more control over the tension applied to the lock cylinder when we go to use it.

Break out the dikes and cut off the excess length of rail.

One wrench is bent at about 90 degrees. The other one is a bit more obtuse than that. The obtuse angle wrench will come in handy once in a while.

If you wiper blade rails didn't have the narrow spot toward the end like mine did, then treat the wiper rail as a street sweeper bristle.
Making a tension wrench from a street sweeper bristle:
First, using pliers or crescent wrenches introduce a 90 degree twist at the end of the bristle about 3/4" from the end.

Start twisting...

And voila!

Next, gently introduce a light and round bend to the end of the bristle. If you crease too hard, it will crack and you'll need to start over again.

The wrench should now look like this:

We don't really need to polish the tension wrench, as it won't need to glide softly past the pins or tumblers in the lock the way the individual picks do. You may wish to grind any sharp edges off, though:

Here we have the small diamond rake pick and the three different tension wrenches.

Bonus: you can make tension wrenches out of girly things such as hairpins or the underwire out of an old bra.

Series: Make your own lock picks
Part 1: Grind out a simple lock pick
Part 2: Make a tension wrench
Part 3: Advanced lock pick profiles
Subscribe to:
Comments (Atom)


