
In the third part of this series, I'll cover using DNS2TCP on unix-like operating systems. DNS2TCP is not written in perl. It's a set of small C programs. It can tunnel multiple types of traffic, as opposed to OzymanDNS which is designed to be used as a Proxy Command for SSH.
Compiling is straight-forward once you download it. This worked on all platforms I tried it on, which includes Ubuntu Linux, OpenBSD, and Mac OS X.
$ tar xvfz dns2tcp-0.4.3.tar.gz
$ cd dns2tcp-0.4.3
$ ./configure
$ make
$ sudo make install
Assuming that you have a valid subdomain nameserver (as outlined in part 1), you just need to edit the configuration file for the "dns2tcpd" server. There's an example file "server/dns2tcpdrc" in the archive that I've modified. Of particular note, make sure to change the "listen" line to 0.0.0.0 or your ethernet interface's IP address. The default configuration will not work because it listens only on localhost. Also, make sure that the "domain" line matches your subdomain. Finally, you must make sure that the chroot directory exists. This is where dns2tcp caches its data. The "ressource" lines are intentionally mis-spelled. The author of this tool lacks proper English grammar skills. That's okay, just keep it in mind. "ressource" lines have the format:
ressources = [resname]:[ip]:[port], ...
My config looks like this, for Squid and SSH:
# config file
listen = 0.0.0.0
port = 53
user=nobody
chroot = /var/empty/dns2tcp/
domain = l33t.h-i-r.net
ressources = ssh:127.0.0.1:22 , proxy:127.0.0.1:3128
Then, run it as follows:
$ sudo dns2tcpd -f /path/to/dns2tcpdrc
or, if you wish to also run it in the foreground for use in a screen session, add the -F flag:
$ sudo dns2tcpd -F -f /path/to/dns2tcpdrc
That's it for the server side.
Now, on the client end, compile and install dns2tcp as well. Configure the "dns2tcprc" file. Unfortunately, it can only be configured with one "ressource" at a time. I am going to use SSH with dynamic proxy again.
#
# configuration :
#
domain = l33t.h-i-r.net
ressource = ssh
local_port = 2222
debug_level=1
I've found that this tunnel software can take a while to fully work. Sometimes up to five minutes. Once it catches on for the first time, though, it seems much more stable and quick than OzymanDNS on the same platforms. Launch it like this:
$ dns2tcpc -f /path/to/dns2tcprc [DNS Server]
Where DNS Server is a DNS server you can access, and probably should be the one you were issued by DHCP.
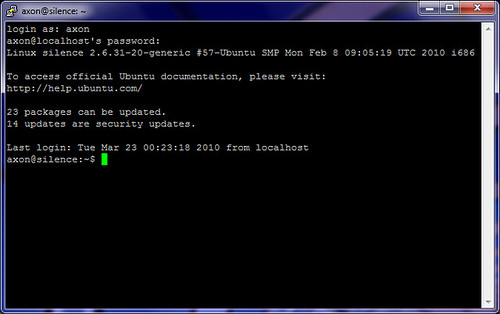
Activate the SSH tunnel from the CLI:
$ ssh -C -p 2222 -D8080 user@localhost
In the screen shot below, you can see both the SSH session and the dns2tcp client window open.
Again, configure Firefox to use the dynamic port you specified above as the proxy on localhost.
After this, you should be in action!
DNS Tunneling Series:
Part 1: Intro and Nameserver setup
Part 2: Windows Clients (using ozymandns)
Part 3: Linux, BSD and Mac OS X clients (using DNS2TCP)
2010-03-23
DNS Tunneling Part 3: Linux, Mac OS X and BSD clients


DNS Tunneling Part 2: Windows Clients
Of all the tools I tried to get working, Dan Kaminsky's OzymanDNS was the only one I could find that actually works for Windows. Maybe there are others out there (link to them in the comments!) but I didn't find any at a glance. Also, Doxpara seems to be down, so here's a mirror of the source package for Linux/Unix/BSD/OS X.
This is generally okay, because OzymanDNS is a fine solution in and of itself, even if it hasn't been updated in five years or so. OzymanDNS server runs fine on Mac OS X, Linux, and BSD. It's all in perl, and heck, it might even work under cygwin on Windows. I haven't bothered trying. I'm using Linux as my server for ozymanDNS.
I did have to perform the following actions before OzymanDNS would run:
sudo perl -MCPAN -e install Net::DNS
sudo perl -MCPAN -e install MIME:Base32
This installs the DNS and Base32 perl modules that Kaminsky's scripts need.
Next, keep in mind the name you chose for your subdomain name server if you followed along in Part 1. You'll need that here. SSH to your server and start ozymanDNS. Keep in mind you'll need to leave this process running while you're on the road. I launched it inside a GNU Screen session so that it could run in the background and I could re-attach to it when I want to. The syntax is:
sudo ./nomde.pl -i [your external-facing IP] [your subdomain name]
Someone made executables of these tools for Windows. You can download the Windows version of OzymanDNS (as well as putty and some DLLs) here. I recommend copying the DLLs and droute.exe into your path somewhere, like C:\Windows\System32 for example.
Once you're on the road and need to tunnel, configure putty. Click the screen shots below for full size.
Connection/Proxy, select the "Local" radio button, the "Consider proxying local host connections" check box, and enter "droute -r [DNS Server] sshdns.[your subdomain]" as shown below. DNS server should probably be whatever DNS server you were assigned via DHCP (use "ipconfig /all" from a command window) - I really don't know why you need something prefixed to your subdomain for ozymanDNS to work, but I always use "sshdns".
Switch to the Connection/SSH option in the configuration tree and enable compression.
Next, set up a Dynamic tunnel on port 8080 (or whatever you want) as displayed below. Then finally go back up to "Session"and connect to Localhost port 22. Since this is a lot of work, I'd advise you to type something like "tunnel" into the "Saved Session" box, and save it. This will save you a lot of hassle down the line.
If all goes well, you'll be prompted to verify the SSH key for the connection, and then be allowed to log in. You'll also have a working Dynamic SOCKS tunnel thanks to this session. Again, I should remind you that this method of tunneling can be slow by nature of how DNS works. Tunneling more traffic over it, via SSH tunneling will be even slower. We try to mitigate that with Compression above, but it only helps so much.
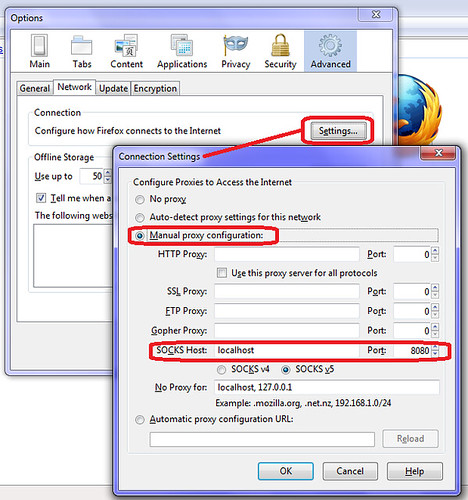
Now, configure Firefox to use the dynamic proxy. Tools/Options, Advanced, Network, Connection Settings. Use localhost for the SOCKS proxy host, and set the port to the one you configured in Putty.
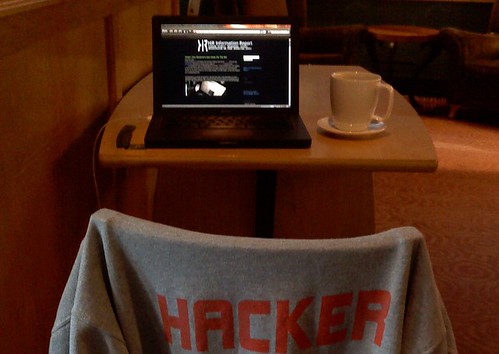
The final test is to make sure that we are actually going through the tunnel. I chose the old standby WhatIsMyIP.org.
I won't cover using ozymandns under Linux or BSD, but it works well enough. Use this on the client end to get a dynamic SOCKS proxy on port 8080.
ssh -D 8080 -o ProxyCommand="/path/to/droute.pl -r [DNS Server] sshdns.[your subdomain]" user@localhost
DNS Tunneling Series:
Part 1: Intro and Nameserver setup
Part 2: Windows Clients (using ozymandns)
Part 3: Linux, BSD and Mac OS X clients (using DNS2TCP)


DNS Tunneling Part 1: Intro and Nameserver setup
I know it's not new, but the fact is that DNS tunneling just works when a lot of other egress methods fall flat on their faces. I've been playing with DNS tunneling in earnest for the past few weeks, since I don't really have much better to do.
So, why does DNS tunneling work, anyway? First, let's look at the two main environments where you'd be likely to use DNS tunneling: Captive portals and enterprise web filters.
Most captive portal systems (as found in coffee shops, hotels, airports) block all IP to external hosts until you've paid, accepted the terms of service, or enter a valid code that a customer service rep gives you. They often employ a transparent http proxy to redirect you to the captive portal's main interface, via meta refresh or HTTP 3xx redirect.
Most enterprise web-filters work by providing a SOCKS or HTTP proxy, and not allowing direct HTTP or HTTPS connections out from employees' workstations. If the content isn't allowed by the filter, the proxy returns an error message to the users.
Some hospitals I've visited use a hybrid of these technologies: employing both transparent proxies and web filtering. Generally, captive portal operators have very little recourse aside from banning you, if you get caught tunneling. People get fired for pulling these tricks with employers. As always: use this stuff wisely.
Now comes the fun part: DNS still works, more often than not, in both of these situations. To test it, try doing an nslookup on a popular domain. If it doesn't return a "private" RFC 1918 IP address (192.168.0.0/16, 172.16.0.0/12, 10.0.0.0/8), then there's a good chance DNS tunneling will work.
While you can't connect via UDP to any external servers, your computer can usually make requests against an internal DNS server all day long. When you tunnel via DNS, you are using a client program that encodes data into DNS requests, all of which are designed to go to the DNS server you configured earlier in this article.
The first and hardest part for any of us, is getting our "server" (at home, co-located, or what have you) set up as an authoritative name server for a subdomain. It's also necessary that DNS traffic (UDP Port 53) can get to your server. You'll have to configure that in your own firewall (at home) or check it with your provider. In my case, I'm running this in my DMZ with external-facing IP addresses and no firewall rules running on the router itself. I'm using no-ip.org for dynamic DNS to my home environment.
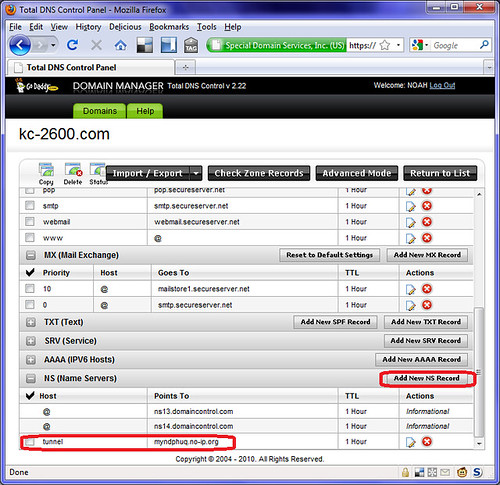
To add a subdomain name server, first you have to buy a domain and have primary nameservers. Most registrars allow you to fiddle with your DNS. For example, Godaddy's "Total DNS control" panel allows you to easily add a sub-domain name server. In this example, I'm editing kc-2600.com and adding a subdomain of "tunnel" and pointing its name server record to my dynamic DNS. If you have a static IP, you can specify this as well.
I did something similar on ZoneEdit:

This really is the hardest part. Once you do this, you have to wait a while for the record to propagate to the root servers. But then, you're home-free. All of the tools I'm about to introduce you to will work just fine once you have your own authoritative subdomain nameserver record.
DNS Tunneling Series:
Part 1: Intro and Nameserver setup
Part 2: Windows Clients (using ozymandns)
Part 3: Linux, BSD and Mac OS X clients (using DNS2TCP)
2010-03-11
Teaser: Cory Doctorow's new novel, For The Win
It was an odd bit of coincidence this morning. Frogman had shared a story with me from Boing Boing: 200 advance-release promo copies of Cory Doctorow's newest novel, For The Win, are being given away to teenage gamers to review. I should mention that I am thankful to have a few friends who skim Boing Boing for the really awesome and interesting stuff. There's far too much content for me to wade through in my RSS reader, so folks like Frogman are my Boing Boing filter.

The end of an era: SecurityFocus
SecurityFocus announced in a memo yesterday that it would, for the most part, cease operations.
2010-03-06
Ye-olde tech: Slide Rule
Even though this virtual slide rule is full of actual win, you can buy a real (if chintzy) slide rule for cheap from ThinkGeek.

2010-03-01
0x0d - Happy Birthday, HiR!


