At work, I frequently deal with both UNIX and Windows servers. My UNIX background has taught me to avoid logging in to systems -- even workstations -- with an administrative account unless you really need to use the power, even if you're a sysadmin. This works really well until it's time to start managing enterprise-wide settings like AD, DNS and DHCP. There are a variety of ways to solve the problem. Most places provide sysadmins with a user-level account and then an administrative-level account. You can log off from your workstation and log in with a domain administrator account to manage things. That's a genuine pain. You can remote desktop to a domain controller and log in with your admin account. You can even set up a terminal server with RSAT and other useful tools, and have your admins log in to that for routine enterprise maintenance.
Alternatively, you can install Remote Server Administration Tools onto Windows 7 Enterprise, and using a few quick tricks, you can have all of the MMC Snap-Ins you like at your fingertips, while still using an unprivileged domain account on your workstation. Once you get RSAT installed, you may need to also use "Programs and Features" to enable the Remote Server Administration Tools roles or its sub-roles as desired.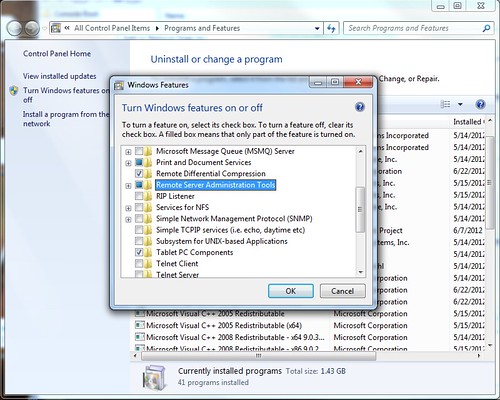 After installing RSAT, you'll notice an "Administrative Tools" item in your start menu, but the tools won't work unless you have domain admin privileges.
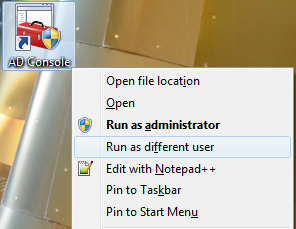
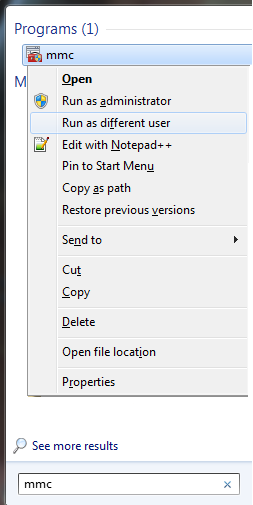
There's a trick to launching an authentication prompt before running any program on Windows. Hold shift, then right-click the program, and select "Run as different user." While you can do this to any of the Administrative Tools items in the start menu, We're going to use this trick to launch the Microsoft Management console so that we can make life even easier. Hit Start, then use the search to find mmc.exe. Hold shift. Right click it. Run as different user.
After installing RSAT, you'll notice an "Administrative Tools" item in your start menu, but the tools won't work unless you have domain admin privileges.
There's a trick to launching an authentication prompt before running any program on Windows. Hold shift, then right-click the program, and select "Run as different user." While you can do this to any of the Administrative Tools items in the start menu, We're going to use this trick to launch the Microsoft Management console so that we can make life even easier. Hit Start, then use the search to find mmc.exe. Hold shift. Right click it. Run as different user.
 Here, provide a domain administrator account. If you have UAC enabled (as you well should!) you'll be asked if you wish to allow mmc to make changes to your computer. Obviously, you do.
Once MMC is running, select "Add/Remove Snap-Ins" from the File menu. Here, you'll be able to load up a bunch of the individual modules from Start->Administrative Tools all into one MMC window.
Here, provide a domain administrator account. If you have UAC enabled (as you well should!) you'll be asked if you wish to allow mmc to make changes to your computer. Obviously, you do.
Once MMC is running, select "Add/Remove Snap-Ins" from the File menu. Here, you'll be able to load up a bunch of the individual modules from Start->Administrative Tools all into one MMC window.
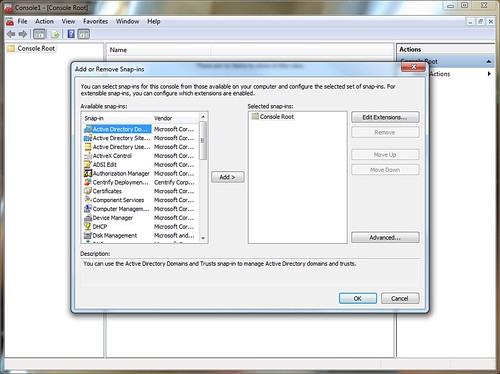 Once you have selected the tools you use frequently, you'll have a tree view of your favorite utilities, kind of like this:
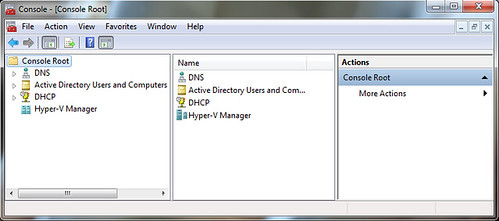 Be sure to connect the individual snap-ins to the servers you need, if they require it (Hyper V, DNS and DHCP in the above example need to connect to other servers) and once you have everything configured the way you plan to use it, use the File-> Save menu to stash the configuration file somewhere handy, such as on your network profile or hard drive.
I opted to create a shortcut on my desktop that launches mmc.exe C:\console.msc and I titled it "AD Console." When I run it, I have to remember to launch it with my domain admin account using the trick above. Now, taking care of the day to day tasks on the enterprise is simple.
Be sure to connect the individual snap-ins to the servers you need, if they require it (Hyper V, DNS and DHCP in the above example need to connect to other servers) and once you have everything configured the way you plan to use it, use the File-> Save menu to stash the configuration file somewhere handy, such as on your network profile or hard drive.
I opted to create a shortcut on my desktop that launches mmc.exe C:\console.msc and I titled it "AD Console." When I run it, I have to remember to launch it with my domain admin account using the trick above. Now, taking care of the day to day tasks on the enterprise is simple.