Michael Santarcangelo, II has given us (the community) a generous gift. A while back, I wrote a review about his book, Into The Breach.
Today, he authorized HiR Information Report to give you access to the e-Book version for free.
Simply order the book online, then apply coupon code: hir31337
You can also purchase hard copies (and ask for an autographed one) as well. While you don't have to agree with Michael's take on things, It's a good read that might change the way you and your managers think about breach of data in the enterprise.
Thanks, Michael!
2008-11-30
A generous gift - Into The Breach
Reverse Tunnel with SSH
Inspired by a thread on the Hak5 Forums...
Sometimes, you might find yourself wishing you could poke arbitrary holes through a NAT or firewall. The potential uses (both good and evil) are nearly limitless. Perhaps you want to be able to log in to the computer in your dorm room while you're a thousand miles away on vacation with family.
You will need a few things before we start:
- Physical access to a computer on the "inside" of the network
- Access and permission to install software on that computer
- A system on the "outside" that can accept SSH connections from the Internet
I'll be using NetBSD on my SparcStation 20 on the inside of the HiR Lab, and one of my web servers with a public IP address on the outside.
SSH Tunneling is the process of encapsulating some other protocol within an SSH session. There are many advantages to this. Essentially, if you can get out of a network with SSH, you can get to almost any TCP service on the outside world, even if it's blocked.
Reverse SSH Tunneling is a similar process. If you can get out of the network with SSH, you can use that SSH tunnel to spawn a listening process on the outside of the network, from which you can get to anything internal.
Step One: Deploy SSH keys without a password
This has to be done from the "inside" computer. You can use your personal desktop system or a server where you have an account. It must be able to SSH out to the Internet.
I don't like to use public keys without passwords, but they do come in handy, particularly for tunneling. The un-protected public key should only be placed into the authorized keys list for UN-TRUSTED accounts that aren't in the wheel group or sudoers file.
I wrote about using passwordless SSH keys before. If you're using a UNIX variant, just follow the first few steps on generating and distributing the ssh keys. If you're using Windows, install PuTTy and follow the steps that Steve Friedl put together.
Step Two: Create and test your tunnel
I wrote a little about tunneling (forward and reverse) back in February. In this case, I'm going to tunnel SSH over a reverse SSH connection -- that is, I'm going to SSH from my inside box (NetBSD) to the web server (betaweb.h-i-r.net), and tell SSH to open a reverse tunnel port (2222) on the web server that connects to the SSH port on the NetBSD box (localhost:22). The -g option allows any remote host to use the tunnel. Otherwise, it will bind only to the localhost interface.
[axon@NetBSD]$ ssh axon@betaweb.h-i-r.net -g -R 2222:localhost:22Now, from anywhere in the world that can access port 2222 on betaweb.h-i-r.net, I can SSH through my home NAT to get to the internal NetBSD box:
Last login: Sun Nov 30 14:13:08 2008 from netbsd.labs.h-i-r.net
[axon@betaweb.h-i-r.net]$
Chimera:~ axon$ ssh -oPort=2222 axon@betaweb.h-i-r.netYou don't need to reverse tunnel to localhost, and you could just as easily use this trick to reverse-tunnel your e-mail (POP/IMAP), VNC to a Windows/Mac desktop or even to an internal web proxy server.
Password: [my password]
Last login: Tue Oct 14 19:01:57 2008 from localhost
NetBSD 4.0.1 (GENERIC) #0: Wed Oct 8 01:06:02 PDT 2008
Welcome to NetBSD!
[axon@NetBSD]$
Step 3: Automate!
If you just leave the SSH tunnel up and running, it won't likely last too long because of session timeouts. You'll need some process to start the tunnel. Here's where you can get creative. Obviously, a process involving the use of cron or at would be one way of going about it. A script running in the background (with nohup) or in a screen session could also take care of things nicely. One idea I had was to set up fetchmail to check a dummy e-mail account every 5 minutes or so. If there's new mail, it initiates the tunnel. Send mail. Wait. Tunnel. Another way would be to upload a file to a web or ftp site to trigger it. You could even make it read information from that file to create the tunnel for different protocols. I opted to create a configuration file on the web server that would be downloaded and used.
On the "inside" box, I created this script and called it tunnel.sh:
#!/bin/shThen, I added this to my crontab:
ssh betaweb.h-i-r.net rm .tunnel
args=`cat .tunnel`
rm .tunnel
ssh $args
*/5 * * * * scp axon@betaweb.h-i-r.net:.tunnel ~/.tunnel && ~/scripts/tunnel.shEvery five minutes, it will try to scp a file called ".tunnel" from the "outside" box. If it was successful, it runs the tunnel.sh script.
The tunnel.sh script removes the .tunnel file from the remote box (so that it doesn't try to spawn multiple tunnels every 5 minutes) and then uses the contents of .tunnel as the arguments for ssh.
I create a file on my laptop named ".tunnel" and add the following:
axon@betaweb.h-i-r.net -g -R 2222:localhost:22 sleep 600Then, I upload it to the location and wait about 5 minutes. Then, I ssh to port 2222 of betaweb.h-i-r.net. The "sleep 600" is executed on the remote end, which means it will only stay connected for 10 minutes (600 seconds).
Tada!
chimaera:~ axon$ scp .tunnel axon@betaweb.h-i-r.net:
axon@betaweb.h-i-r.net's password:
stdin: is not a tty
.tunnel 100% 58 0.1KB/s 00:00
[ wait 5 minutes ... cue Jeopardy theme song ]
chimaera:~ axon$ ssh -oPort=2222 axon@betaweb.h-i-r.net
Password: [my password]
Last login: Tue Oct 14 23:24:10 2008 from localhost
NetBSD 4.0.1 (GENERIC) #0: Wed Oct 8 01:06:02 PDT 2008
Welcome to NetBSD!
[axon@NetBSD]$
Considerations and Risks:
I've already stated that using public keys without a password is risky business.
The other shady business is directly executing anything using arguments pulled from some file on a remote server. All it would take is "; [insert evil command here]" added to the .tunnel file and havoc can potentially be wreaked on that internal box.
If you can get away with it, BY ALL MEANS use separate accounts that are not used for anything other than this tunneling process. Lock them down as best you can and be mindful of local privilege escalation attacks.
See? This is why admins put firewalls up in the first place. And don't go pointing your finger at me if you get in trouble for unauthorized tunneling.
2008-11-28
We've got cards, yo! (and 2600 This Friday)
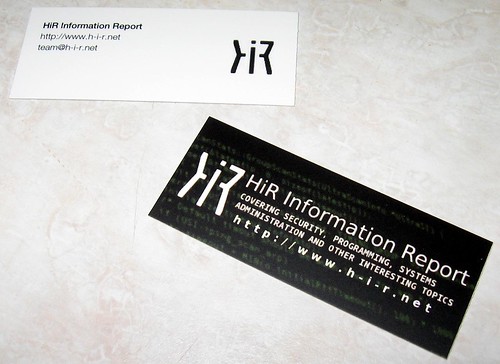
It's hard to tell, but there's green source code in the background of the front of the card. These are MiniCards by Moo.com. They've got a nice finish. I'll be handing them out to the HiR crew soon. We were all sick of being at conventions and events without being able to hand anyone some contact info. The e-mail address on the back will spam the whole team (so please don't abuse it?) Note: AsmodianX@, Frogman@, tmib@ and ax0n@ will get to individual writers at h-i-r.net.
Also, the KC 2600 meeting is coming up in one week. Same time and place. Oak Park Mall food court at 5:00PM.
2008-11-25
Capacitor Plague
"Capacitor Plague" is the colloquial term for a vast range of electrolytic capacitor failures, most often used when several capacitors on a circuit board are bulging or have burst. The following photo shows the cooked acidic residue that sprayed out from several capacitors hiding under the mechanical part of one of my DVD players.
In my case, the residue had been cooked onto the backplane and corroded several surface mount components. This cheap DVD player is a write-off. I could probably fix it, but it would be more trouble than it's worth.
Capacitor plague is common on older motherboards and video cards, as well as in other chintzy consumer electronics. When it happens, there's usually a hiss or a pop from the device. If you catch it (and clean up the electrolyte using flux cleaner or high-grade isopropyl alcohol if any leaked) before it ruins something else, you can usually buy and solder in replacement capacitors of equal value. Remember, though, that many capacitors are polarity sensitive.
Electronics repair tips:
- If polarity is marked on a component (by a colored band down the side of a capacitor or a band around the positive end of a diode), mark the positive terminal on the board before removing the component. I usually just put a black dot near the positive terminal on the solder side of the board using a permanent marker.
- Avoid confusion of parts by replacing only one failed component at a time.
- Use a grounded work mat and a wrist strap to avoid a static discharge that could damage the part you're working on.
2008-11-21
Security Bloggers Network is back online
SBN is now powered by lijit networks. Here's the RSS Feed for SBN as well.
As of right now, Security Bloggers Network is the combined buzz of about 180 different blogs, all of which have at least partial focus on information security. Drop it into your RSS aggregator and start getting fed.
Update: Security4All has pointed out that the SBN site and feed aren't working right now. They were a bit ago. Keep your eyes on the links. It'll probably be back this weekend.
Okay, looks like it's online at www.securitybloggers.net now.
2008-11-20
GMail In Terminal Mode - Really (with Links-SSL)
Sorry to make a second post about this, but I got all nostalgic about the Terminal theme for GMail, and it reminded me that you can actually access GMail with a text-only browser.
It's been a while since I've done it this way, but Gmail actually plays along quite nicely with the Links (not lynx) browser, as long as you have it compiled with SSL support. If you use Links in X11, you can even use the mouse to click on things.
GMail Themes? Terminal Mode!
GMail recently enabled a Theme feature. I couldn't resist using the new "Terminal" theme. I'm such a nerd.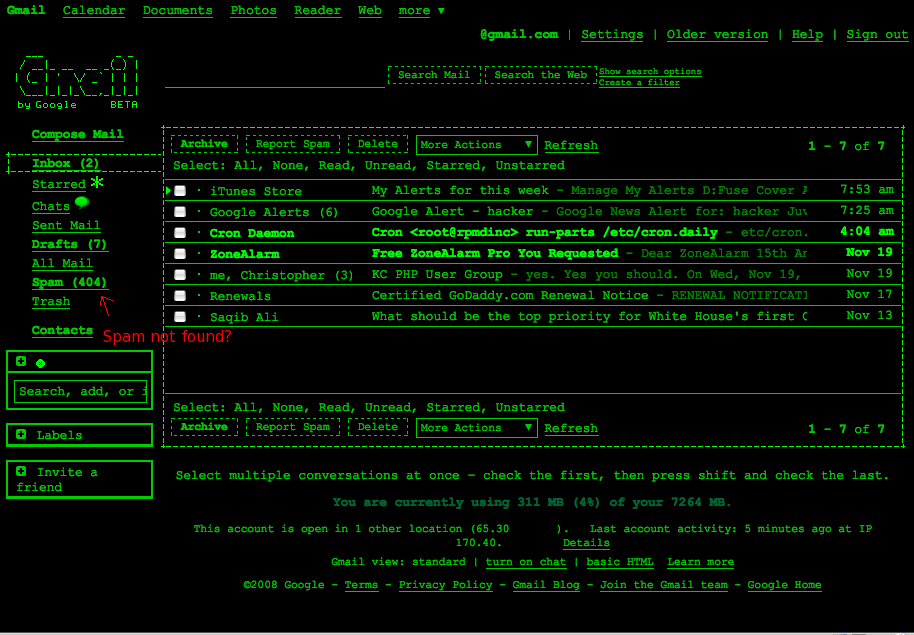
2008-11-19
Open-Source HDR photography with CHDK and qtpfsgui
Often, one photograph might have regions that are overexposed and others that are too dark. Details are lost in these regions. Explained simply, HDR is about taking over-exposed photos to get the detail from the dark areas and under-exposed photos to capture textures in the brighter areas, then tone-mapping them together into one high-contrast composite image. Here's what you need to make tone-mapped HDR images:
- Tone-mapping software
- A set of photographs. Not just any photographs:
- All taken from exactly the same perspective.
- Varied exposure. It's recommended you have at least 3: one underexposed, one "normal" exposed, and one overexposed.
- The more photos, the better (to an extent)
- Take the highest quality photos possible. That means cranking up the resolution, using the lowest ISO you can get away with, and shooting in RAW if your camera can handle it.
I've written a little about The Canon Hacker's Development Kit, and even demonstrated CHDK at a 2600 meeting a while back ago.
CHDK is a firmware patch for Canon digital cameras. On inexpensive point-and-shoot Canons such as the PowerShot A530 my wife bought me for Christmas a while back ago, the firmware gets revamped, unleashing the ability to shoot in lossless RAW format, view live-updating histograms on-screen, run scripts, and even play games. You can obviously read more about it on the CHDK wiki, but Lifehacker had a decent write-up that you should check out.
Using CHDK to get a set of bracketed photos
While CHDK has a decent bracketing script on the wiki, you don't even need that. The default "Allbest" firmware has bracketing built-in. Read the CHDK installation instructions first. In fact, I recommend that if you haven't played with CHDK before, you bookmark this page, get CHDK installed, and play with it for a while first. Just to get used to it.
If you're local to Kansas City, I'd be more than happy to help you get up to speed. The script functionality is worth looking at. I'll cover it in a later article.
Pardon my "Screen shots" - I had to take them with a camera phone, so I hooked my Canon A530 up to the TV screen so that I could take photos of the menu without trying to focus on the tiny screen of my camera through the tiny screen on my phone.
Once CHDK is installed and started, fire up the Alt menu. Select:
Extra Photo Operations
--Bracketing in continuous mode
----TV bracketing value

Set that to at least 1/3 Ev as shown above (click for higher res). The bigger this number is, the fewer photos you'll need for a good range, but keep in mind that the more photos you get, the better. 2/3 or 1 Ev is a good compromise if you choose 5-7 photos. With 1 1/3 Ev or higher, you could try 3 or 5 photos.
To enable RAW (if supported)
RAW parameters
--Save RAW
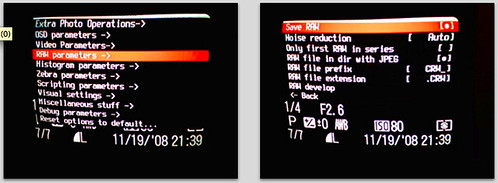
Select that, but keep in mind that it will take a few extra seconds per photo to save the image, and the RAW image will take up a lot of space on the memory card. For this demo, I won't be using RAW mode. If you choose to use RAW, they can be processed with UFRaw, a freeware tool that turns RAW photos into high-quality JPEG images.
Bail out of the Alt menu and if it's not already in photo mode (instead of play/view mode), switch it over. In the Function menu, switch to Custom Timer drive mode. Hit the Menu button, and select the delay you want (a few seconds is a good idea, to avoid the jiggle as you hit the shutter) and the number of photos. I had 0 seconds delay in this photo, but you should probably go for 2 seconds or so. The camera should be on a tripod or stable surface.

Notice that in the last frame, CHDK has noted that bracketing is enabled for 2/3 Ev.
I then shot 7 bracketed photos of a Mt. Dew can. I used iPhoto to import these, but if you're an open-source zealot, I've had good luck using gtkam on FreeBSD and Linux with my Canon camera.

The hard part is done.
Tone-Mapping with qtpfsgui
A lot of the software for HDR is expensive, too. Photomatix is one of the more popular tools, and it's $99. qtpfsgui is an open-source tool based on QT. It runs on Linux, Windows and Mac OS X with little fanfare. While not as intuitive or easy to use as Photomatix, you still get more than you pay for with qtpfsgui. It's free, after all.
Load the images in, and select the option to automatically align them.
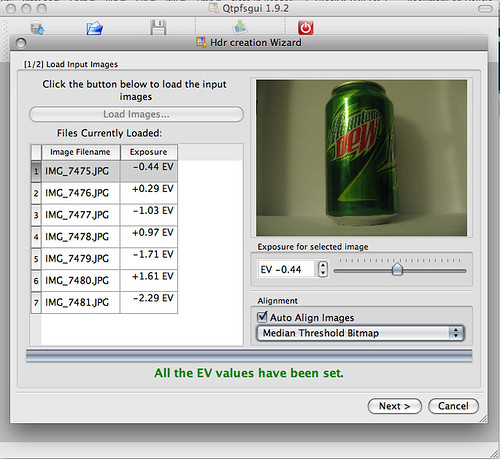
Click through the wizard and you'll have an HDR composite. Feel free to tinker with the values in the wizard to get the effects you want, but it's not needed if you just want to get started. In the resulting window, click "Tonemap the Hdr", then have fun exporting the images and playing with the values in the new window. Clicking "Apply" here will give you a composite with your settings. By default, it's a thumbnail size that renders quickly. You can see 4 different ones I did below with different settings.
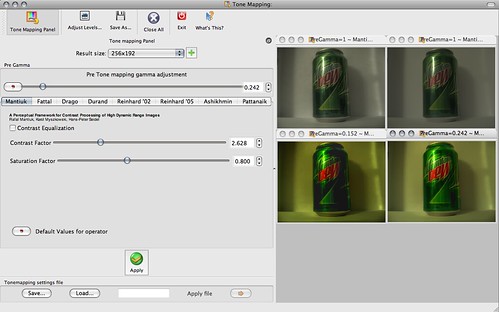
Once you've got a thumbnail that you really like, bump the Result size up to something usable and apply it again. Then use File - Save As to export the shiny, HDR image. Wow and amaze your friends.
Notice how the brightest and darkest areas retain a lot of detail. Click here for full size.

Here's a more extreme example of HDR that I took this morning:

Metasploit Framework 3.2 released
 In a press release issued this morning, the Metasploit team announced the immediate release of Metasploit Framework version 3.2, which boasts significant improvements and additional features from previous versions:
Version 3.2 includes exploit modules for recent Microsoft flaws, such
as MS08-041, MS08-053, MS08-059, MS08-067, MS08-068, and many more.
The module format has been changed in version 3.2. The new format
removes the previous naming and location restrictions and paved the way
to an improved module loading and caching backend. For users, this means
being able to copy a module into nearly any subdirectory and be able to
immediately use it without edits.
The Byakugan WinDBG extension developed by Pusscat has been integrated
with this release, enabling exploit developers to quickly exploit new
vulnerabilities using the best Win32 debugger available today.
The Context-Map payload encoding system development by I)ruid is now
enabled in this release, allowing for any chunk of known process memory to
be used as an encoding key for Windows payloads.
The Incognito token manipulation toolkit, written by Luke Jennings, has
been integrated as a Meterpreter module. This allows an attacker to gain
new privleges through token hopping. The most common use is to hijack
domain admin credentials once remote system access is obtained.
The PcapRub, Scruby, and Packetfu libraries have all been linked into
the Metasploit source tree, allowing easy packet injection and capture.
There are many other improvements listed, so head on over and check it out, or get to the downloading already.
2008-11-18
Rock, Paper, Scissors, Lizard, Spock!
This is just too funny to not share. I saw it on Big Bang Theory last night. Then, I saw the video clip in my Google Reader this morning via Geeks are Sexy.
Watch. Enjoy. What better way to determine which sorry sap has to buy pizza for your next late-night maintenance window?
A more thorough explanation of the concept (which has apparently been around since at least 2005) can be found here. I still can't tell exactly what you're supposed to do to make a "lizard", though.
2008-11-14
R.I.P. Security Bloggers Network (for now)
 Alan Shimel just reported that Feedburner networks are going the way of the Dodo, and the beloved Security Bloggers Network RSS feed on FeedBurner is no more.
For those who don't know what SBN was, it was a huge RSS feed with some great security blogs all rolled into one. Drop it into Google Reader or something, and you were all set. HiR just recently got on board. Too bad it had to happen this way.
Don't worry, though. Shimel assures us that there will be another, comparable spliced RSS feed coming soon. Until then, if you were watching the Security Bloggers Network, you might want to start hunting down links for your favorite reads. If you have some favorite information security sites, feel free to post links to them, or a link to an OPML file.
2008-11-13
Simple Pleasures
I'm sitting here compiling the latest build of nmap directly from the source tree. I haven't done this in quite a while. I'm lazy and usually make do with whatever binary build I can find. Now that I have a reasonably fast OpenBSD machine (not in a VM) I decided to go for it again and saw this gem at the end of ./configure: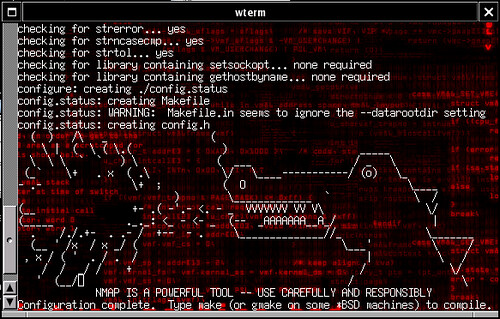
Perhaps I'm easily entertained, or maybe it's just been a heck of a week and I'm ready for Friday. Regardless, it made my day. Thanks, Fyodor!
2008-11-12
UNIX Tip: the tr command, newlines and more
tr is used to translate characters. It can translate all uppercase letters to lowercase. It can delete all occurances of a single character, and much more.
To turn all uppercase letters lowercase (a useful thing when parsing user input from a shell script), use this:
bash-3.2$ echo This Is CrAzY! | tr [A-Z] [a-z]Using tr -d, you can remove any characters from a string as well. Here, I remove several punctuation marks:
this is crazy!
bash-3.2$ echo "You're right. That *is* crazy." | tr -d \'\*\!\?\.
Youre right That is crazy
One of the best ways to use tr, though, is for converting newline characters to something useful.
When running shell commands or writing shell scripts, most people can quickly adapt to using commands such as cut or awk to manipulate tabular data. See also: more awk recipes. Let's say we have a text file with the following values, and we want this data to be represented in CSV format, all on one line. This is where newlines make things tricky.
0.00tr can tackle it easily, using "\n" to represent the newline character. Just translate newlines to commas, and you're good to go:
128.00
49.00
7031
4218
bash-3.2$ cat file | tr "\n" ","Similarly, you can take large chunks of text and replace all newlines with a space if you wish to un-do old-school text-editor formatting before importing into a word processor.
0.00,128.00,49.00,7031,4218,
tr is a somewhat obscure command, but it can save a lot of headache, particularly when trying to format text output. The same result can be achieved (albeit with much more complex commands) with awk or sed, so this is a good one to know about, and it's found on almost every posix-compliant platform (and in cygwin)
2008-11-07
2600 Meetings
It's that time again - The first Friday of the month! The Kansas City 2600 meeting will take place tonight at 5:00 PM (although I might be running a little late) at Oak Park Mall in the food court. Check the 2600 Meetings page to find one near you!
2008-11-06
Crimping Twisted-Pair Ethernet (and Crossover)
In the Geek 100, I said that every geek should be able to Terminate category 5 cable with RJ-45 plugs and make a crossover cable. While home networking isn't nearly as daunting as it used to be with ubiquitous WiFi routers, I stand by my assertion that no geek has a valid excuse for being unable to crimp some cables. It's a useful skill to have and it's quite easy to learn.
All you need (aside from some Twisted-Pair ethernet cable that has bad ends or no ends) are some crimp-on RJ-45 plugs, a knife and a crimping tool. The plugs are less than $1 each at Radio Shack and cents each in bulk, knives are commodity and crimping tools like the one shown (I've had it for probably 15 years) are available for $20 or less. If your crimping tool doesn't come with a wire cutter, a pair of diagonal pliers might be useful as well. There are some much nicer crimping tools available that get really expensive, but the entry-level ones are probably just fine for the geek who only needs to run wires occasionally.
Take your knife and cut the sheath off about 3/4" of the end of the cable. Inside, there are four pairs: Blue, Orange, Green and Brown. Due to carryover from ye-olde telecom days, the pairs are divided into "Tip" (color striped with white) and "Ring" (solid color). Many cable manufacturers put a nylon strand, string, or tuft inside the sheath as well. This makes stripping a long length of sheath easy, but you can safely cut away whatever of it is exposed without harm.
Arrange the wires in either of the two configurations shown below. We'll get to putting the RJ-45 plugs on in a moment. For the time being, focus on the order of the wires.
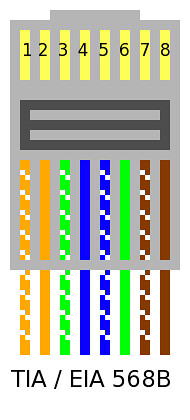
These days, 568-A is kind of "the standard" but when I was learning, the industry was hell-bent on using 568-B. Honestly, as long as you use the same 568 scheme on both ends of the cable and you crimp the RJ-45 plug properly, it really doesn't make a bit of difference at all. The wires are ordered this way to reduce crosstalk and interference, so I advise you stick with one of the two diagrams above.
I have the wires ordered 568-B below. The tips (white-striped wires) are hard to determine in the photo, and sometimes they'll be tricky to identify in real life. You may wish to do this under an eye loop or a workbench magnifying lens if your eyesight is sub-par.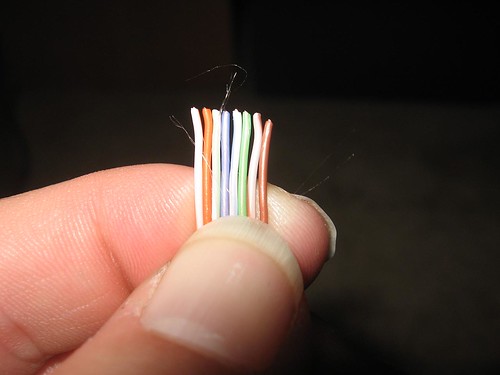
Use a wire cutter or a diagonal plier to cut the wires to the same length. It's important to keep the wires held flat and in the right order as shown above.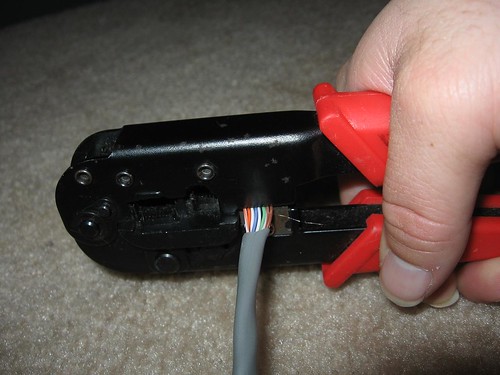
Slide the RJ-45 plug onto the cable end. Make sure the wires are still even and in the right order, and make sure that the sheath goes deep into the plug while still allowing the wires to "bottom out" in the plug. The sheath should be positioned so that the plastic tab that's crimped to hold the wires in place also holds the sheath. The wires should not be exposed out the bottom of the plug. (Thanks for the reminder, Ryan)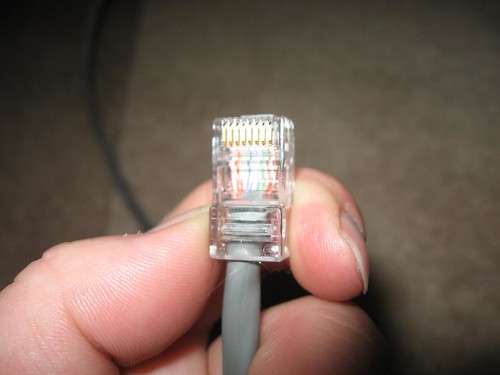
I stole this crimping "action shot" from the Loopback tester tutorial. Crimping the plug should be pretty straightforward. Make sure to give it a few good squeezes to ensure a good connection.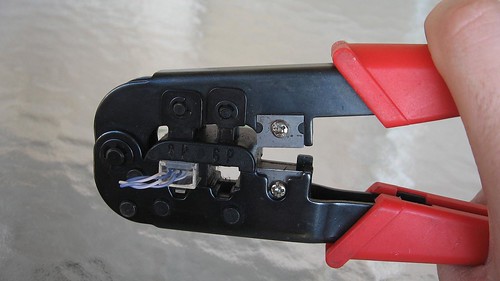
Make sure you wire both ends the same, and make sure the plugs are both installed facing the proper direction (with the metal pins pointed toward you and up). Here's another diagram I found on Wikipedia:
To make a crossover cable that can be used to connect two hubs/switches or two computers together (Without a hub or switch), simply wire one end as 568A and the other as 568B.
2008-11-05
Xorg.conf for OpenBSD MacBook / Parallels
 On a lot of hardware, X.org just works. OpenBSD is no exception. At certain resolutions and in particular on notebooks, X.org is not happy and getting it configured properly when that happens is usually a time-draining adventure.
This configuration file (xorg.conf) works great on OpenBSD 4.4 under Parallels Desktop on a MacBook and gives you full 1280x800 resolution at 24bpp color. It should also work for FreeBSD under Parallels as well, but I haven't taken it for a spin yet.
So far, I'm really digging OpenBSD 4.4. It might not be as easy to configure as Ubuntu or its Linux brethren, but it's rock-solid and I still prefer the BSD port and package systems to RPM or Debian-style package management.
2008-11-02
Happy Morris Worm Day!
 Twenty years ago to the day, Robert Morris, a Cornell student at the time, unleashed his worm (from the MIT campus!) on what little of the Internet existed in 1988.
To this day, no one really knows for sure how many computers were affected by the Morris Worm, which exploited any of several different vulnerabilities in order to replicate itself. Supposedly designed to be "harmless", it caused a large-scale denial-of-service attack, partly because of an error in the routine to check if it had already infected a given host.
Robert was the first person tried under the 1986 Computer Fraud & Abuse Act, and DARPA formed CERT Coordination Center in response to this incident. I found some interesting commentary about this via the Security Bloggers Network (of which HiR Information Report is a member). There's also some more information on the Wikipedia page: [Morris worm].
Creative Commons Photo Credit: Go Card USA on Flickr
2008-11-01
The Geek 100: How'd you do? (Poll)
See the whole series: The Geek 100
This post contains a poll within an iFrame. If you don't see it in your RSS reader, visit HiR Information Report and take the poll, located on the right side of the site.
See the whole series: The Geek 100
The Geek 100 Pt. 5: Science and Electronics
See the whole series: The Geek 100
This is a list of 100 basic things and skills every geek should have. I've broken this series up into five parts. Let's face it: a list of 100 things would be tedious to wade through. Over the rest of the week, look for twenty more skills to show up daily. The skills assume you have done it in the past and can remember how to do it right now (or, like a good Geek, you've jotted it down in one of your notebooks). Having it in your personal notebook is okay. Scrambling to the Internet means you don't have the skill... yet.
Science. Every geek should be able to:
- Build a dry-ice bomb
- Build a gas-turbine engine from junkyard parts
- Build a usable battery from household materials
- Build an electric motor/generator from household materials
- Build some form of a rocket motor
- Comprehend and express orders of magnitude
- Make a non-Newtonian "Oobleck" fluid
- Make an explosion using only a few plastic containers, electricity and water
- Know how to make hot-packs or cold-packs with simple chemical reactions
- Use the Scientific Method
Electronics. Every geek should be able to:
- Access debug mode on a mobile phone (preferably your own)
- Build a simple FM transmitter
- Build logic gates with discrete components
- Burn an (E)EPROM
- Calibrate and read an oscilloscope
- Program a microcontroller
- Properly use a digital multimeter to measure electric current
- Solder surface-mount components
- Use a logic probe
- Use a schematic diagram to assemble a simple circuit from parts
See the whole series: The Geek 100
Subscribe to:
Posts (Atom)


