Adeona blipped across my radar earlier this week and I've had it running on my MacBook ever since. Adeona is a free, Open Source (GPL 2.0) laptop tracking tool designed to aid you in recovery should your precious ever get stolen.
In its current version, it's not difficult to remove or disable, but on MacOS X, the fact that it's installed and running is not obvious to the user. On OS X, it can capture a snapshot from the iSight if equipped. This means that periodically, the iSight's LED comes on for a moment. This captured image is uploaded along with the location information.
One thing that males Adeona stick out from the competition (aside from its price tag) is that the location update information is securely stored on the OpenDHT network, a free, distributed hash table service. This means that no one can use Adeona or the data it generates to track you surreptitiously without having the retrieval file and the password you chose. Centralized commercial services often have the ability to track you, or their centralized information may become compromised. Adeona has no such risks.
You COULD potentially install Adeona on someone else's laptop, but if you're looking for software to help you spy on someone, there are a lot more efficient and feasible options out there. Adeona will get you an IP address and traceroute output. With the help of an ISP, this will help with a police investigation. If you have iSight photographs enabled, you might even get a clear photo of whomever is using your laptop to really seal the deal.
Once you install Adeona and select your password, a periodic schedule is started to gather and upload information to OpenDHT. It's that simple. Install and go. Whenever the laptop has Internet access, it will send periodic updates. You should copy the configuration file to a USB Key or have it backed up in a place that doesn't travel with the laptop, as this file is needed to get the location data from OpenDHT once you believe your laptop has been stolen. If you wish to retrieve those updates, download Adeona to another computer and use the Adeona-retrieve tool. You can use the retrieval tool on the laptop Adeona's installed on, but if it's stolen you won't have that luxury. Load the configuration file and enter your Adeona password. It's that simple.
Adeona will grind for a while, as locating and retrieving data from OpenDHT can take a while. Once it's done, though, you'll get a text file and optionally a graphic from the iSight camera. Here's my fugly mug and a pixelized Adeona status file (click to enlarge)
2008-07-30
Adeona - Open source laptop tracking
H.D. Moore: Punk't, not pwned.
Oh, how we love drama, and there's plenty of drama in the world of information security.
As you've probably figured out by now, Dan Kaminsky's report of a DNS static source port bug (and the simple exploitation of the same) has fueled a considerable source of recent controversy and drama. Shortly after details hit the security blogs, H.D. Moore (author of Metasploit) and |)ruid put together some checks for the vulnerability. Even yesterday, he released a third Metasploit plugin to check between two different DNS servers in an attempt to detect poisoning.
A few days ago, HD stumbled across a DNS server "in the wild" which had been poisoned to redirect all Google traffic to a batch of rogue sites meant to monetize google ads by automatically clicking them in hidden iframes. After discussing this DNS server in the wild with a reporter for IDG News Service, the reporter went on to write a piece (which is not worth linking to) blatantly stating that BreakingPoint Systems (where H.D. serves as Director of Security Research) was "owned", when there was no such pwnage.
A second article was published which clarified some points, but the original article is being linked to like mad on some social news sites, and it hasn't been edited yet as of the time of writing here.
For H.D.'s side of the story, check out his post on the Metasploit Blog.
2008-07-28
HiR Reading Room: No Tech Hacking
Johnny Long has been around as an info-sec writer and presenter for a while. In No Tech Hacking, he takes the reader through some of his twisted adventures, flippantly poking fun at some of the "security" he's encountered along the way.
When it comes to penetration testing and security awareness in general, there's a pretty massive human element that's simply ripe for the picking. There's also a lot of low-tech stuff that can be leveraged to your advantage. For many, the obvious first move on taking over a network is enumerating your target with ping sweeps and port scanners. If you want to get into a building, you might brush up on your lock-picking skills or reach for a brick to throw into a window. While these techniques have some kind of merit (not always good), it's often more effective to go low-tech (or No Tech!) as much as you can.
Johnny covers his low-tech tricks in detail and often with photos and screen shots. It's more than just social engineering and tailgating to get your mark. It's about thinking through info-sec problems with a different mindset than you're probably used to. Profile your targets and pay attention to seemingly useless details.
From bypassing locks to using exposed information via the Internet, people watching to vehicle profiling: there's a lot of low-tech information contained in this book, and you're almost guaranteed to learn something you hadn't thought of before.
No Tech Hacking closes with some sage advice to would-be no-tech victims. It was an entertaining and informative read. I hope I can see Johnny speak one of these days. He won't be talking at DefCon this year, but maybe he'll be there.
2008-07-25
Friday Geek-Out: July 25, 2008 and upcoming KC gatherings
I showed up a bit early to the Geek-Out. So did (jeff)isageek. We've been gabbing about podcasting, blogging and random geekery. I don't know how long Jeff's hanging out, but I'll be here probably until well after midnight. If you see this before then (and if you're near Overland Park, KS), come on out! We're at Daily Dose!
I'm pondering the usefulness of a full-on laptop while I'm at DefCon. I may try making do with only the Jornada 720 and jLime Linux. I probably won't have my digital camera with me (I loaned it out to a good friend who is currently on a road trip) but I can mobile blog with my cell phone and its camera. For the essentials, the Jornada should do everything else I really need. Here, I have BrightKite and GMail up on Minimo in the background and the Hak.5 IRC channel in a terminal window with irssi. It's surprisingly responsive and dare I say peppy. Peppy enough that I might not need a real laptop on the convention floor.
Next Friday is 2600 Night. We meet in the food court at Oak Park Mall in Overland Park, KS and then afterwards get a bite to eat. We wrap things up with a late-night Geek-Out at the Dose where you can pick your poison of uppers (caffeine) or downers (get your beer and cocktails on!).
No Friday Geek-Out on the 8th, because we'll all be at DefCon, hopefully!
See you around!
2008-07-24
Black Hat USA 2008 Briefings and Training
 Looks like HiR will be present at Black Hat USA 2008 Briefings and Training. Asmodian X will be there getting a brain full of knowledge. I, on the other hand, will be crack-a-lacking in my cubicle then packing my bags for Vegas.
Looks like August will be a great month. Hopefully we come away with lots of fun stuff to share!
Held at Caesar's Palace in Las Vegas, NV.
Training: August 2-3 (Weekend) & August 4-5 (Weekday)
Briefings: August 6-7
2008-07-23
HiR at DefCon 16 and IT Security World 2008
![]() DefCon 16: Las Vegas, NV Aug 8-10, 2008 At The Riviera.
DefCon 16: Las Vegas, NV Aug 8-10, 2008 At The Riviera.
I'm pretty sure at least two of the HiR crew will be there. Also, make sure to swing by skybox 208 on Saturday and say hi to our buddies at i-Hacked.
It should come as no surprise that you'll probably find me in quite a few of the Physical Security tracks, but I'm looking forward to Nathan Hamiel and Shawn Moyer's talk on social networks and seeing what in the world Dan Kaminsky has to say now that his uber-l33t DNS exploit is old news.
e-mail ax0n (at) h-i-r (dot) net if you want my contact info to meet up. Asmodian X will likely be around as well. There'll be thousands of people in attendance, so we probably won't be easy to spot. I think it goes without saying, but protect your laptop or wireless PDA before you come. Be prepared to VPN or Tunnel out if you plan on using the Internet. This is seriously one of the most hostile networks you'll ever connect to. You might be better off with a notepad and some paper. I'll be at IT Security World 2008 as well. Not quite as exciting as DefCon, but legitimate enough you might be able to get your boss to pay your way. Check it out, look at the agenda, and see if there's anything even remotely relevant to your job.
2008-07-20
HiR Reading Room: Beyond Fear
Beyond Fear: Thinking Sensibly About Security In An Uncertain World by Bruce Schneier is a Post-9/11 look at security for normal people. It arms the reader with the knowledge and understanding to distinguish FUD (Fear, Uncertainty and Doubt) and "Security Theater" from things that really do improve security.
While Schneier overly simplifies or dilutes certain security concepts that have well-established definitions in the industry, I feel that the book itself was a worthwhile read for anyone because the concepts are presented in a clear, easy-to-understand manner.
The book itself starts off by describing what security entails, and what elements are at play. From there, it starts giving examples of various scenarios and explains why certain countermeasures would work or fail. Security, versus Security Theater.
For those of us who are already working in or have an understanding of security and how it works, this book will be a little bit repititious at some spots. Conversely, it's entertaining enough to read through from beginning to end. If you often find yourself critical of the effectiveness of so-called "security" protocols, this might be the book for you. If you already have a firm grasp of the security mindset but want to be able to explain security in simple terms that anyone can understand, this book is packed with anecdotes and verbiage that simply make sense.
Overall, I enjoyed Beyond Fear quite a bit. I wouldn't dare cite it as a serious reference in a research paper on security, but I'd most certainly recommend it to technical and non-technical people alike who seem to have succumbed to FUD from a lack of understanding.
Fun With Laptop Repair
I was asked to fix a power jack on an Extensa 5420 today. Power jack mishaps are commonplace on laptops. If you trip over the cord, pick the laptop up or set it down wrong, then the power cord stresses the jack. This can either cause the solder bonds to loosen, or in the worst cases, the jack gets ripped right off the motherboard, potentially causing permanent damage.
With the exception of my MacBook, I've taken apart every single laptop I've ever owned, and I've done laptop repair on the side since I was 15 years old. Despite their complex looks and tightly-packed circuitry, most laptops are quite easy to disassemble, usually without any special tools.
I'll go over some basics. Once you've successfully taken apart one modern laptop, most others come pretty easy. Not as many of my photos turned out as well as I wanted, though.
On the bottom, many laptops have user-serviceable panels. These panels are easy to remove with screws. If possible, remove the battery and remove the panel. Under the panel are most of the upgradeable components such as RAM and Hard Drive. On the Extensa, the WiFI adapter, heat pipes, cooling fan and CPU are accessible as well.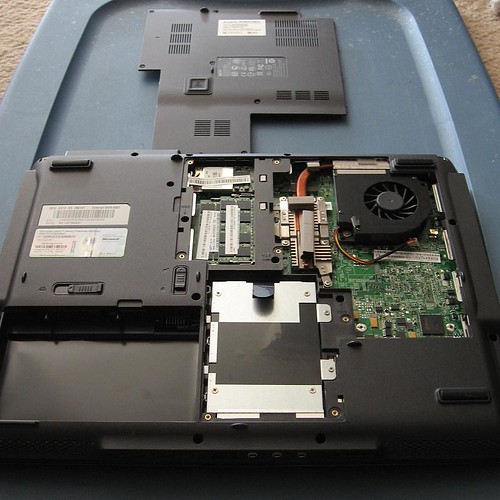
Remove anything that appears to be hanging you up in disassembly. Usually, you'll want to remove the hard drive at the very least. After you do that, start removing the rest of the screws from the underside of the laptop. They may be different lengths, so you might want to set them aside in a particular order so that you know which screw went where.
Moving to the top, you usually have to remove the LCD panel to take the laptop apart. Look for a bezel that spans from across the top of the keyboard and usually wraps over the LCD hinges. Gently pull up on this cover. This should expose the LCD cables and the screws holding the hinges to the laptop. Carefully remove the cables and screws, then lift the LCD off of the laptop.
With any luck the laptop should be able to be opened, separating the bottom shell from the top shell where the keyboard is. You may want to remove the keyboard as well, and unhook the ribbon cable if you can. Keyboards are intentionally designed to be easily replaceable on most modern laptops.
I was happy to see that Acer opted to attach the power jack to the motherboard with a short cable. Most other laptops I've repaired have the power jack soldered onto the motherboard. Repairing a soldered-on power jack sometimes involves lots of solder, and possibly replacing the jack. This one just needed the plastic bracket to be bent back into shape.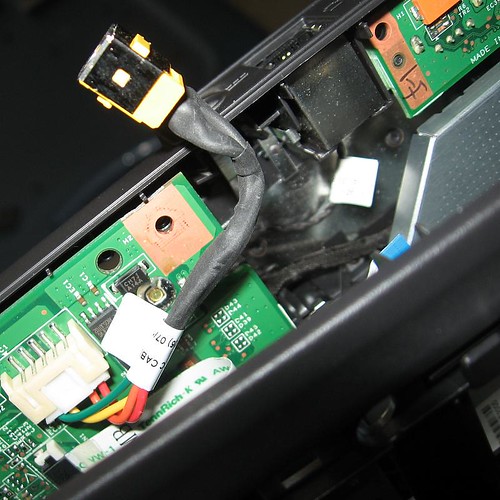
After I re-mounted the power jack into the chassis, I secured it with a drop of cyanoacrillate "super glue". I let the glue cure for about 10 minutes before re-assembling the Extensa.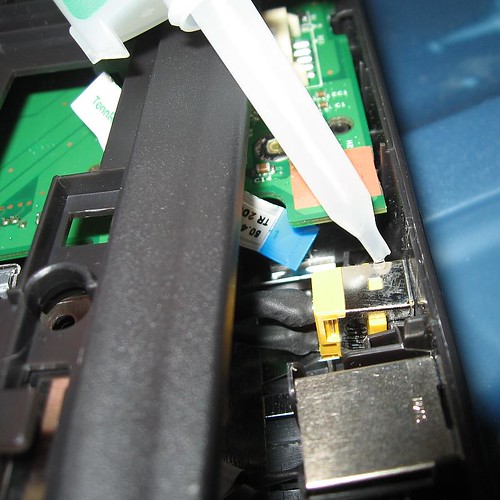
All of this work reminded me why I really love Apple's MagSafe power cords.
2008-07-18
Friday Geek-Out!
We're here kicking it at Daily Dose. Looking over the most recent 2600 Magazine.
Asmo tries his hand at lockpicking with the tension wrench from Part 2 and bogota rake from Part 3.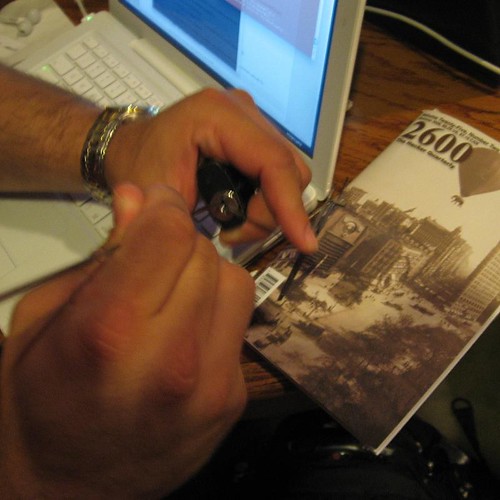
Success! The bogota rake is particularly evil if you don't feel like going SPP.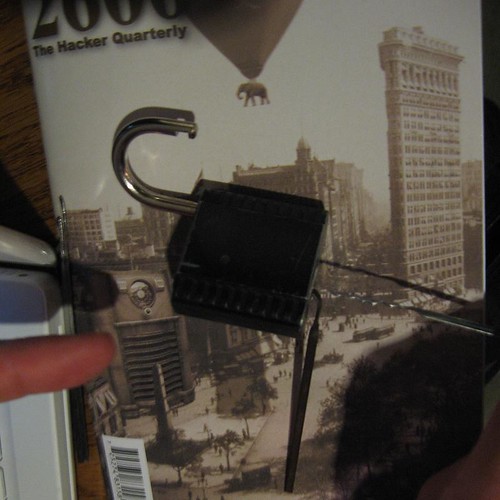
The Geek-Out's always fun. We discuss current projects, brainstorm which dumpsters we want to raid, bounce ideas off one another, and imbibe alcohol or caffeine. Ahh, yes. We love The Daily Dose.
HiR Reading Room: Home Security Methodology Vacation Guide
 I ran across this on SecurityFocus' Pen-Test list today. It's a methodology for vacationers, taken from a hardcore security nerd standpoint.
Homes are both an asset and a form of protection for our assets. They are unique in that they have both a real and a personal (nostalgic) value. Securing our homes and making them safe for the ones we share it with is often more difficult than it should be. We want to live in a secure home but we don't want to feel like we live in a prison. But then we go on vacation! We want to make sure that our house can be converted into a fortress for our belongings, a safe haven for any family members staying behind, and a refuge for us to return to. To do this, we need to know security and of all the things we can secure about our home. This guide aims to be that course of action.
The guide follows the HSM methodology. In that methodology, you learn that security, the means of separating threats from assets, is the best way to avoid an attack. Then should an attack occur anyway, we cover the controls which you can have in place to thwart the threat or minimize damages. Therefore this guide will have you securing home before you are expected to find ways of controlling various, common threats. The concepts may seem as odd to you as a practice for protecting your assets. Part of the problem is that much of the existing security concepts are built upon old research. Some of these concepts you know about security may no longer be true if they had ever been true. Some current practices evolved from faulty logic, faulty or improperly conducted statistical surveys, urban folklore, and old, regional, or knee-jerk legislation.
2008-07-13
Make your own lock picks - Part 3
Series: Make your own lock picks
Part 1: Grind out a simple lock pick
Part 2: Make a tension wrench
Part 3: Advanced lock pick profiles
In this series, I'll show you how to make a set of high-quality lock picks from stuff you either already have laying around the house, or materials that are easy to acquire for cheap.
This is the third part of the series, where I will discuss some more advanced lock pick designs and what purpose they serve. You can use these templates to grind out your own lock picks using the skills you learned in Part 1.
I actually made a few more picks the same night that I wrote Part 2.
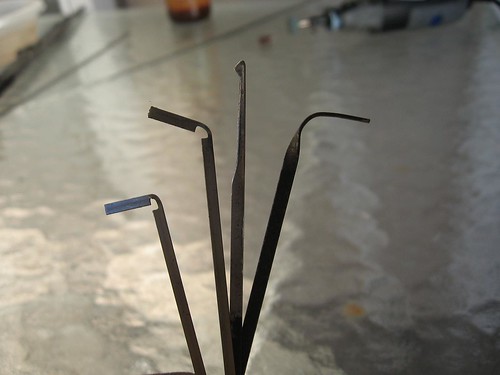
Left to right: Small diamond rake, medium hook pick and multiple peak bogota-style rake.
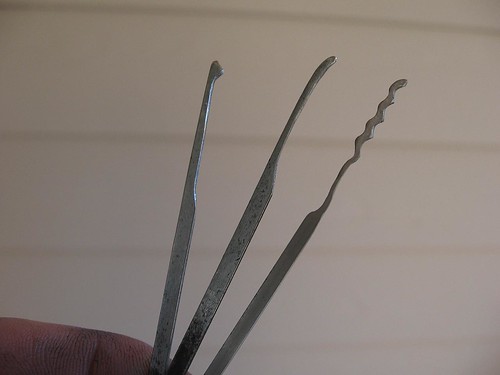
The Bogota rake was made from one of the leftover wiper rails. The others were made from street sweeper bristles.
As a general rule, any pick with a single curve (called a "hook") is designed for single-pin picking. This is where the locksmith applies light tension to the cylinder, feeling for which of the pins in the lock is binding. The binding pin will be harder to move than the others. Applying gentle pressure to that pin should push it up to the shear line. A distinct sensation will be felt through the tension wrench when this happens. Then, the locksmith finds the next pin which is binding. This process goes on and on until all pins have been set and the plug rotates, unlocking the lock.
Any pick with multiple peaks or odd shapes are called "rakes" or "jigglers". While applying tension with the tension wrench, these rakes are used to try to jar the pins to the shear line quickly. This technique has several advantages and several disadvantages. As a general rule, it works quite effectively on cheap locks like what you find on filing cabinets or low-end Kwikset door locks.
Here's a thread on LockPicking101.com with some excellent photos of real lock picks with rulers to help you scale them. These profiles can help you cut out some more advanced pick designs.
The most basic way to copy a lock pick profile like this is to wing it and go by sight. This works for some of the more basic hook pick shapes quite well.
For more intricate rake designs meant to exploit pin spacing, it's advised to print the pick template out at a 1:1 ratio (actual size) on paper and use it as a real template to cut with. There are a few ways to accomplish this. You may cut out the shape with a precision knife or razor such as an X-ACTO, and glue it to the pick media of your choice. As heat can destroy paper, and water (quenching) can separate glue, this can be a tricky process. You can also cut the template out and use it as a stencil, and paint your pick media with a high-temperature spray paint. Alternatively, you can just go slow and frequently hold the template to your pick to see how close you're getting.
One fascinating technique I haven't put any of my own research into involves electrochemical etching. I haven't personally seen the results, but if you sand the factory paint off of a hacksaw blade, then use a robust spray paint (like underbody paint from the auto parts store) to paint the stencil design onto the blade, you can use a power supply to energize a saltwater bath which will eat away all of the exposed metal. This should, in theory, leave a pick-shaped piece of hacksaw blade in the saltwater. I honestly don't feel right going into the specifics of electrochemical etching of steel here without having tried it myself, but there's a lot of information on the web about it. A fellow lockpicking enthusiast sparked this technique and linked to an article about making reed valves for two-cycle engines with EC Etching. If I get around to trying it myself, I'll let you know how it goes.
Series: Make your own lock picks
Part 1: Grind out a simple lock pick
Part 2: Make a tension wrench
Part 3: Advanced lock pick profiles
2008-07-12
The WarCycle
With gas prices going through the roof and the weather staying pretty nice, I've been doing a lot of running around on my bicycles lately. Occasionally, when I feel like riding somewhere new, I'll throw my wardriving rig onto the back of a bicycle and head out.
I have wireless broadband almost anywhere in the US, and open WiFi has practically become an expected commodity at many restaurants and shops. I have no need to "steal" wireless from home users, and have no desire to go cracking WEP keys, either. Mostly, I just scan for networks for the sport and competition, logging all of the ones I find to WiGLE, where, at the time of writing I'm currently ranked 121st out of more than 4,000 people who apparently felt like uploading stumble files to WiGLE.
I'm currently using a piece of flat metal strapped down to some pannier bags on my bike to mount the 19dBi omni-directional antennae for my stumble rig. My tweaked HP Jornada 720 provides the brain and software (JLime Linux, Kismet and GPSd) for scanning, and GPS Coordinates come from an old Garmin GPS12. Wireless signals are gathered by a 200mW EnGenius 2511CD+ EXT2 card. Everything except the antennae are inside one of the bags on the bike: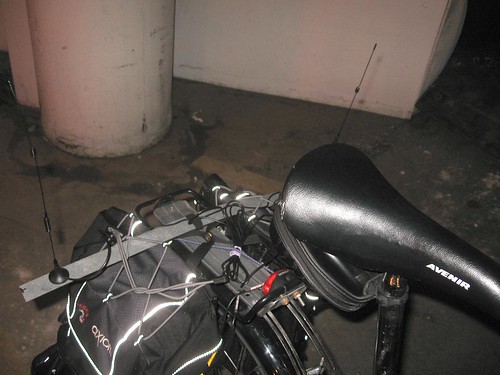
While a bicycle certainly lacks the speed advantage of a car, the low speed and close proximity to the edge of the road gives a bicycle a distinct advantage over using a car for locating wireless nets. I also use a lot of smaller residential roads to get around. Many wardrivers miss these smaller streets, leaving behind whole blocks of densely-packed homes ripe for the picking.
I've used quite a few different rigs for wireless scanning both on bicycles and in my cars. Here's some photo love:
Warcycle 1.0: Mountain bike with HP Jornada 680e, Windows CE, MiniStumbler, Garmin eTrex GPS, EnGenius Card, 2x 19dBi antennae. This was taken at the March 2007 KC 2600 Meeting.
Ford Escort, NEC Versa 4050C, OpenBSD, BSD Airtools, Garmin eTrex GPS, Linksys WPC11v3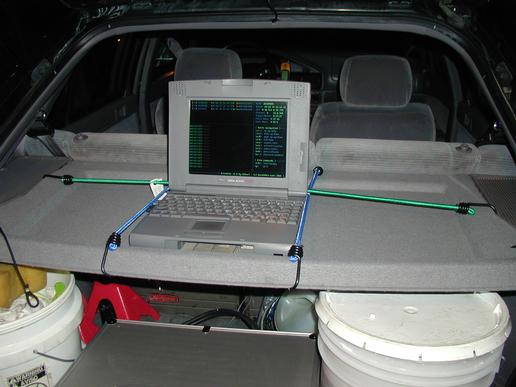
Ford Focus, Jornada 720, JLime, Kismet, Engenius card, GPS12 and dual 19dBi antennae. I used this rig when I went to hang out with some Hak5 guys in April.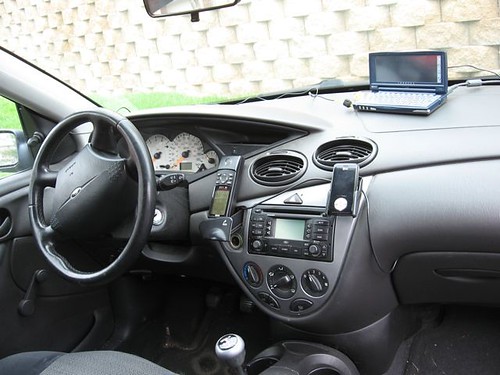
Same setup at the first photo, but with a different bicycle (Trek 1200) and the antennae are strapped to the tops of the bag. When the Jornada's tucked away, this is a stealthy setup but not quite as sensitive as having the antennae mounted upright.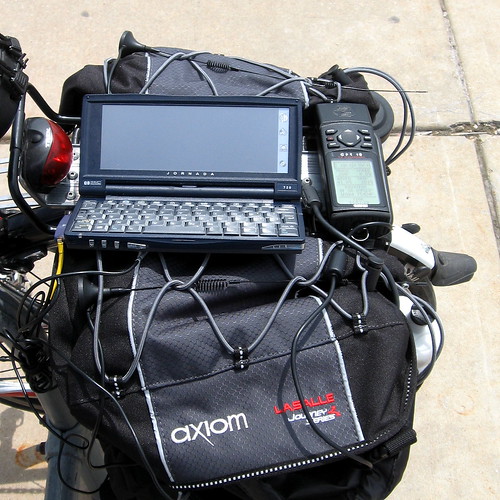
There seems to be a healthy following of WarDriving as a sport on WiGLE, surprisingly.
2008-07-10
Make your own lock picks - Part 2
Series: Make your own lock picks
Part 1: Grind out a simple lock pick
Part 2: Make a tension wrench
Part 3: Advanced lock pick profiles
In this series, I'll show you how to make a set of high-quality lock picks from stuff you either already have laying around the house, or materials that are easy to acquire for cheap.
In the second part of this series, I will show you how to make a tension wrench. Tension wrenches are usually made of spring steel. They're inserted into the keyway with the lock pick to apply a slight amount of turning force to the lock cylinder. This helps the locksmith feel when the pins hit the shear line, and keeps set pins from falling back down. It's difficult (and silly) to even try picking a cylinder or wafer lock without a separate source of tension, so this should be considered a must-have tool.
Tools and things you will need to follow along doing it my way:
- Beer (very important, or not. But good to have)
- A rotary tool such as a Dremel would be helpful
- Grinding discs for the dremel
- Two pairs of pliers or adjustable crescent wrenches
- Diagonal Plier Cutters (Dikes)
- Eye protection
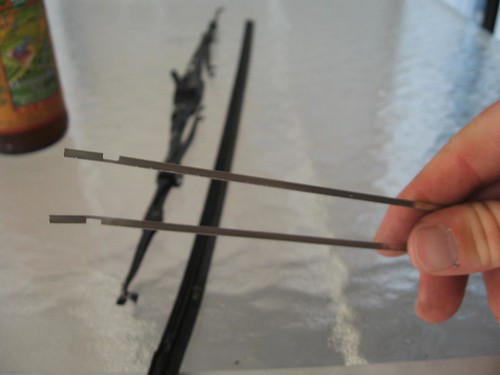
Making tension wrenches from windshield wiper blades:
I thought I was going to have to go dumpster diving on my way home from work this afternoon to find an old wiper blade in the trash bin behind some car parts store. As luck would have it, I found some old blades in the middle of an industrial park on my way home. They'd been run over and mangled, but that's okay.
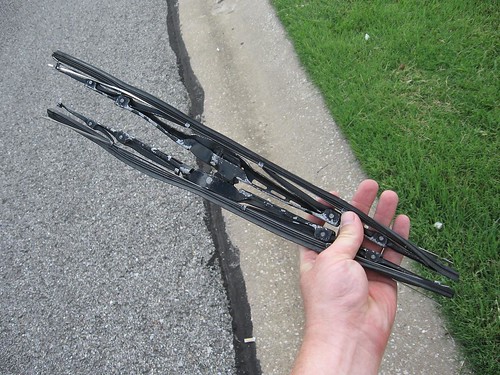
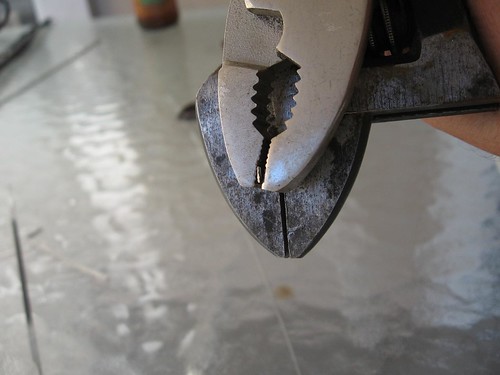
Using pliers, remove the blades and the metal rails around them.

Here are the parts we're after. They look a lot like those street sweeper bristles, don't they? You can throw away the rest of the wiper blade and arm assembly.
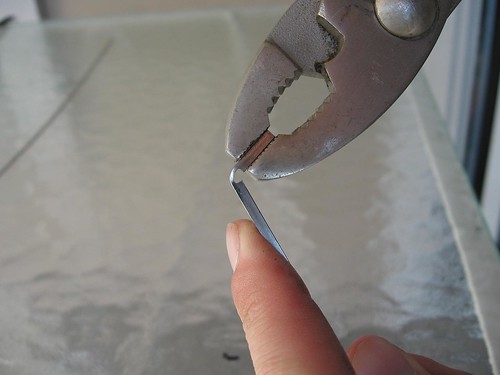
Using pliers, bend the wiper blade rail as shown. Bent this way, the long part will act as a spring to give us more control over the tension applied to the lock cylinder when we go to use it.
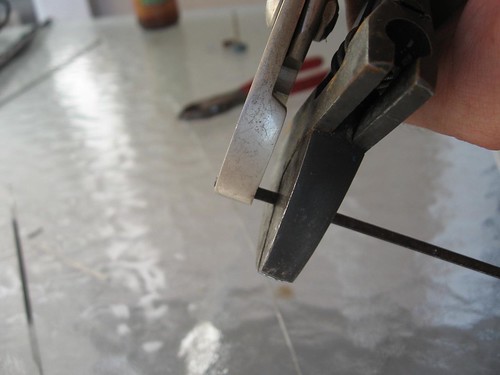
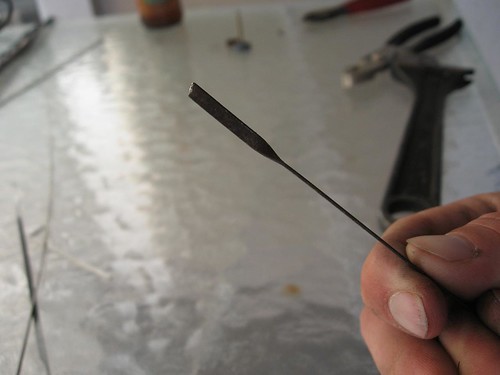
Break out the dikes and cut off the excess length of rail.

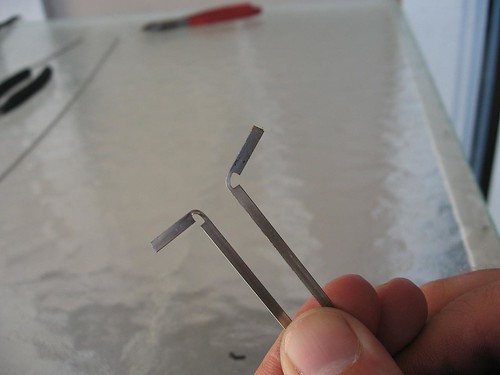
One wrench is bent at about 90 degrees. The other one is a bit more obtuse than that. The obtuse angle wrench will come in handy once in a while.
If you wiper blade rails didn't have the narrow spot toward the end like mine did, then treat the wiper rail as a street sweeper bristle.
Making a tension wrench from a street sweeper bristle:
First, using pliers or crescent wrenches introduce a 90 degree twist at the end of the bristle about 3/4" from the end.
Start twisting...
And voila!
Next, gently introduce a light and round bend to the end of the bristle. If you crease too hard, it will crack and you'll need to start over again.

The wrench should now look like this:
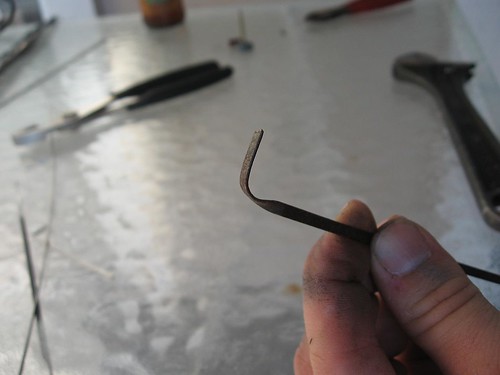
We don't really need to polish the tension wrench, as it won't need to glide softly past the pins or tumblers in the lock the way the individual picks do. You may wish to grind any sharp edges off, though:
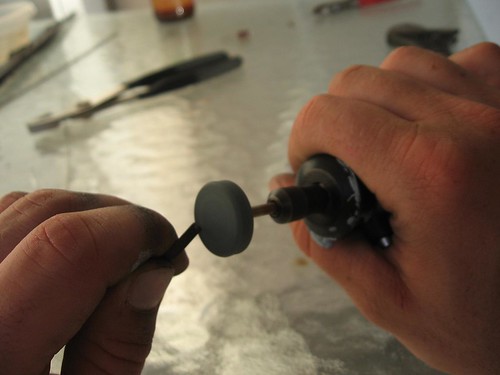
Here we have the small diamond rake pick and the three different tension wrenches.
Bonus: you can make tension wrenches out of girly things such as hairpins or the underwire out of an old bra.

Series: Make your own lock picks
Part 1: Grind out a simple lock pick
Part 2: Make a tension wrench
Part 3: Advanced lock pick profiles
Nerds in the fortune cookie factory
I just got back from getting some mediocre Chinese carry-out for lunch. Upon opening the fortune cookie (which I grabbed myself from a large bowl of them), I found this:
Beware. The machines are coming to destroy us.
2008-07-08
Make your own lock picks - Part 1
Series: Make your own lock picks
Part 1: Grind out a simple lock pick
Part 2: Make a tension wrench
Part 3: Advanced lock pick profiles
In this series, I'll show you how to make a set of high-quality lock picks from stuff you either already have laying around the house, or materials that are easy to acquire for cheap.
The first part will cover the basics of how to grind out a simple pick. I chose to use a "Diamond Rake" because of the simple shape. Skills you should pick up in this part:
- Selecting pick material
- Cleaning the raw material
- Using a rotary grinding tool
- Quenching
- Rounding sharp edges
- Polishing
- Beer (very important, or not. But good to have)
- A rotary tool such as a Dremel, or a bench grinder (!)
- Wire brush, Grinding and polishing discs for the above tool or grinder
- Metal polishing compound (Alloy wheel polish is inexpensive and works fine)
- Sandpaper (400 grit or finer, wet/dry recommended)
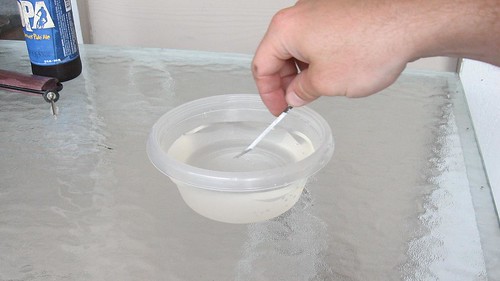
- A bowl of water
- Eye protection
Raw material for the picks will almost always be some kind of spring steel. Some things I've made picks from in the past:
- Metal from the carcass of old windshield wiper blades
- Street sweeper bristles
- Old hacksaw blades
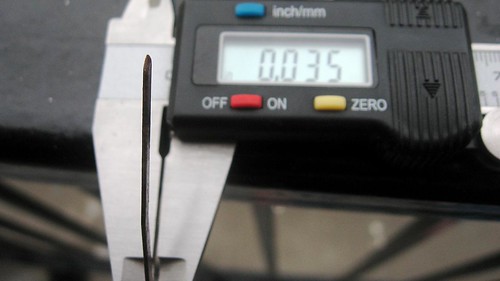
I find these street sweeper bristles in the gutter all the time. Keep your eyes peeled along major roadways.
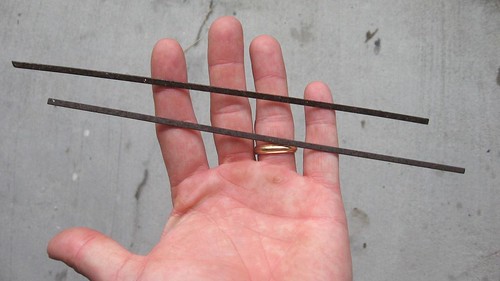
They measure .035 thick, which is narrow enough to fit in most traditional keyways, but thick enough to be really strong.
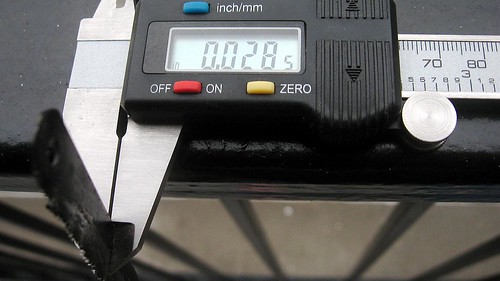
Alternatively, an old hack saw blade I had laying around measured .0285 thick. These are good for making larger picks, and the steel is usually high quality. If you opt to use an old hack-saw blade, I recommend grinding off all of the teeth on a bench grinder first. Remember to keep quenching the blade! I'll cover quenching in a bit.
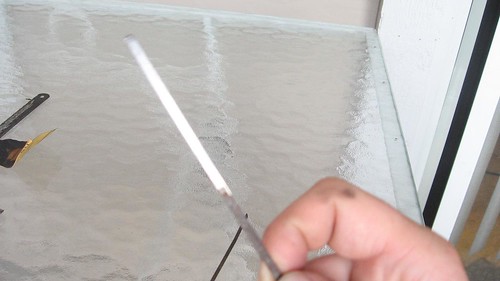
I stuck with the street sweeper bristles for this article, because they're easier to work with. First, I used a wire brush attachment to clean all of the rust and paint off of the end of the bristle. Make sure you have eye protection.
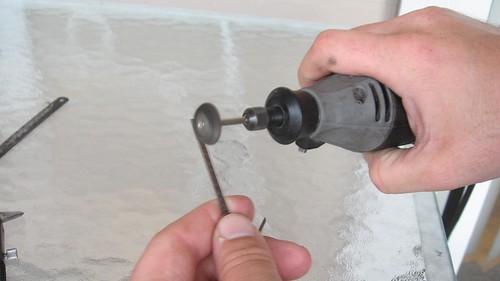
Clean at least 3" from the end. You could also use sandpaper or a sanding drum on the rotary tool if you wish. Don't make the bristle too thin.
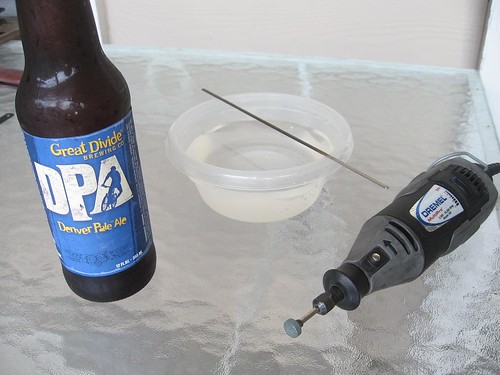
Beer: Great Divide Dever Pale Ale. Yum. Shown is a bowl of water for quenching the pick, and my dremel with a small grinding wheel. Smaller grinding wheels are better for cutting detailed shapes into your pick.
Start grinding. You'll see the shape I eventually come up with in a moment, if you wish to use this article as a guide.
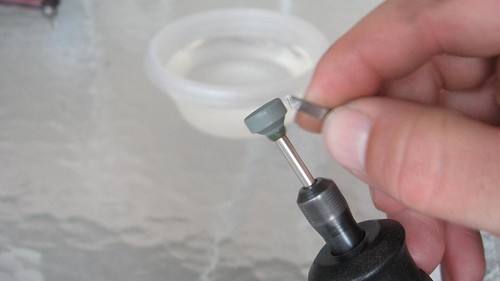
Don't let the metal get too hot to hold. Frequently, dip it into the water. You can't quench it too often, but if the metal overheats it will get brittle. If that happens, it could break while you're working on it, or be difficult to use once you're finished.
Here's the shape I cut out. As you'll see in the next photo, I worked on the narrow part a little more as I rounded the sharp edges.
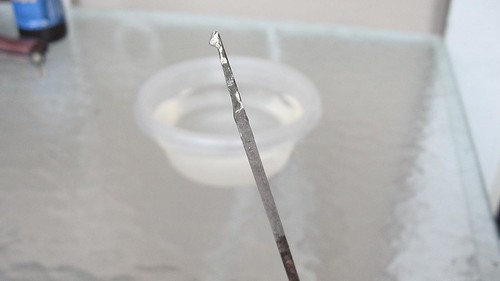
Holding the pick body at an angle, take off all the sharp edges and bevel or round them. Here you can see the extra work I put into the narrow part of the pick. Also, I switched to a larger grinding wheel to make it easier to round off the edges.
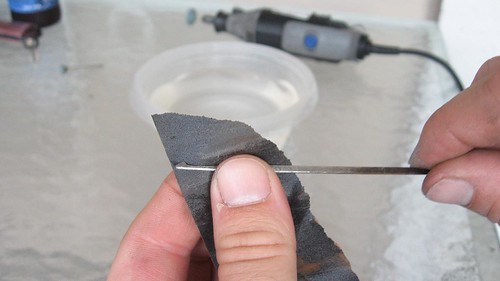
A little touch-up with some sandpaper will get the pick nice and smooth.
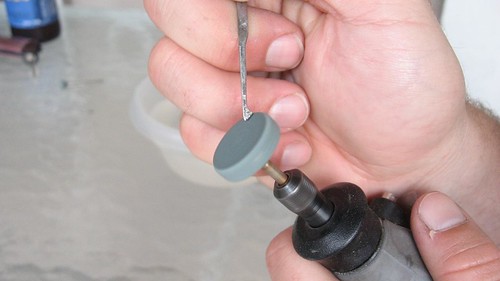
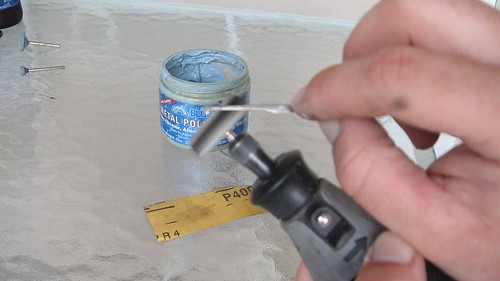
Put some metal polish on a polishing wheel attachment.
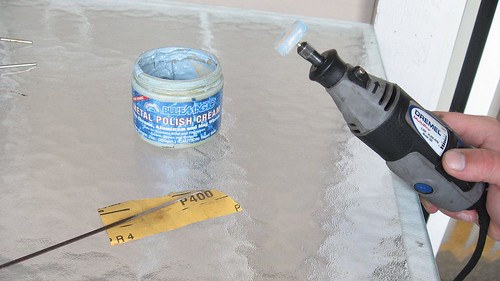
Start polishing the pick to a satin, smooth finish.
It should almost be like a mirror.

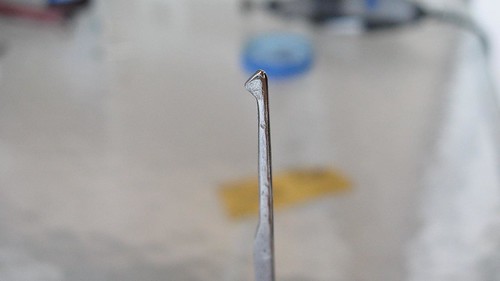
Close-up of the pick head.
Series: Make your own lock picks
Part 1: Grind out a simple lock pick
Part 2: Make a tension wrench
Part 3: Advanced lock pick profiles
2008-07-05
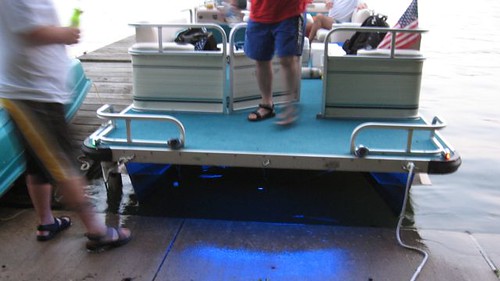
Bringing in the 4th of July with style
Asmodian X and a friend of the HiR crew admire the handiwork of a hard morning spent setting up a professional grade fireworks display. I was there to help, but being behind the lens means you can't see me here. Frogman was out sick, unfortunately. He always plays a big part in our annual 4th-of-July carnagefest of doom. 

SoundQ, Another friend of HiR, was out on the lake we were shooting the fireworks off at. Check out his l33t under-boat neon job.